Set up your Rover 2 with a Jetson
The Viam Rover 2 arrives preassembled with two encoded motors with suspension, a webcam with a microphone unit, a 6 axis IMU, power management and more. It is primarily designed for use with a Raspberry Pi 4, but you can use it with a larger Jetson board with some additional setup.
This guide provides supplemental instructions for setting up your rover with a Jetson Nano.
Important
You must purchase the following hardware separately:
- Four 18650 batteries (with charger) or a RC type battery with dimensions no greater than 142mm x 47mm x 60mm (LxWxH) (with charger)
- A MicroSD card and an adapter/reader
- A longer 40 pin ribbon cable: female-female
- 4 25 mm female-female standoffs
- WiFi board: either a board that directly interfaces with the Nano or a USB based device
- Electrical tape
The ribbon cable you purchase must meet these requirements:
- Female-female
- 2.54 mm spacing
- Both connectors facing the same direction
- Pin continuity order to be 12-12
- Recommended length ~200 mm
Safety
Read all instructions fully before using this product.
This product is not a toy and is not suitable for children under 12.
Switch the rover off when not in use.
Warning
Lithium-ion batteries may pose a flammable hazard. This product requires four 18650 lithium-ion batteries OR an RC-type battery. DO NOT connect multiple power sources simultaneously. Refer to the battery manufacturer’s operating instructions to ensure safe operation of the Viam Rover. Dispose of lithium-ion batteries per manufacturer instructions.
Caution
Damage may occur to the board and/or Viam Rover if wired incorrectly. Refer to the manufacturer’s instructions for correct wiring.
Disclaimer: This product is preliminary and experimental in nature, and is provided “AS IS” without any representation or warranty of any kind. Viam does not make any promise or warranty that the product will meet your requirements or be error free. Some states do not allow the exclusion or disclaimer of implied warranties, so the above exclusions may not apply to you.
Setup
- Install the WiFi board/device on the Nano. Follow the manufacturer’s instructions to do so.
- Power the Jetson Nano with a power supply and prepare the device and install
viam-server. - Switch back to the main guide and complete these two steps: Add the power supply and Configure the low-voltage cutoff circuit.
- Unscrew the top of the rover with the biggest Allen key.
- Take the height extenders provided in your kit. Apply them to the rover chassis posts.
- Unscrew the standoffs in the motherboard and relocate them to the Jetson board hole pattern:

- Connect the ribbon cable to the motherboard and Jetson Nano. The ribbon cable needs to be routed towards the front of the rover and flip back to the pins on the Jetson Nano, as pictured:

- Use the smallest Allen key and the provided M2.5 screws to attach your board to your rover through these standoffs. The USB ports should be facing the left-hand side of the rover, when viewed from above:

- Connect the webcam’s USB lead to any USB port on your board.
- Flip the power switch to turn your rover on.
Important
You must purchase the following hardware separately:
- A 4S RC type battery with dimensions no greater than 142mm x 47mm x 60mm (LxWxH) (with charger)
- A MicroSD card and an adapter/reader
- A longer ribbon cable: female-female (ensure that the contacts are correct)
- 4 25 mm female-female standoffs
- WiFi board: either a board that directly interfaces with the Nano or a USB based device
- A wired DC jack connector with the same polarity as the Jetson Orin Nano power input
- Electrical tape
The ribbon cable you purchase must meet these requirements:
- Female-female
- 2.54 mm spacing
- Both connectors facing the same direction
- Pin continuity order to be 12-12
- Recommended length ~200 mm
Safety
Read all instructions fully before using this product.
This product is not a toy and is not suitable for children under 12.
Switch the rover off when not in use.
Warning
Lithium-ion batteries may pose a flammable hazard. This product requires four 18650 lithium-ion batteries OR an RC-type battery. DO NOT connect multiple power sources simultaneously. Refer to the battery manufacturer’s operating instructions to ensure safe operation of the Viam Rover. Dispose of lithium-ion batteries per manufacturer instructions.
Caution
Damage may occur to the Jetson Orin Nano and/or Viam Rover if wired incorrectly. Refer to the manufacturer’s instructions for correct wiring.
Disclaimer: This product is preliminary and experimental in nature, and is provided “AS IS” without any representation or warranty of any kind. Viam does not make any promise or warranty that the product will meet your requirements or be error free. Some states do not allow the exclusion or disclaimer of implied warranties, so the above exclusions may not apply to you.
Setup
- Power the Jetson Orin Nano with a power supply and prepare the device and install
viam-server. - Switch back to the main guide and complete these two steps: Add the power supply and Configure the low-voltage cutoff circuit.
- Unscrew the top of the rover with the biggest Allen key.
- Take the height extenders provided in your kit. Apply them to the rover chassis posts.
- Unscrew the standoffs in the motherboard and relocate them to the Jetson board hole pattern:
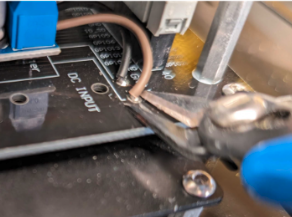
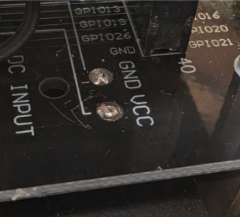
IMPORTANT: Disconnect the 5V buck converter. Unlike other boards, the Jetson Orin Nano requires a 7-20V input, which means that the board must be powered directly from the battery. Before commencing, ensure that everything is powered off. It is recommended that you clip the buck converter wires completely and place electrical tape over the exposed contacts, as pictured:
Connect the ribbon cable to the motherboard and Jetson Orin Nano.
Use the smallest Allen key and the provided M2.5 screws to attach your board to your rover through these standoffs. The USB ports should be facing the left-hand side of the rover, when viewed from above:


- Connect a WiFi adapter or a board that directly interfaces to the underside of the Jetson Orin Nano.
- Connect the webcam’s USB lead to any USB port on your board.
- Flip the power switch to turn your rover on.
Control your rover on the Viam app
If you followed the instructions in the Jetson installation guide, you should have already made an account on the Viam app, installed viam-server on the board, and added a new machine.
To configure your rover so you can start driving it, add a Viam Rover 2 Fragment to your machine.
Next steps
After adding the appropriate fragment, follow one of these tutorials with your borrowed or owned rover:

Have questions, or want to meet other people working on robots? Join our Community Discord.
If you notice any issues with the documentation, feel free to file an issue or edit this file.
Was this page helpful?
Glad to hear it! If you have any other feedback please let us know:
We're sorry about that. To help us improve, please tell us what we can do better:
Thank you!