Contributing to the Docs
Thank you for wanting to help us make the docs better. Every contribution is appreciated.
Note
Before you start, please review this document and our Code of Conduct.
Goals
The Viam documentation aims to:
- Educate users (explain concepts, provide an overview of what is possible)
- Help users accomplish tasks (performing an action, building a thing)
We do that by providing concise and well-structured documentation to users. When users stumble, we provide avenues for feedback, so we can take action and prevent other users from running into similar issues.
Voice
We aim to be friendly but not colloquial, direct, and concise.
Here are a few additional pointers:
| Subject | Judgment |
|---|---|
| Emoji ✨ | No |
| Exclamation marks | Use sparingly |
| Rhetorical questions | No |
Audience
We write for a technical audience that spans from entry-level to expert. However, common tools and concepts such as version control, moving files with ssh, JSON are beyond the scope of our docs. To make the content as accessible as possible we will, where possible, include actions to be taken and text that guides the user as to what they are achieving when performing these actions.
For example, when copying a file to another machine with ssh, we would describe the action with words like “Use ssh to move the file onto the other machine” alongside the command to move the file. Explaining ssh goes beyond the scope of our docs. Where needed, we will link to supporting documentation but not provide supporting documentation ourselves where it would duplicate existing external documentation. Use your judgment to determine when we need to explain more and when we need to link to supporting content. When in doubt, ask during review.
Project structure
All documentation is in the docs folder. For information about Hugo and how to develop locally, see the README.
Content types
When creating a new piece of content, decide which one of the four content types the content should be. Note this in a comment in the front matter of the file.
The docs use the Diátaxis Framework as the basis of the content structure with the following four content types:
Explanation (conceptual): An understanding-oriented piece of content. This content provides background knowledge on a topic and tends to be referenced in how-to guides and tutorials. For example the
viam-serverpage. It’s useful to have a real or imagined “Why?” question to serve as a prompt.How-to Guide (procedural): A task-oriented piece of content that directs a reader to perform actions step by step to complete a task, like instructions to sauté onions. Generally starts with a description of the task and things to consider, and then provides a set of numbered steps to follow. For example, the Move a base page.
Tutorial: A learning-oriented piece of content that functions as a lesson for the reader. A tutorial helps readers to learn and apply skills by doing something meaningful and attainable, like a recipe to cook a full meal.
Reference: A concise, information-oriented piece of content that generally starts with an overview/introduction and then a list of some kind (configuration options, API methods, etc.). Examples include the API pages as well as component and service pages.
Example template: Component template.
Style guide
All docs are written in Hugo Markdown. Most Markdown formatting is supported. For a brief introduction to Markdown, check out this Markdown Cheatsheet. Some additional formatting options are supported with Hugo Shortcodes.
We follow the Rackspace Style Guide with many rules encoded in Vale rules.
Additional we enforce the following substitutions:
| Do not say | Instead say |
|---|---|
| web app, cloud app | Viam or web UI |
| viam app, Viam App | Viam or web UI |
| Viam-server, Viam server, Viam-Server | viam-server |
| Config Tab, Config tab, Configure Tab | CONFIGURE tab |
| Vision service, Vision Service | vision service |
| Motion service, Motion Service | motion service |
| slam service, Slam service, SLAM Service | SLAM service |
| Data Management Service, Data Management service | data management service |
| in the website | on the website |
| on the app | in the app |
| user of an org | member of an org |
| main part and child part, main part and non-main part | main part and sub-part |
| subpart | sub-part |
| drop down | dropdown |
| drop-down | dropdown |
| RPLIDAR, Rplidar | RPlidar |
| compute parts | computer |
| microprocessor | Raspberry Pi or Jetson or another specific term |
Vale linting
Tip
We recommend you work in Visual Studio Code and install the Vale extension to use the vale linter.
When you open a PR, your changes will be checked against a few style rules. To run this check locally, follow the instructions in the Vale Readme.
markdownlint
We recommend you work in Visual Studio Code and install the markdownlint extension.
UI elements
Use bold text for UI elements, such as tabs and buttons.
Example values
Use examples that resemble real data. For emails this could be amanda@viam.com.
When using placeholders in code examples, follow the Google developer documentation style guide’s rules for formatting placeholders.
Images and screenshots
Use screenshots in introductory materials and where the surrounding text is not enough to direct the reader. Be aware that screenshots tend to get outdated quickly and come with a maintenance burden.
Rules for images:
- Place images in the
assetsfolder. The folder uses the same content structure as the docs. Your images should be in the folder the page that uses it is in. However, there is no need to duplicate an image into multiple places if you use it in multiple pages. - All images require alt text.
- All images should be smaller than 1MB. Hugo throws a warning during local builds (such as
make serve-prod) if an image exceeds this size. Use an image compressor like TinyPNG. This is to reduce the overall page and repo size.
Remove EXIF data automatically
Important
To ensure that you do not accidentally add EXIF data on images, please install exiftool and add the following lines to the .git/hooks/pre-commit file in your local repository.
if [ "git diff --name-only | grep -EI '.*(png|jpg|jpeg)$' | wc -l" ];
then
list= $(git diff --diff-filter=d --name-only | grep -EI ".*(png|jpg|jpeg)$")
for item in $list
do
exiftool -all= $item
done
fi
If you don’t already have a .git/hooks/pre-commit file in your docs git repo directory, you can copy the existing pre-commit.sample file in that directory as pre-commit to use the sample template, or create a new pre-commit file in that directory with the above content.
If you create a new file, you must also make it executable with: chmod 755 /path/to/my/.git/hooks/pre-commit.
With this configuration in place, each commit you make will remove EXIF data from any image files (with extension .png, .jpg, or .jpeg) that are part of your commit.
Image markup
If the image is supposed to take up the full width of the page use the regular markdown syntax: .
If the image is smaller use the imgproc shortcode with an appropriate resize value.
<!-- Remove space between curly braces -->
{ {<imgproc src="PATH/TO/IMAGE.png" resize="300x" declaredimensions=true alt="ALT">} }
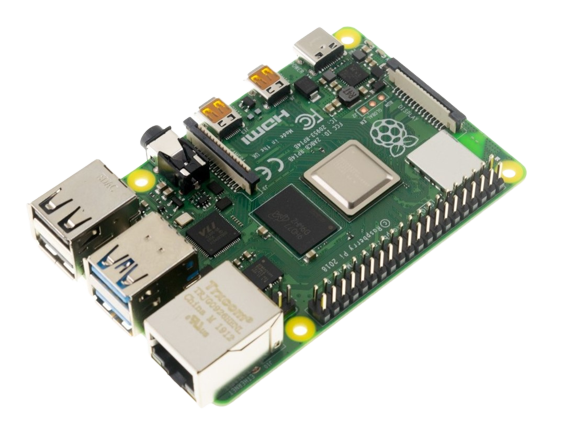
{ {<imgproc src="/installation/thumbnails/raspberry-pi-4-b-2gb.png" resize="x60" declaredimensions=true alt="Raspberry Pi">} }
{ {<imgproc src="/installation/thumbnails/raspberry-pi-4-b-2gb.png" resize="x200" declaredimensions=true alt="Raspberry Pi">} }


The imgproc shortcode will:
- convert the image into the
webpformat (which is more efficient) and resize the image - resize the image in the current format and set that image as a backup in case
webpis not supported. This does reduce file size when the website is being served. However, the source file should still be smaller than 1MB to minimize overall page and repo size. For more information on the resize options see Image Processing.
Only specify declaredimensions if the image is not responsive (if it doesn’t resize). The only images that you’d want to use declaredimensions on are the ones that take up the same space on mobile as on desktop.
An example of this are the small board icons on the front page which should never be a different size than they are. The pictures in cards, however, need to resize because they change size based on the available screen space.
Screenshot should most often be added with normal markdown syntax. Then they’ll take up the max size they can on a big screen but be smaller on mobile. If you want to resize a large image, use the largest size the image can take up as the image to resize the image to.
Note
You cannot directly use the <img> html tag for images in the assets folder because the images, once built, are renamed.
If you really need to use html directly, place the image in the static folder.
GIFs and videos
We encourage the use of GIFs and Videos. Our docs have two kinds of videos:
- Regular videos with video controls and audio
- GIF-like videos that do not have video controls or audio and function like GIFs
Regular videos
For regular videos that should use the video shortcode as follows:
<!-- remove space -->

{ {<video webm_src="/heart.webm" mp4_src="/heart.mp4" alt="A robot drawing a heart" poster="/general/heart.jpg">} }
We use webm and mp4 source files for videos because they are generally smaller.
The poster is an image that gets loaded as a preview.
GIF-like videos
GIF-like videos on our pages are generally used to show robot actions. We do not use the GIF file format within our docs because it uses a lot of bandwidth - more than videos - and the best practice is to not use them.
Instead, we use a video div with two sources:
<!-- remove space -->

{ {<gif webm_src="/heart.webm" mp4_src="/heart.mp4" alt="A robot drawing a heart">}}
Place the files into the static directory.
Note
If you use videos to add a video preview for a page (such as to a tutorial), you should also add a
Why?
- GIFs take more bandwidth than MP4 and WEBM videos, so on our page, we prefer to use MP4 and WEBM.
- Link previews using
og:imageonly support GIFs - Automatic conversion between the formats is possible but we also need to make sure that the resulting GIFs are presentable and under 1MB.
Formatting guide
Front matter
Each file that generates a page in Hugo starts with front matter that looks like this:
---
title: "Build a line-following robot with only a rover and a webcam"
linkTitle: "Line Follower"
weight: 90
type: "docs"
description: "Instructions for building a line-following robot that uses a webcam to track lines."
# SME: "SME Name"
---
- The
descriptiongets used for previews. - The
weightdetermines the ordering of pages in the side navigation bar.
Prod/Draft/Future pages
Add draft: true to the Front Matter to set a page to Draft.
You can commit and push the page and it won’t display in production.
Add future: true to the Front Matter to begin building a page to production on a certain date (for example, a release date).
File names
File names are kebab-case, with hyphens, such as upload-model.md.
One sentence per line
To make reviews easier, each new sentence should begin on a new line.
Add hyperlinks (sparingly)
Where related resources would be helpful to a reader, link them. However:
- Links are an opportunity for a reader to get lost or get distracted. If that happens, a link is not helpful. Placing links near the end of a section/page can help avoid this.
- Avoid a page becoming a sea of blue hyperlinks. Excessive linking can make a page harder to view and read.
Important
Links should always have descriptive text. Never write “Click here” with here as the link text. Instead use “To learn more about X, read PAGE NAME” with the page name as the link text.
When linking to an image or another page within the docs please use relative links (appendix/contributing/) or (/appendix/contributing/).
Note
You must add a trailing slash on links.**
This is enforced with htmltest.
Glossary
We have built a glossary into our docs. Jargon and product-specific concepts should have an entry in the appendix/glossary folder. You can use a glossary entry on any page like this:
<!-- Remove spaces between curly braces -->

This text will have additional information on hover for the
word { {< glossary_tooltip term_id="smart-machine" text="smart machine" >} }.
Reusable text snippets
If you need to use the same text in multiple locations, for example when cautioning users to disconnect power before changing connections or providing a commonly used instruction set or procedure, you can use reusable snippets.
The following is an example of the 
Caution: Keep your API key safe
We strongly recommend that you add your API key as an environment variable. Anyone with your API key can access your machine, and the computer running your machine.
Including another file
This is a Heading in the Sample File
This entire section was added to the current topic using the readfile shortcode.
Changes to included files do not appear in local mode (hugo server -D).
You’ll need to halt and restart the server to view the changes.
Heading 2
- bullet 1
- bullet 2
Heading 3
This Markdown code:
Markdown Table
| id | name    |
|----|---------|
| 1  | Roberta |
| 2  | Oliver  |
| 3  | Shayna  |
| 4  | Fechin  |
Renders like so:
Markdown Table
| id | name |
|---|---|
| 1 | Roberta |
| 2 | Oliver |
| 3 | Shayna |
| 4 | Fechin |
This HTML code:
<h3>HTML Table</h3>

<table>
  <tr>
    <th>id</th>
    <th>name</th>
  </tr>
  <tr>
    <td>1</td>
    <td>Roberta</td>
  </tr>
  <tr>
    <td>2</td>
    <td>Oliver</td>
  </tr>
  <tr>
    <td>3</td>
    <td>Shayna</td>
  </tr>
  <tr>
    <td>4</td>
    <td>Fechin</td>
  </tr>
</table>
Renders like so:
HTML Table
| id | name |
|---|---|
| 1 | Roberta |
| 2 | Oliver |
| 3 | Shayna |
| 4 | Fechin |
This is the last line of the included file.
Section content before this line is contained in an included file:
Tab Panels
Supported
- Markdown and HTML images
- Images should be included with the imgproc shortcode.
You cannot directly use the
<img>html tag for images in the assets folder because the images, once built, are renamed. If you really need to use html directly, place the image in the static folder.
- Images should be included with the imgproc shortcode.
You cannot directly use the
- Alert Shortcode
- PRISM syntax highlighting (the three backticks)
- “codelang” highlighting (add codelang=“language” to tab element). It’s very ugly, needs css work, and is not recommended at this time.
Not supported
- Footnotes
- Expanders
Example usage
# remove spaces

{ {<imgproc src="/general/tabbed-panel-markdown.png" resize="300x" declaredimensions=true alt="Screen capture of Tab/Tabs Shortcode Usage" style="border:solid 1px black">} }

What is Rendered?
It renders vanilla HTML and markdown, Alerts, and images. For example, these two images:
Markdown Image Example
HTML Image Example (with border)


Code with syntax highlighting
Line numbering is off by default.
{
  "word": "Three backticks and the language name enables Prism syntax highlighting."
}
With just line 6 highlighted. See the prism line highlight extension for more info:
while (True):
    # When True, sets the LED pin to high or on.
    await led.set(True)
    print('LED is on')

    await asyncio.sleep(1)

    # When False, sets the pin to low or off.
    await led.set(False)
    print('LED is off')

    await asyncio.sleep(1)
With linked lines and lines 8-10 highlighted.
while (True):
    # When True, sets the LED pin to high or on.
    await led.set(True)
    print('LED is on')

    await asyncio.sleep(1)

    # When False, sets the pin to low or off.
    await led.set(False)
    print('LED is off')

    await asyncio.sleep(1)
Alert shortcodes
Important
This is an alert.
How to use notes, cautions, and warnings
Info/Tip: Use to convey helpful information or clarification. They both use the same color.
Note/Important/Stability Notice: These call attention to something important.
When creating alerts about important messages, set the title attribute as title="Important".
If you want to include a more detailed title or message, use title="Important: $message" to provide additional context.
Caution: Provide notice that a certain action or event could damage hardware or cause data loss.
Warning: Use to notify the reader of an issue to avoid loss of life, personal injury, and health hazards. Electrical and physical safety fall into this category.
Tip
The “title” and “color” keywords and the names of colors (“tip,” “note,” and so on) are case sensitive. If you use uppercase, alerts will not have a title and the color border will be incorrect.
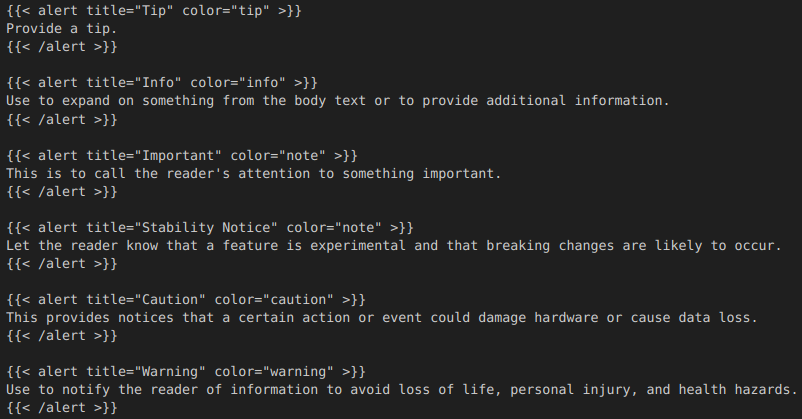
Tip
Provide a tip.
Info
Use to expand on something from the body text or to provide additional information.
Important
This is to call the reader’s attention to something important.
Stability Notice
Let the reader know that a feature is experimental and that breaking changes are likely to occur.
Caution
This provides notices that a certain action or event could damage hardware or cause data loss.
Warning
Use to notify the reader of information to avoid loss of life, personal injury, and health hazards.
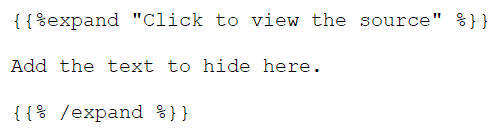
Using expanders
Expanders allow to you add long sections of code to your topic and hide them until the reader decides to view it.
Within the expander, you can still use most other shortcodes and syntax highlighting from Prism functions properly.
The shortcode displays your expander’s title in a light blue bar to make it noticeable.
Screen Capture of an Expander

Usage
- Add the shortcode tags. Make sure that the title is suitable for your use.
- Drop in the material you want to hide until the reader wants it.

Figures
The figure shortcode enhances the existing figure and figurecaption html tags.
Figure supports the standard html attributes associated with the html img and figure tags, as well as an attr element for attribution text and attrlink if you wish to add a link to the attribution text.
This shortcode places the caption (that is the “title”) above the table. The title is set in 12pt italic with a green underline.
Figure styles the Attribution text as body text.
Footnotes
To add a footnote:
"Some completely[^f] random text."

[^f]: this is the text for the footnote
You can place the footnote text immediately beneath the paragraph where you put the marker. Hugo will place it at the bottom of the page.
Pull requests
If you are making a small change, like fixing a typo or editing a few lines of text, you do not need to create an issue. However, if you plan to make bigger changes, we ask that you create an issue and discuss the change with us in advance.
To get started:
- Fork the official repo into your personal GitHub.
- Clone the forked repo to your local system.
- Add the remote path for the ‘official’ repository:
git remote add upstream git@github.com:viamrobotics/docs.git
When you are ready to contribute changes to the docs:
- Make sure you are on the main branch:
git switch main - Sync your forked main branch with the official repo:
git pull upstream main - Create a new branch for your changes:
git switch -c my-new-feature - Edit some docs…
- Commit your changes:
git commit -am 'Add some feature' - Make sure your local branch is still up-to-date with the official repo:
git pull upstream main - Push to the branch:
git push origin my-new-feature - Submit a pull request
Questions
If you have questions or would like to chat, please find us on the Community Discord.
Was this page helpful?
Glad to hear it! If you have any other feedback please let us know:
We're sorry about that. To help us improve, please tell us what we can do better:
Thank you!