Pet Photographer: Create a Data Filtering Module
If your machine captures a lot of data, you might want to filter captured data to selectively store only the data you are interested in. For example, you might want to use your smart machine’s camera to capture images based on specific criteria, such as the presence of a certain color, and omit captured images that don’t meet that criteria.
In this tutorial, you will use a custom module to function as a color filter, and use it with a camera to only capture images where your pet is in the frame in the following way:
Attach a colored object, such as a blue collar, to your pet.
Set up a camera in an area where your pet is likely to appear in the frame, and configure the data management service to capture and sync images from that camera.
Configure the
colorfiltercustom module to filter captured images from your camera, saving them only when your pet, along with their easily-identifiable colored object, is present in the frame.

The source code for this module is available on the modular-filter-examples GitHub repository .
In addition to the colorfilter module used in this tutorial, the example repository also includes a sensor reading filter which you could use to control and filter the data recorded by a sensor component.
Hardware requirements
To create your own filtering pet photographer robot, you’ll need the following hardware:
- A computer
- A webcam or other type of camera
- A colored object, such as a blue collar for enhanced accuracy (optional)
Tip
In this tutorial, the camera is configured to identify and filter images with the color blue, as it is less common in many environments. If your pet already has a distinct color that is different from their environment, you can also configure your camera to use that color to identify pictures of your pet.
Make sure your webcam is connected to your computer.
Setup
Add a new machine on Viam.
On the machine’s page, follow the setup instructions to install viam-server on the computer you’re using for your project.
Wait until your machine has successfully connected to Viam.
Note
Your viam-server must be version 0.8.0 or newer, as filtering capabilities were introduced in the RDK starting from that version.
Then, install Go or Python on both your local development computer and on your machine’s board if they are not the same device.
Add the custom module
In this tutorial, you can choose to add custom data filtering to your machine in one of two ways:
- Download the
colorfiltermodule from Viam and get started quickly. - Code your own color filtering module, exploring the process of building a module from scratch.
Download the colorfilter module
Follow the instructions below to download the colorfilter module in your preferred programming language:
Clone the
colorfiltermodule from GitHub onto your computer:git clone https://github.com/viam-labs/modular-filter-examples.gitNavigate to the Python color filter directory,
pycolorfilter.Note the path to your module’s executable,
run.sh , for later use.Add the
colorfiltermodule to your smart machine as a local module and continue the tutorial from there.
Clone the
colorfiltermodule from GitHub onto your machine’s computer:git clone https://github.com/viam-labs/modular-filter-examples.gitNavigate to the Go color filter directory,
colorfilter.Inside of the
moduledirectory, compile the executable that runs your module.Save the path to your module’s executable for later use.
Add the
colorfiltermodule to your smart machine as a local module and continue the tutorial from there.
Code your own module
To code your own color filtering module, first create the necessary files and directories on your smart machine:
- Create a folder for your module with the name of your model
colorfilter.- Your model name must use all lowercase letters.
- Inside that folder, create a file called
color_filter.py .
- Create a folder for your module with the name of your model
colorfilter.- Your model name must use all lowercase letters.
- Inside that folder, create:
- A file called
color_filter.go . - A directory named
module.
- A file called
Code a filter resource model
Next, include all the methods that the corresponding Viam SDK requires in its API definition.
You can write your own code or copy the code from the colorfilter module’s
To write your own code, implement a client interface defined by the required methods outlined in the
- Open the
color_filter.py file you just created and implement the required methods fromclient.py .- Exclude the
get_imagesmethod, which you will customize to add filtering functionality in the upcoming section. - Include the other methods within the class corresponding to your resource type (in this case, the
CameraClientclass).
- Exclude the
For more information, refer to Write your new resource model definition.
To write your own code, implement a client interface defined by the required methods outlined in the
- Open the
color_filter.go file you just created and implement the required methods in it. Exclude theImagesmethod, which you will customize to add filtering functionality in the upcoming section.- You can create your own code or copy the code from the viam-labs
colorfilterrepository’scolor_filter.go file.
- You can create your own code or copy the code from the viam-labs
For more information, refer to Write your new resource model definition.
The filter function in your custom filter module must contain two critical elements:
- A utility function that will check if the caller of the filter function is the data management service.
- A safeguard that ensures if the data management service is not the caller, an error and the unfiltered data is returned.
Important
You must include both the safeguard and utility functions in order to access data filtering functionality within your module.
For programming languages other than Python and Go, the API of the component you’re receiving data from will provide comparable utility functions and safeguards. These tools help you to check the caller of your filter function and ensure your smart machine responds accordingly.
For detailed information, please refer to the documentation for your chosen SDK.
Follow the steps below to include the utility function and check whether the data management service is the caller of the function responsible for data capture. If a service other than the data management service calls the function, it will return the original, unfiltered data.
To check the caller of the collector function using the utility function:
First, import from_dm_from_extra:
from viam.utils import from_dm_from_extra
Then, include it in the conditional statement in your filter function:
if from_dm_from_extra(extra):
    detections = await self.vision_service.get_detections(img)
With this configuration:
- Your camera checks if the data management service is the caller of the filter function by using
from_dm_from_extra.
Write a conditional statement that checks FromDMContextKey:
Important
Use FromDMContextKey to check the caller of the data capture function when working with a modular camera using the Go SDK.
For all other components, you should use FromDMString instead.
See the sensor filter example for example code to support working with a sensor.
images, metadata, err := c.actualCam.Images(ctx)
if err != nil {
    return nil, resource.ResponseMetadata{}, errors.New("could not get images")
}

if ctx.Value(data.FromDMContextKey{}) != true {
    // If not data management collector, return images without filtering.
    return images, metadata, nil
}

detections, err := c.visionService.Detections(ctx, images[0].Image, map[string]interface{}{})
With this configuration:
- Your camera gets images from the underlying camera, then checks if the data management service is the caller of the filter function by using
FromDMContextKey. - If
FromDMContextKeyistrueand the data management service is the caller, the code requests detections on the captured image.
After implementing a check to identify the initiator of the filter function, you must include the safeguard that will return an error if the data management service is not the caller.
To do this, include the following in your filter module’s resource model:
Edit NoCaptureToStoreError from Viam:
from viam.errors import NoCaptureToStoreError
Then, edit the if from_dm_from_extra(extra) conditional statement from earlier to add a second conditional statement within it that returns the error when the data management service is not the caller:
if from_dm_from_extra(extra):
    detections = await self.vision_service.get_detections(img)
    if len(detections) == 0:
        raise NoCaptureToStoreError()
This code:
- Checks the length (
len) of thedetectionsvariable. - Raises a
NoCaptureToStoreError()iflenis equal to0to signify that the data management service is not the caller.
Open data.ErrNoCaptureToStore:
if len(detections) == 0 {
   return nil, nil, data.ErrNoCaptureToStore
}
This code:
- Checks the length (
len) of thedetectionsvariable. - Raises a
data.ErrNoCaptureToStoreerror iflenis equal to0to signify that the data management service is not the caller.
Now that you’ve included the required utility function and safeguard, your complete color filter function should look like the following:
async def get_images(
  self,
  *,
  filter_source_names: Optional[Sequence[str]] = None,
  extra: Optional[Dict[str, Any]] = None,
  timeout: Optional[float] = None,
  **kwargs
  ) -> Tuple[Sequence[NamedImage], ResponseMetadata]:
    """Filters the output of the underlying camera"""
    images, metadata = await self.actual_cam.get_images(
        filter_source_names=filter_source_names,
        extra=extra,
        timeout=timeout,
        **kwargs
    )
    if from_dm_from_extra(extra):
        from viam.media.utils.pil import viam_to_pil_image
        img_pil = viam_to_pil_image(images[0])
        detections = await self.vision_service.get_detections(img_pil)
        if len(detections) == 0:
            raise NoCaptureToStoreError()

    return images, metadata
If the data management service is the caller, the filter function requests detections from the vision service and returns the image if the specified color is detected.
Otherwise, it raises a NoCaptureToStoreError() error.
This code includes the utility function and safeguard you implemented earlier, and also includes error handling for getting images and obtaining detections.
// Images returns images from the underlying camera, filtering based on the vision service when called by data management.
func (c *colorFilterCam) Images(ctx context.Context) ([]camera.NamedImage, resource.ResponseMetadata, error) {
    images, metadata, err := c.actualCam.Images(ctx)
    if err != nil {
        return nil, resource.ResponseMetadata{}, errors.New("could not get images")
    }

    if ctx.Value(data.FromDMContextKey{}) != true {
        // If not data management collector, return images without filtering.
        return images, metadata, nil
    }

    if len(images) == 0 {
        return nil, resource.ResponseMetadata{}, data.ErrNoCaptureToStore
    }

    detections, err := c.visionService.Detections(ctx, images[0].Image, map[string]interface{}{})
    if err != nil {
        return nil, resource.ResponseMetadata{}, errors.New("could not get detections")
    }

    if len(detections) == 0 {
        return nil, resource.ResponseMetadata{}, data.ErrNoCaptureToStore
    }

    return images, metadata, nil
}
If the data management service is the caller, the filter function requests detections from the vision service and returns the image if the specified color is detected.
Otherwise, it raises a data.ErrNoCaptureToStore error.
After you have implemented your resource API’s required methods and written your filter function, your final code should look like this:
In this code: The Python SDK simplifies the verification process by exposing the utility function If the boolean is Click to view sample code from
from typing import (
    ClassVar, Mapping, Sequence, Optional, cast, Tuple, List, Any, Dict
)
from typing_extensions import Self
from viam.proto.app.robot import ComponentConfig
from viam.proto.common import ResourceName, ResponseMetadata, Geometry
from viam.components.camera import Camera
from viam.resource.types import Model, ModelFamily
from viam.resource.base import ResourceBase
from viam.media.video import NamedImage
from PIL import Image
from viam.errors import NoCaptureToStoreError
from viam.services.vision import Vision
from viam.utils import from_dm_from_extra
from viam.media.utils.pil import viam_to_pil_image


class ColorFilterCam(Camera):

    """A ColorFilterCam wraps the underlying camera
    `actual_cam` and only keeps the data captured on the
    actual camera if `vision_service` detects a certain
    color in the captured image.
    """
    MODEL: ClassVar[Model] = Model(
        ModelFamily("example", "camera"),
        "colorfilter")

    def __init__(self, name: str):
        super().__init__(name)

    @classmethod
    def new_cam(
        cls,
        config: ComponentConfig,
        dependencies: Mapping[ResourceName, ResourceBase]
    ) -> Self:
        cam = cls(config.name)
        cam.reconfigure(config, dependencies)
        return cam

    @classmethod
    def validate_config(
        cls,
        config: ComponentConfig
    ) -> Sequence[str]:
        """Validates JSON configuration"""
        actual_cam = config.attributes.fields["actual_cam"].string_value
        if actual_cam == "":
            raise Exception(
              "actual_cam attribute is required for a ColorFilterCam component"
              )
        vision_service = config.attributes.fields[
          "vision_service"
        ].string_value
        if vision_service == "":
            raise Exception(
              """
              vision_service attribute
              is required for a
              ColorFilterCam component
              """
            )
        return [actual_cam, vision_service]

    def reconfigure(
        self,
        config: ComponentConfig,
        dependencies: Mapping[ResourceName, ResourceBase]
    ):
        """Handles attribute reconfiguration"""
        actual_cam_name = config.attributes.fields[
          "actual_cam"
        ].string_value
        actual_cam = dependencies[
          Camera.get_resource_name(actual_cam_name)
        ]
        self.actual_cam = cast(Camera, actual_cam)

        vision_service_name = config.attributes.fields[
          "vision_service"
          ].string_value
        vision_service = dependencies[
          Vision.get_resource_name(
            vision_service_name
          )
        ]
        self.vision_service = cast(
           Vision,
           vision_service
        )

    async def get_properties(
              self,
              *,
              timeout: Optional[float] = None,
              **kwargs
    ) -> Camera.Properties:
        """Returns details about the camera"""
        return await self.actual_cam.get_properties()

    async def get_images(
              self,
              *,
              filter_source_names: Optional[Sequence[str]] = None,
              extra: Optional[Dict[str, Any]] = None,
              timeout: Optional[float] = None,
              **kwargs
    ) -> Tuple[
         List[NamedImage],
         ResponseMetadata
         ]:
        """Filters the output of the underlying camera"""
        images, metadata = await self.actual_cam.get_images(
            filter_source_names=filter_source_names,
            extra=extra,
            timeout=timeout,
            **kwargs
        )
        if from_dm_from_extra(extra):
            img_pil = viam_to_pil_image(images[0])
            detections = await self.vision_service.get_detections(img_pil)
            if len(detections) == 0:
                raise NoCaptureToStoreError()

        return images, metadata

    async def get_point_cloud(
              self,
              *,
              extra: Optional[Dict[str, Any]] = None,
              timeout: Optional[float] = None,
              **kwargs
    ) -> Tuple[
         bytes,
         str
         ]:
        raise NotImplementedError

    async def get_geometries(self) -> List[Geometry]:
        raise NotImplementedError
from_dm_from_extra, to see if the caller is the data management service for you.true, the function will call the vision service to get detections and return the image if the color is detected.
Otherwise, it raises NoCaptureToStoreError().
In this code: The If Click to view sample code from
// Package colorfilter implements a modular camera that filters the output of an underlying camera and only keeps
// captured data if the vision service detects a certain color in the captured image.
package colorfilter

import (
"context"
"fmt"

    "go.viam.com/rdk/logging"
    "github.com/pkg/errors"

    "go.viam.com/rdk/components/camera"
    "go.viam.com/rdk/data"
    "go.viam.com/rdk/pointcloud"
    "go.viam.com/rdk/resource"
    "go.viam.com/rdk/rimage/transform"
    "go.viam.com/rdk/services/vision"

)

var (
    // Model is the full model definition.
    Model = resource.NewModel("example", "camera", "colorfilter")
    errUnimplemented = errors.New("unimplemented")
)

func init() {
    resource.RegisterComponent(camera.API, Model, resource.Registration[camera.Camera, *Config]{
    Constructor: newCamera,
    })
}

func newCamera(ctx context.Context, deps resource.Dependencies, conf resource.Config, logger logging.Logger) (camera.Camera, error) {
    c := &colorFilterCam{
        Named: conf.ResourceName().AsNamed(),
        logger: logger,
    }
    if err := c.reconfigure(ctx, deps, conf); err != nil {
        return nil, err
    }
    return c, nil
}

// Config contains the name to the underlying camera and the name of the vision service to be used.
type Config struct {
    ActualCam string `json:"actual_cam"`
    VisionService string `json:"vision_service"`
}

// Validate validates the config and returns implicit dependencies.
func (cfg \*Config) Validate(path string) ([]string, error) {
    if cfg.ActualCam == "" {
        return nil, fmt.Errorf(`expected "actual_cam" attribute in %q`, path)
    }
    if cfg.VisionService == "" {
        return nil, fmt.Errorf(`expected "vision_service" attribute in %q`, path)
    }

    return []string{cfg.ActualCam, cfg.VisionService}, nil

}

// A colorFilterCam wraps the underlying camera `actualCam` and only keeps the data captured on the actual camera if `visionService`
// detects a certain color in the captured image.
type colorFilterCam struct {
    resource.Named
    actualCam camera.Camera
    visionService vision.Service
    logger loggingg.Logger
}

// reconfigure applies config settings to the component. Called from the constructor.
func (c *colorFilterCam) reconfigure(ctx context.Context, deps resource.Dependencies, conf resource.Config) error {
    camConfig, err := resource.NativeConfig[*Config](conf)
    if err != nil {
        return err
    }

    c.actualCam, err = camera.FromDependencies(deps, camConfig.ActualCam)
    if err != nil {
        return errors.Wrapf(err, "unable to get camera %v for colorfilter", camConfig.ActualCam)
    }

    c.visionService, err = vision.FromDependencies(deps, camConfig.VisionService)
    if err != nil {
        return errors.Wrapf(err, "unable to get vision service %v for colorfilter", camConfig.VisionService)
    }

    return nil

}

// DoCommand simply echoes whatever was sent.
func (c \*colorFilterCam) DoCommand(ctx context.Context, cmd map[string]interface{}) (map[string]interface{}, error) {
    return cmd, nil
}

// Close closes the underlying camera.
func (c \*colorFilterCam) Close(ctx context.Context) error {
    return c.actualCam.Close(ctx)
}

// Images returns images from the underlying camera, filtering based on the vision service when called by data management.
func (c \*colorFilterCam) Images(ctx context.Context) ([]camera.NamedImage, resource.ResponseMetadata, error) {
    images, metadata, err := c.actualCam.Images(ctx)
    if err != nil {
        return nil, resource.ResponseMetadata{}, errors.New("could not get images")
    }

    if ctx.Value(data.FromDMContextKey{}) != true {
        // If not data management collector, return images without filtering.
        return images, metadata, nil
    }

    if len(images) == 0 {
        return nil, resource.ResponseMetadata{}, data.ErrNoCaptureToStore
    }

    detections, err := c.visionService.Detections(ctx, images[0].Image, map[string]interface{}{})
    if err != nil {
        return nil, resource.ResponseMetadata{}, errors.New("could not get detections")
    }

    if len(detections) == 0 {
        return nil, resource.ResponseMetadata{}, data.ErrNoCaptureToStore
    }

    return images, metadata, nil
}

// NextPointCloud does nothing.
func (c \*colorFilterCam)NextPointCloud(ctx context.Context)(pointcloud.PointCloud, error)
{
    return nil, errUnimplemented
}

// Properties returns details about the camera.
func (c \*colorFilterCam) Properties(ctx context.Context)(camera.Properties, error)
{
    return c.actualCam.Properties(ctx)
}

// Projector does nothing.
func (c \*colorFilterCam) Projector(ctx context.Context) (transform.Projector, error) {
    return nil, errUnimplemented
}
Images method gets images from the underlying camera, then checks if the data management service is the caller using ctx.Value(data.FromDMContextKey{}).true, the function calls the vision service to get detections and returns the images if the color is detected.
Otherwise, it raises the ErrNoCaptureToStore error.
For more information, see Write your new resource model definition.
Code an entry point file
Next, code your module entry point file which viam-server will use to initialize and start the filter module.
To code an entry point file yourself, locate the API as defined in the relevant <resource-name>/<resource-name>.go file in the RDK source code.
- In this example, the camera’s API is defined in the
camera.go file in the RDK source code. When developing yourmain.go ormain.py file, reference this file.
Follow these steps to code your entry point file:
- Inside of your filter module’s directory, create a new file named
main.py . This will be the entry point file for the module. - Add the code below which initializes and starts the filter module.
import asyncio
from viam.components.camera import Camera
from viam.module.module import Module
from viam.resource.registry import Registry, ResourceCreatorRegistration
import color_filter


async def main():

    """
    This function creates and starts a new module,
    after adding all desired resource models.
    Resource creators must be
    registered to the resource
    registry before the module adds the resource model.
    """
    Registry.register_resource_creator(
        Camera.API,
        color_filter.ColorFilterCam.MODEL,
        ResourceCreatorRegistration(
            color_filter.ColorFilterCam.new_cam,
            color_filter.ColorFilterCam.validate_config
        )
    )
    module = Module.from_args()
    module.add_model_from_registry(
        Camera.API,
        color_filter.ColorFilterCam.MODEL
    )
    await module.start()

if __name__ == "__main__":
    asyncio.run(main())
Follow these steps to code your entry point file:
- Open the folder named
moduleinside of your filter module’s directory and create a new file namedmain.go . This will be the entry point file for the module. - Add the code below which initializes and starts the filter module.
// Package main is a module which serves the colorfilter custom module.
package main

import (
  "context"

  "go.viam.com/rdk/logging"
  "go.viam.com/rdk/utils"

  "github.com/viam-labs/modular-filter-examples/colorfilter"
  "go.viam.com/rdk/components/camera"
  "go.viam.com/rdk/module"
)

func main() {
  utils.ContextualMain(mainWithArgs, module.NewLoggerFromArgs("colorfilter_module"))
}

func mainWithArgs(ctx context.Context, args []string, logger logging.Logger) (err error) {
  myMod, err := module.NewModuleFromArgs(ctx, logger)
  if err != nil {
    return err
  }

  err = myMod.AddModelFromRegistry(ctx, camera.API, colorfilter.Model)
  if err != nil {
    return err
  }

  err = myMod.Start(ctx)
  defer myMod.Close(ctx)
  if err != nil {
    return err
  }
  <-ctx.Done()
  return nil
}
For more information, see Create a new module.
Once you’ve written your filter module, compile your module into a single executable that runs your module when executed.
Note the absolute path to your module’s executable for use in the next section.
Add as a local module
Whether you’ve downloaded the colorfilter module, or written your own color filtering module, the next step is to add the module to your smart machine as a local module:
Navigate to the CONFIGURE tab of your machine’s page.
Click the + (Create) button next to your main part in the left-hand menu and select Local module, then Local module.
Enter a name or use the suggested name for your local module, enter the module’s executable path, then click Create.
- The name must use only lowercase characters.
Then, click the Save button in the top right corner of the page to save your changes.

Add services
Next, add the following services to your smart machine to support the color filter module:
- The data management service enables your smart machine to capture data and sync it to the cloud.
- The vision service enables your smart machine to perform color detection on objects in a camera stream.
Add the data management service
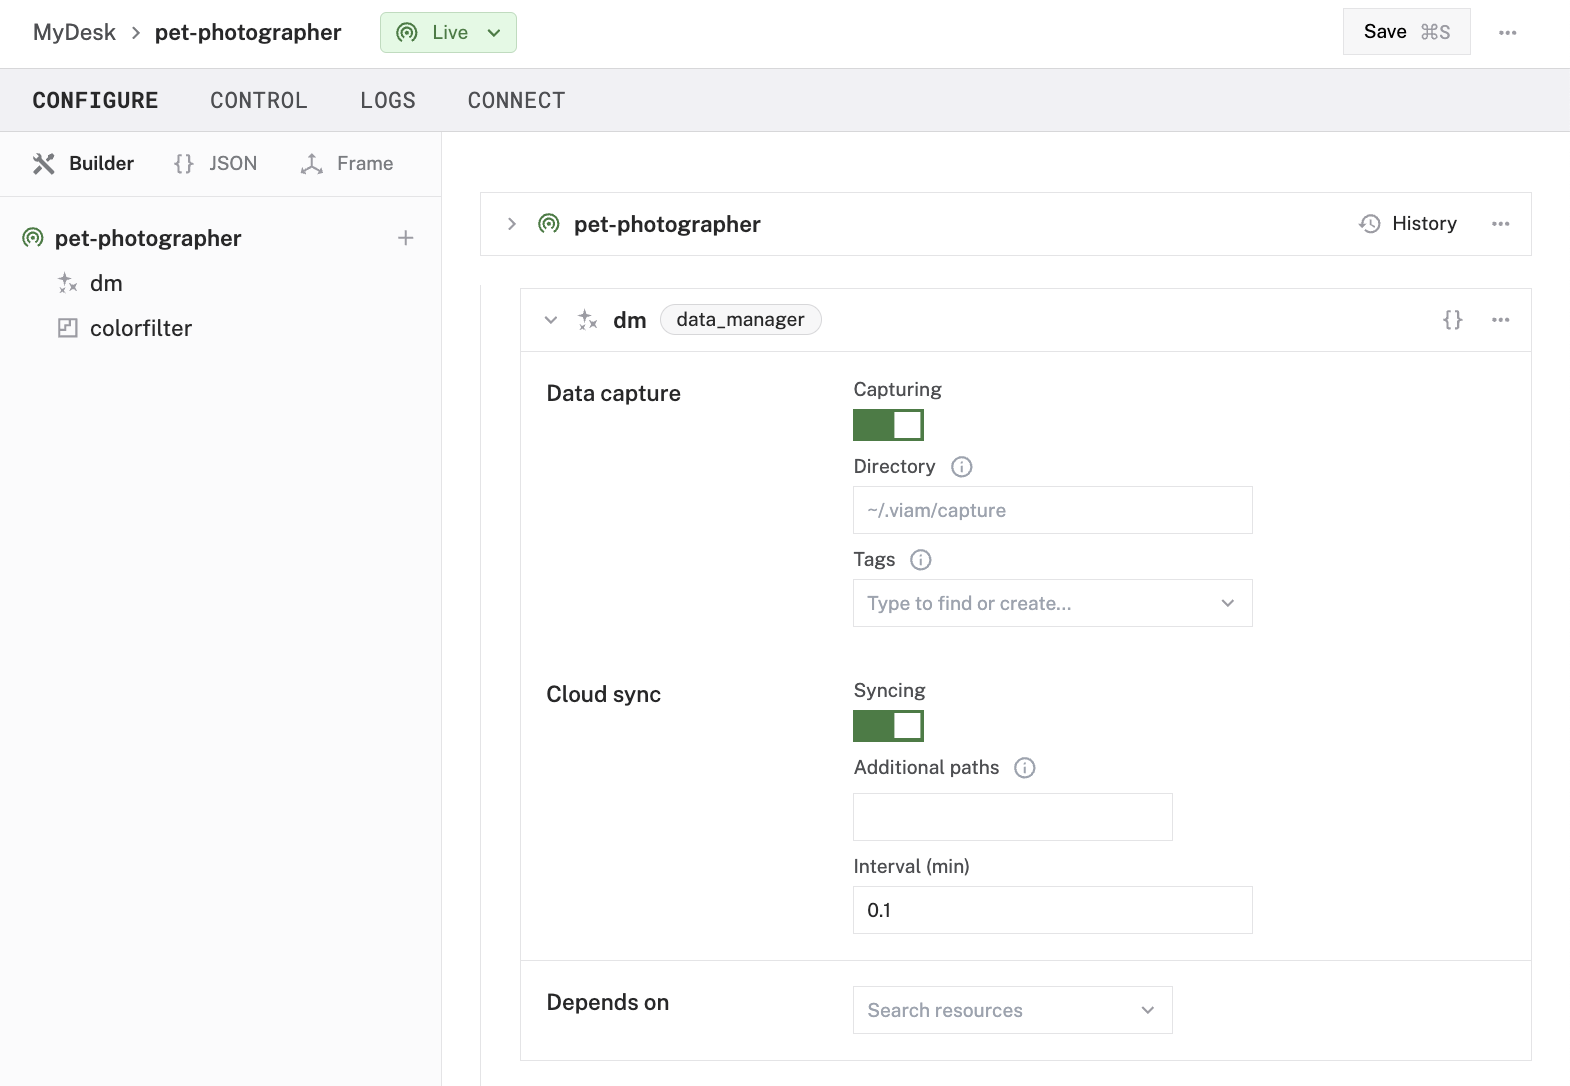
To enable data capture on your machine, add and configure the data management service to capture and store data on your machine’s computer:
On the CONFIGURE tab, click the + icon next to your machine part in the left-hand menu and select Blocks.
Search for
data management, then select thedata_manager/builtinblock.Enter a name or use the suggested name for your instance of the data manager. This tutorial uses the name ‘dm’ in all example code.
Click Add to machine. On the panel that appears, you can manage the capturing and syncing functions individually. By default, the data management service captures data every 0.1 minutes to the
~/.viam/capture directory. Leave the default settings as they are.Click Save in the top right corner of the screen to save your changes.
For more detailed information, see Add the data management service.

Add the data management service to the services array in your rover’s raw JSON configuration:
{
  "name": "dm",
  "api": "rdk:service:data_manager",
  "model": "rdk:builtin:builtin",
  "attributes": {
    "sync_interval_mins": 0.1,
    "capture_dir": "",
    "tags": [],
    "additional_sync_paths": []
  }
}
Add the vision service
To enable your smart machine to detect a specific color in its camera stream, add a color_detector vision service.
For this tutorial, we will configure the vision service to recognize a blue dog collar using #43A1D0 or rgb(67, 161, 208).
If you have a different item you want to use, or want to match to a color that matches your pet closely, you can use a different color.
- Navigate to the CONFIGURE tab of your machine’s page.
- Click the + icon next to your machine part in the left-hand menu and select Blocks.
- Search for
color detector, then select thevision/color_detectorblock. - Enter a name or use the suggested name for your color detector. This tutorial uses the name ‘my_color_detector’ in all example code.
- click Add to machine.
- In the vision service’s Attributes section, click the color selection box to set the color to detect.
For this tutorial, set the color to
#43A1D0orrgb(67, 161, 208). Alternatively, you can provide the color of your pet, or use a different brightly-colored collar or ribbon. - Set Hue Tolerance to
0.06and Segment size px to100. - Click the Save button in the top right corner of the page.
Your configuration should look like the following:

For more detailed information, refer to Configure a color detector.
Add the vision service object to the services array in your rover’s raw JSON configuration:
{
  "name": "my_color_detector",
  "api": "rdk:service:vision",
  "model": "color_detector",
  "attributes": {
    "segment_size_px": 100,
    "detect_color": "#43a1d0",
    "hue_tolerance_pct": 0.06,
    "camera_name": "cam"
  }
}
Click the Save button in the top right corner of the page when done.
Enable filtering by color
With the vision and data management services configured, you can now configure your camera to filter by color and sync photos to Viam’s cloud.
Configure your camera
If you haven’t already, add a camera component to your smart machine:
On the CONFIGURE tab, click the + (Create) button next to your main part in the left-hand menu and select Blocks. Start typing “webcam” and select camera / webcam. Enter a name or use the suggested name for your camera. This tutorial uses the name ‘cam’ in all example code. Click Add to machine.
Leave the video_path blank and the camera will use the default video path for your machine. If this doesn’t work when you test your camera later, you can try a different video path by following the prompt in the camera’s configuration panel.
Click Save in the top right corner of the screen to save your changes.

Add the color filter component
Click the + icon next to your machine part in the left-hand menu and select Local module, then Local component.
On the Create menu:
Select the
cameratype from the dropdown menu.Select or enter
example:camera:colorfilter, the model namespace triplet of your modular resource’s model.Provide a name for this instance of your modular resource. This name must be different from the module name.
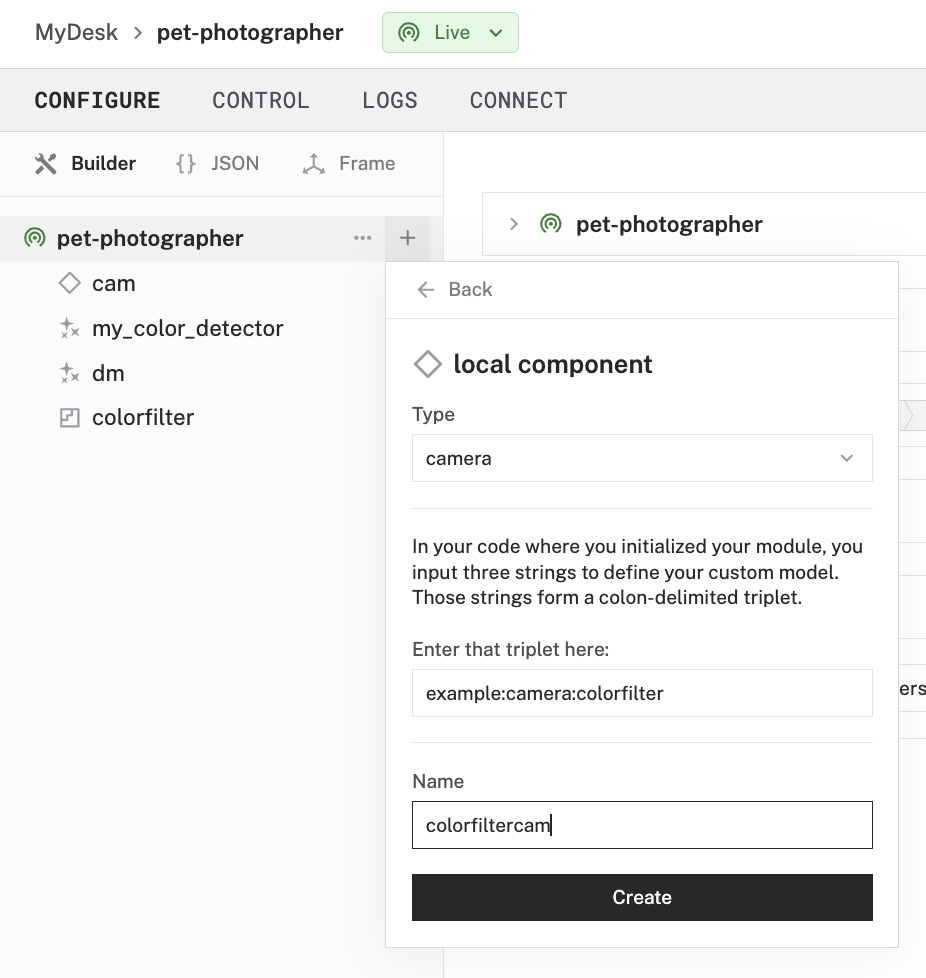
Click Create to create the modular resource.
In the resulting module configuration pane, copy the following JSON configuration into the attributes field:
{
  "vision_service": "my_color_detector",
  "actual_cam": "cam"
}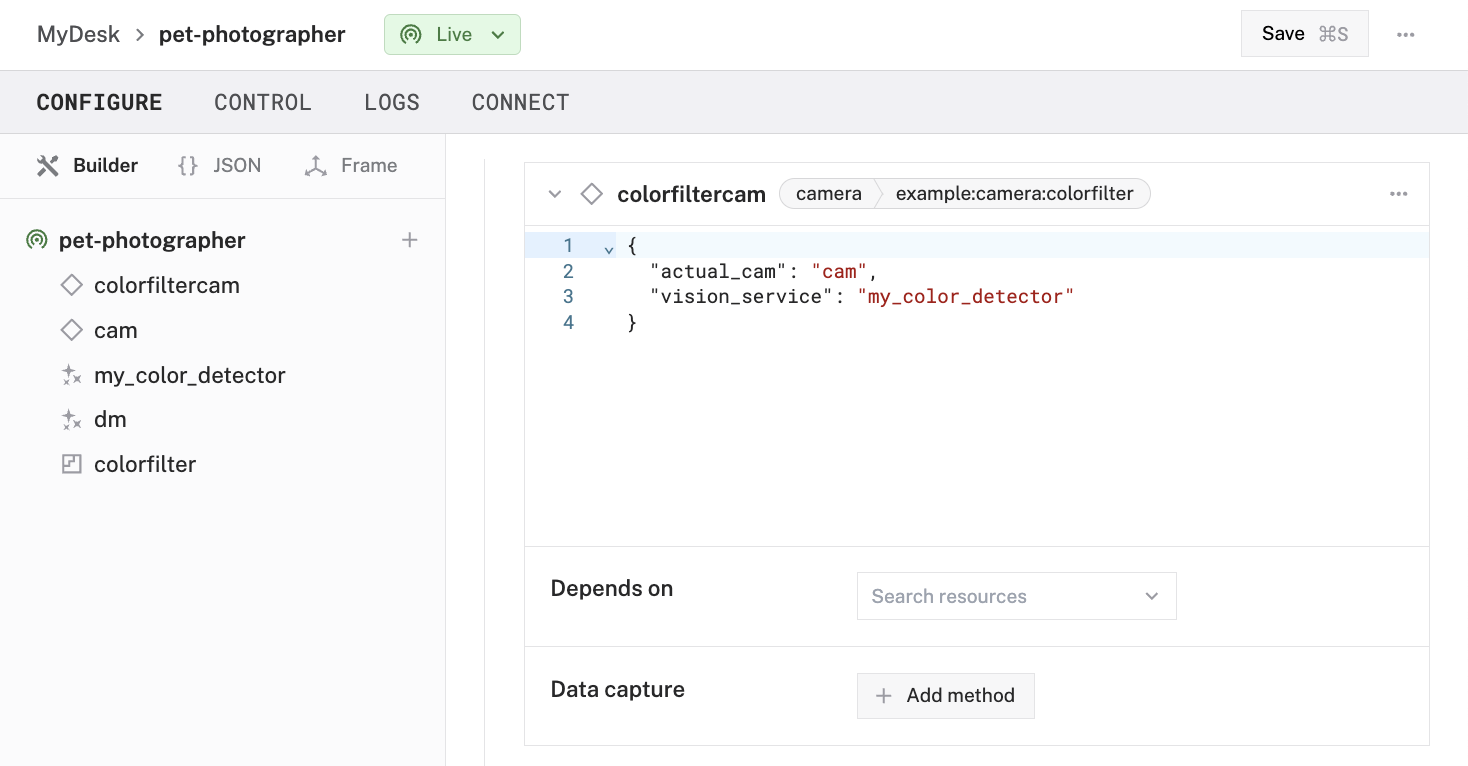


Configure data capture
To add data capture for the color filter camera:
Click Add method in the Data capture section of your color filter camera component.
Toggle the Method dropdown menu, select GetImages, and set the Frequency of the capture to
0.1, which will configure the data management service to capture images from your camera once every 10 seconds.Click the MIME type dropdown and select
image/jpeg.Click Save in the top right corner of the screen.

Test your color filter camera
To test that your color filter camera is capturing and filtering images properly, navigate to the CONTROL tab on your machine’s page.
On the colorfiltercam panel, toggle View colorfiltercam to view your camera’s live feed. Test the filter by positioning your smart machine so that it captures an image of your pet wearing its collar. Then examine the DATA tab to confirm that only pictures containing your pet wearing their collar are stored.
For example, the following is the result of several dozen pictures of the same dog, but only those pictures where he is wearing the blue collar were captured and synced to the cloud:

Next steps
Your pet photographer is now set up. Place it in an area your pet frequently visits and don’t forget to attach the colored object to your pet.
Now you can follow similar steps and customize the code you’ve written to configure a sensor for detecting specific thresholds or filter out blurry images from your camera’s captures.
Try these other tutorials for more on working with the data management and vision services:


Was this page helpful?
Glad to hear it! If you have any other feedback please let us know:
We're sorry about that. To help us improve, please tell us what we can do better:
Thank you!