Build a Flutter App that Integrates with Viam
Flutter is Google’s user interface toolkit for building applications for mobile, web, and desktop from a single codebase. If you’re looking to monitor and control individual machines with the same functionality you have on the CONTROL tab, you can use the general-purpose Viam mobile app rather than creating your own. If you need custom functionality or a custom interface, you can use Viam’s Flutter SDK to build a custom app to interact with your machines that run on Viam.
This tutorial guides you through creating a mobile app that shows your machines and their components. As you work through this project you will learn the following:
- Flutter development basics
- How to trigger app behavior when a user presses a button
- The basics of using Viam’s Flutter SDK
Requirements
You do not need any hardware for this tutorial other than a computer capable of running viam-server.
This tutorial assumes you already have a machine configured.
Set up your Flutter development environment
This tutorial uses Visual Studio Code (VS Code) as the development environment (IDE), and uses the VS Code Flutter extension to generate sample project code. You can use a different editor, but it will be much easier to follow along using VS Code.
Platform compatibility
Flutter can compile and run on many different operating systems. For this tutorial, you will be developing for iOS. In other words, iOS is your development target.
You can always run your app on another platform later by configuring the code specific to that target.
Install Flutter
Install Flutter according to the Flutter documentation. Those instructions include installation of various tools and extensions for different development targets. For this walkthrough, you only need to install the following:
- Flutter SDK
- Visual Studio Code with the Flutter extension
- Xcode, which is required for developing for iOS
- When prompted, do install Cocoapods. You need it to support the iOS simulator.
Flutter version
We recommend using Flutter 3.19.6, as this sample app was tested with this version.
fvm is a useful tool for targeting specific flutter versions.
You can run fvm use 3.19.6 in the terminal before building your sample app to target Flutter 3.19.6.
Start creating code
Create your Flutter project
Launch VS Code. Open the command palette by pressing
Ctrl+Shift+PorShift+Cmd+P, depending on your system.Start typing “flutter new.” Click the Flutter: New Project command when it populates.

- Click Application, then choose a folder in which to create your project.
- Give your project a name, for example,
smart_machine_app . Naming itsmart_machine_app will make it slightly easier to follow along in later steps.

When you hit Enter, Flutter auto-generates a project folder with a useful starter project. VS Code automatically opens it.
If you don’t change any of the code files, you’ll have a counter app with a button that adds one to the total each time you press it. That’s not going to be very helpful for interacting with your fleet of machines, so in the next steps, you’ll edit three of these automatically-created files to start building out a Viam-integrated app.
Edit the YAML configuration files
In the VS Code file explorer, find and open the
pubspec.yaml file. This file specifies your app’s metadata including its current version and dependencies.Delete the contents of your
pubspec.yaml file and replace them with the following configuration which, among others, specifies theviam_sdkas a dependency for your project:name: smart_machine_app description: "A Flutter app that integrates with Viam." publish_to: "none" # Remove this line if you wish to publish to pub.dev version: 1.0.0+1 environment: sdk: ">=3.2.3 <4.0.0" dependencies: flutter: sdk: flutter flutter_dotenv: ^5.1.0 image: ^4.0.17 cupertino_icons: ^1.0.2 viam_sdk: ^0.0.20 dev_dependencies: flutter_test: sdk: flutter flutter_lints: ^2.0.0 flutter: uses-material-design: trueNote
If you named your app something other than
smart_machine_app, change thenamevalue in the first line of thepubspec.yaml file to the name you gave your app during setup.Next, open the
analysis_options.yaml configuration file. This file specifies how strictly Flutter should enforce best practices in your code when it checks for things like syntax errors. For this tutorial, you will use a less strict analyzer configuration to start, but you can always tune this later. If you later publish an actual production app, you will likely want to increase the strictness of the analyzer before sharing your app with others.Replace the contents of the
analysis_options.yaml file with the following:include: package:flutter_lints/flutter.yaml linter: rules: avoid_print: false prefer_const_constructors_in_immutables: false prefer_const_constructors: false prefer_const_literals_to_create_immutables: false prefer_final_fields: false unnecessary_breaks: true use_key_in_widget_constructors: false
Configure iOS-specific code
Now you’ll update some configurations in the iOS-specific code to support the Viam Flutter SDK.
Open
ios/Podfile . If Podfile does not exist in that directory, generate it by runningflutter pub getin the root directory of your app. If theflutter pub getcommand returns an error, you may need to upgrade the Flutter SDK.At the top of the file you will see the following lines:
# Uncomment this line to define a global platform for your project
# platform :ios, '11.0'
Uncomment the line and change it to use version 17.0:
# Uncomment this line to define a global platform for your project
platform :ios, '13.0'
Open
ios/Runner/Info.plist . It will look something like this: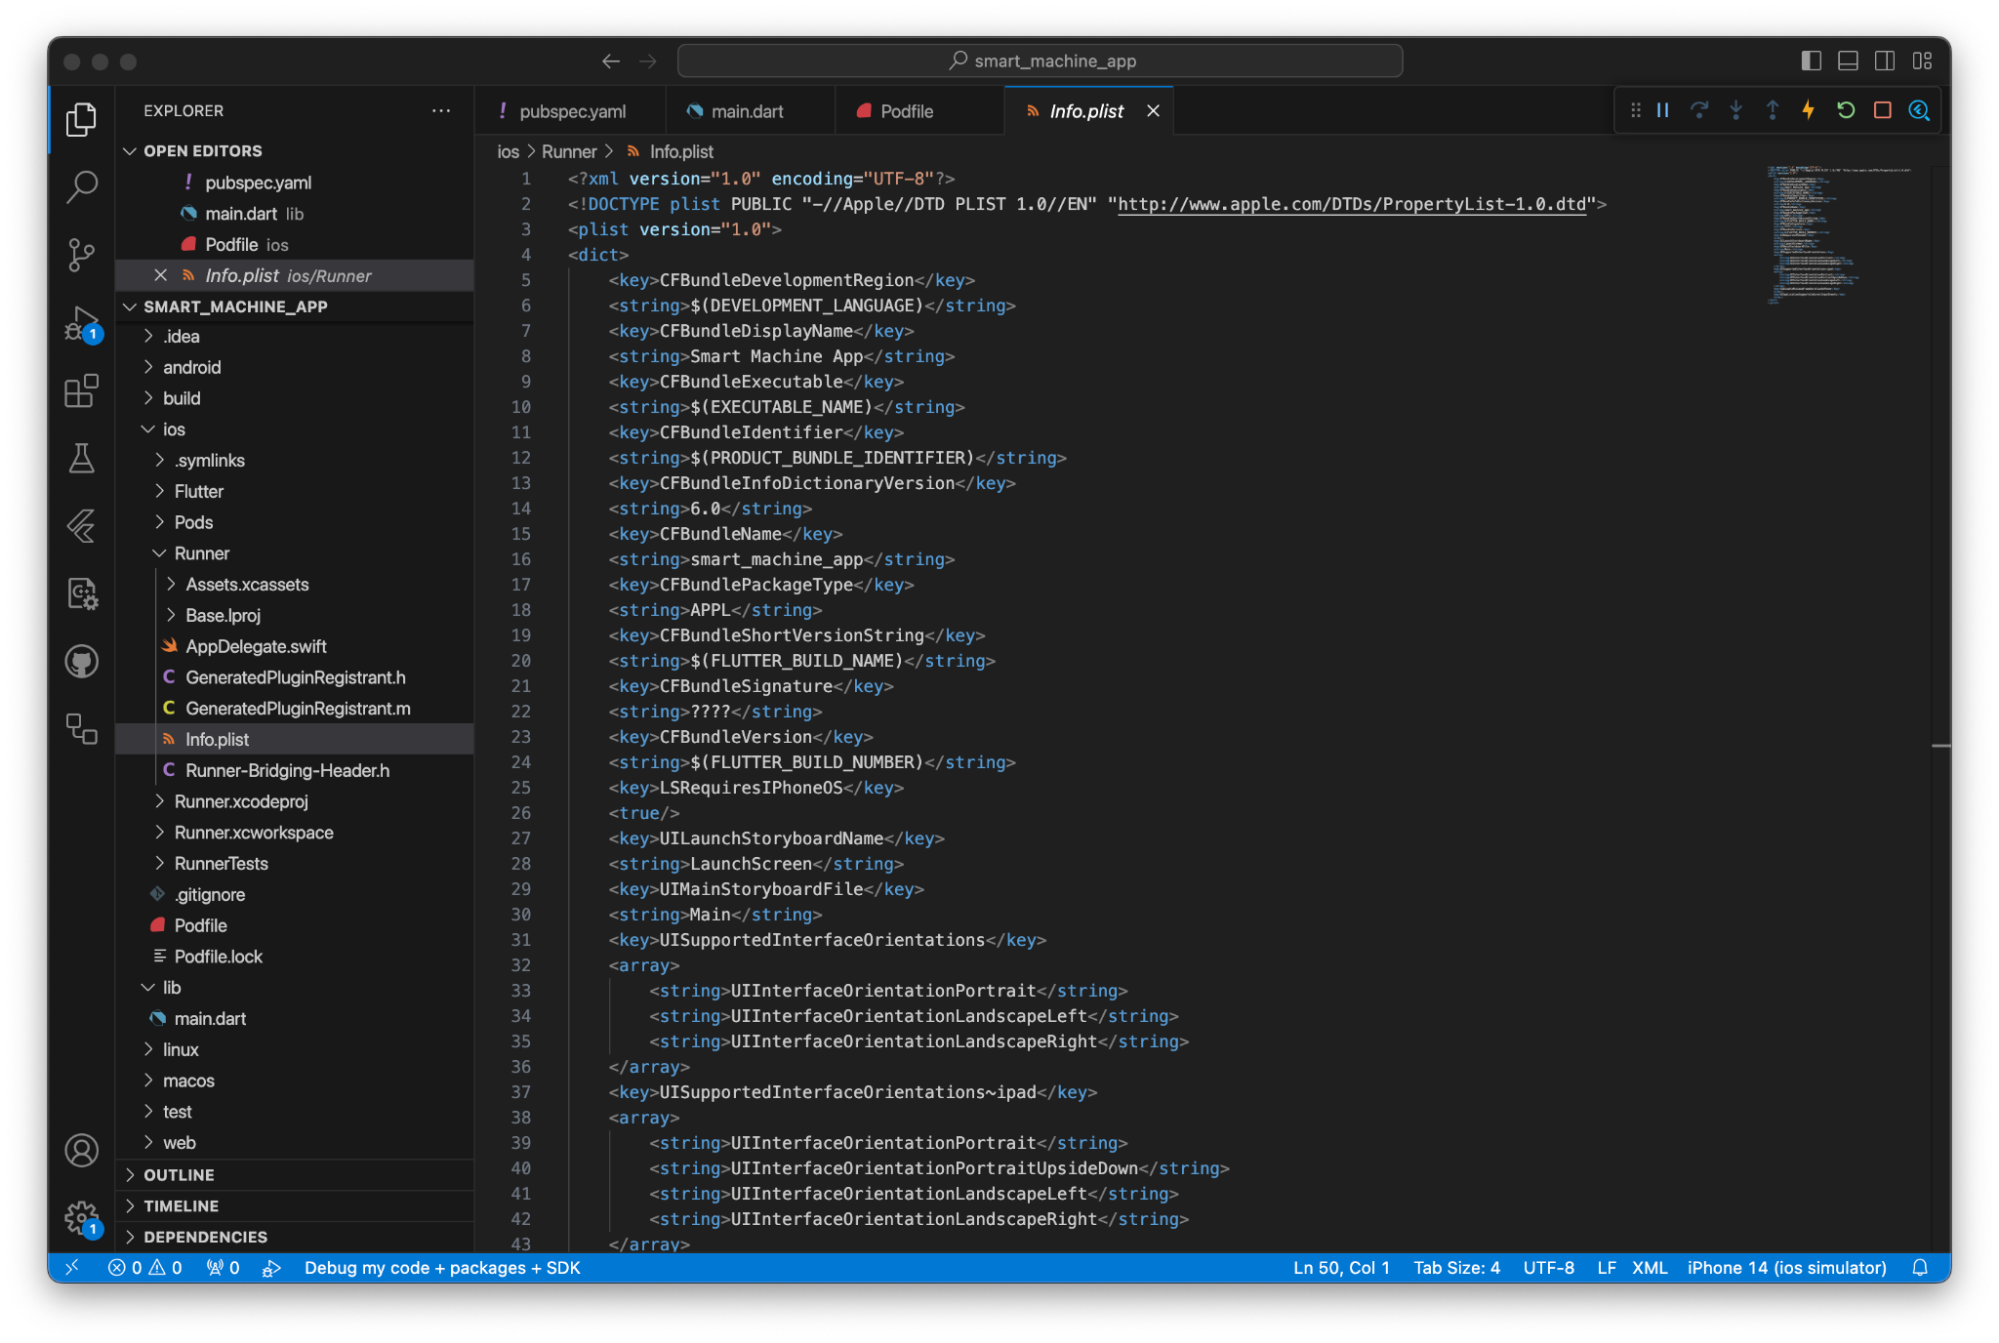
Insert the following code into the first line after the
<dict>. These lines are required to establish WebRTC and local device mDNS connections.<key>NSLocalNetworkUsageDescription</key> <string>Smart Machine App requires access to your device's local network to connect to your devices.</string> <key>NSBonjourServices</key> <array> <string>_rpc._tcp</string> </array>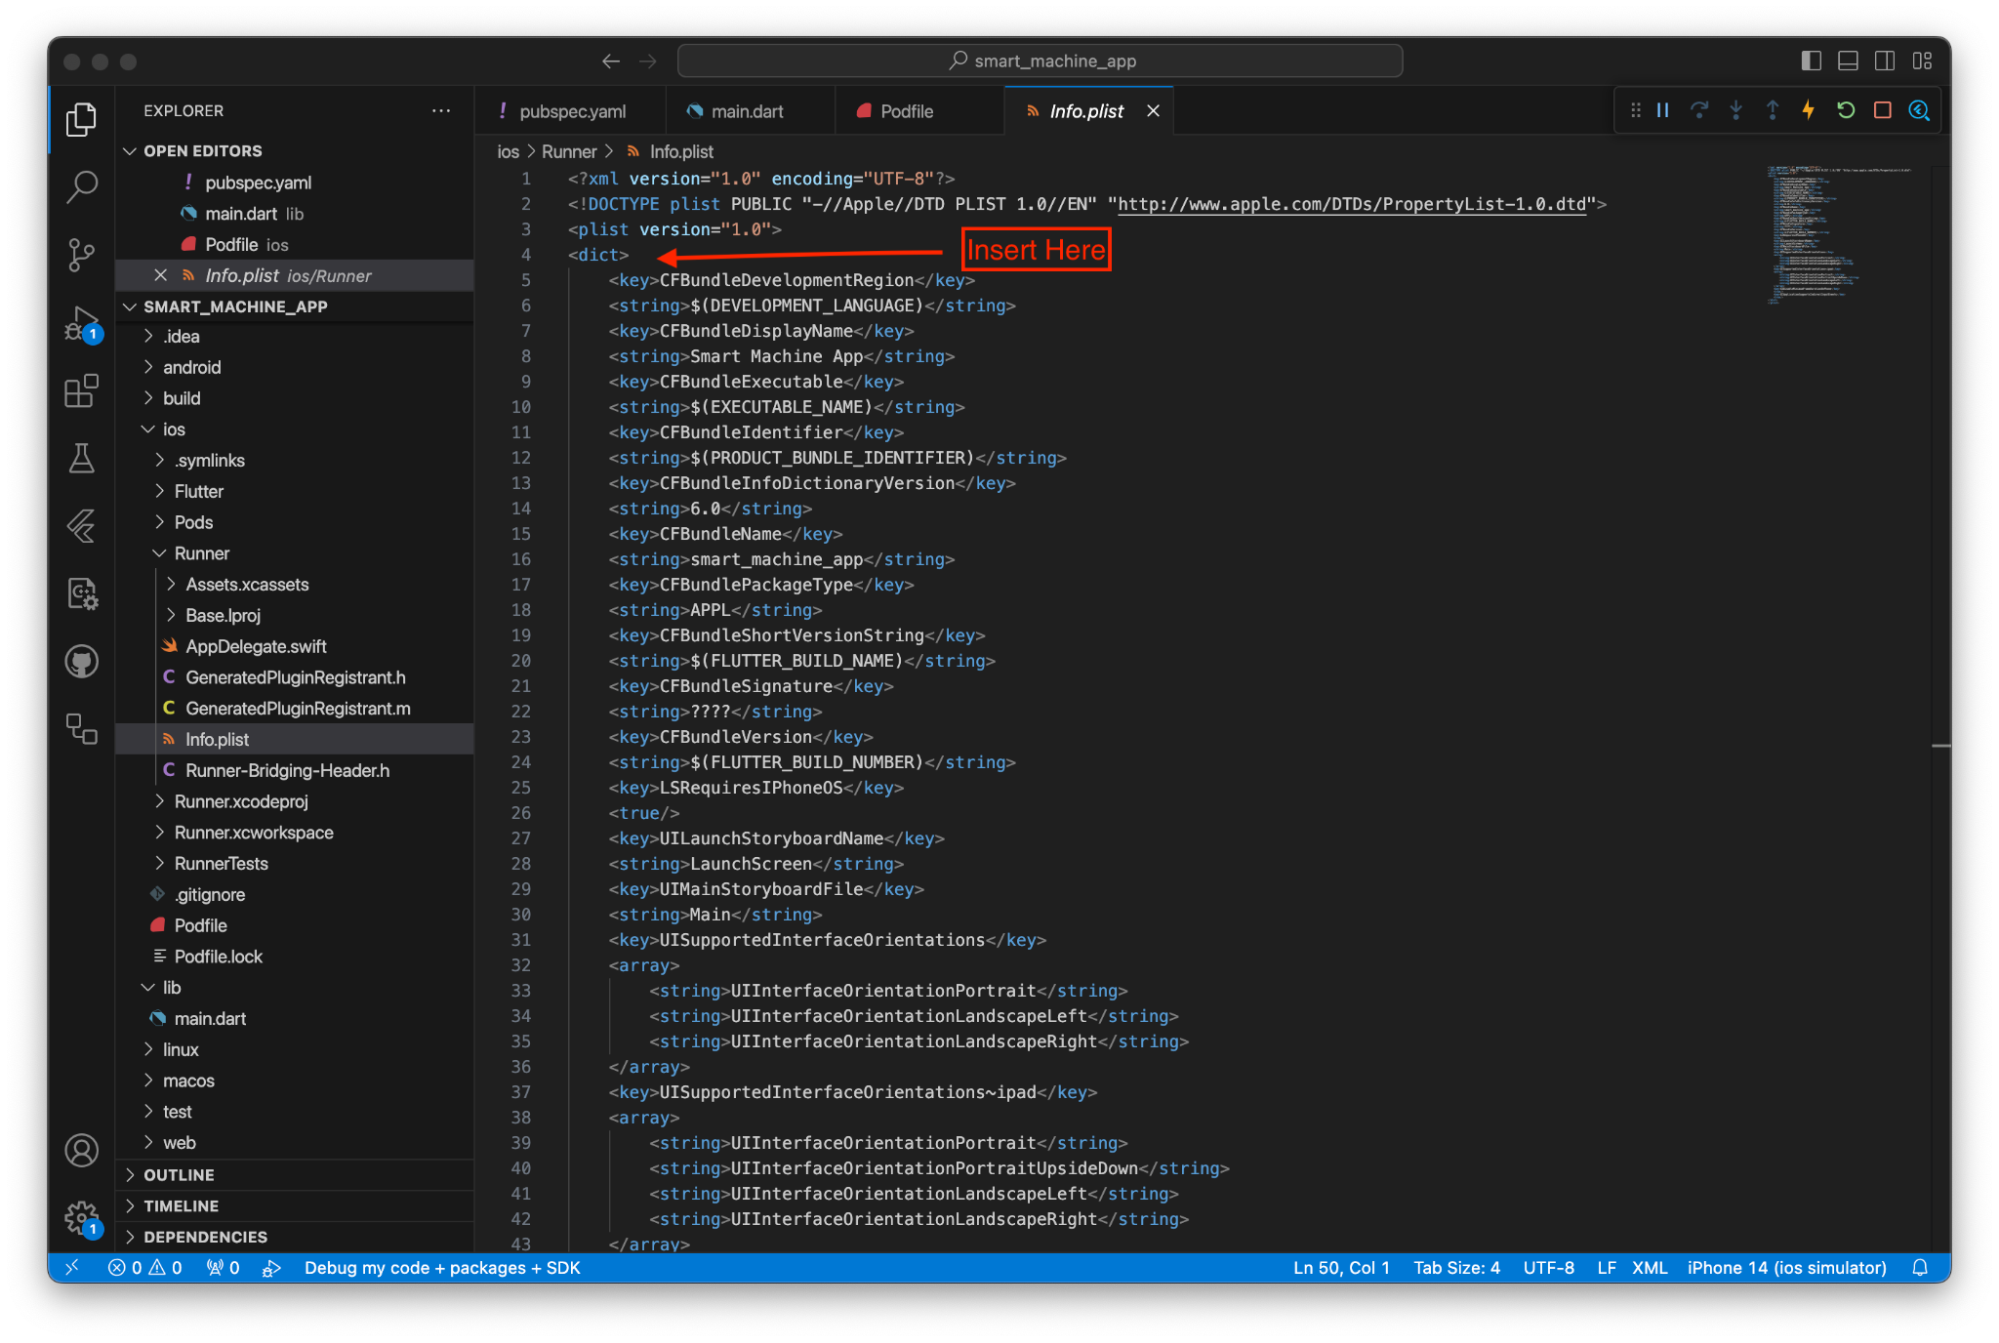
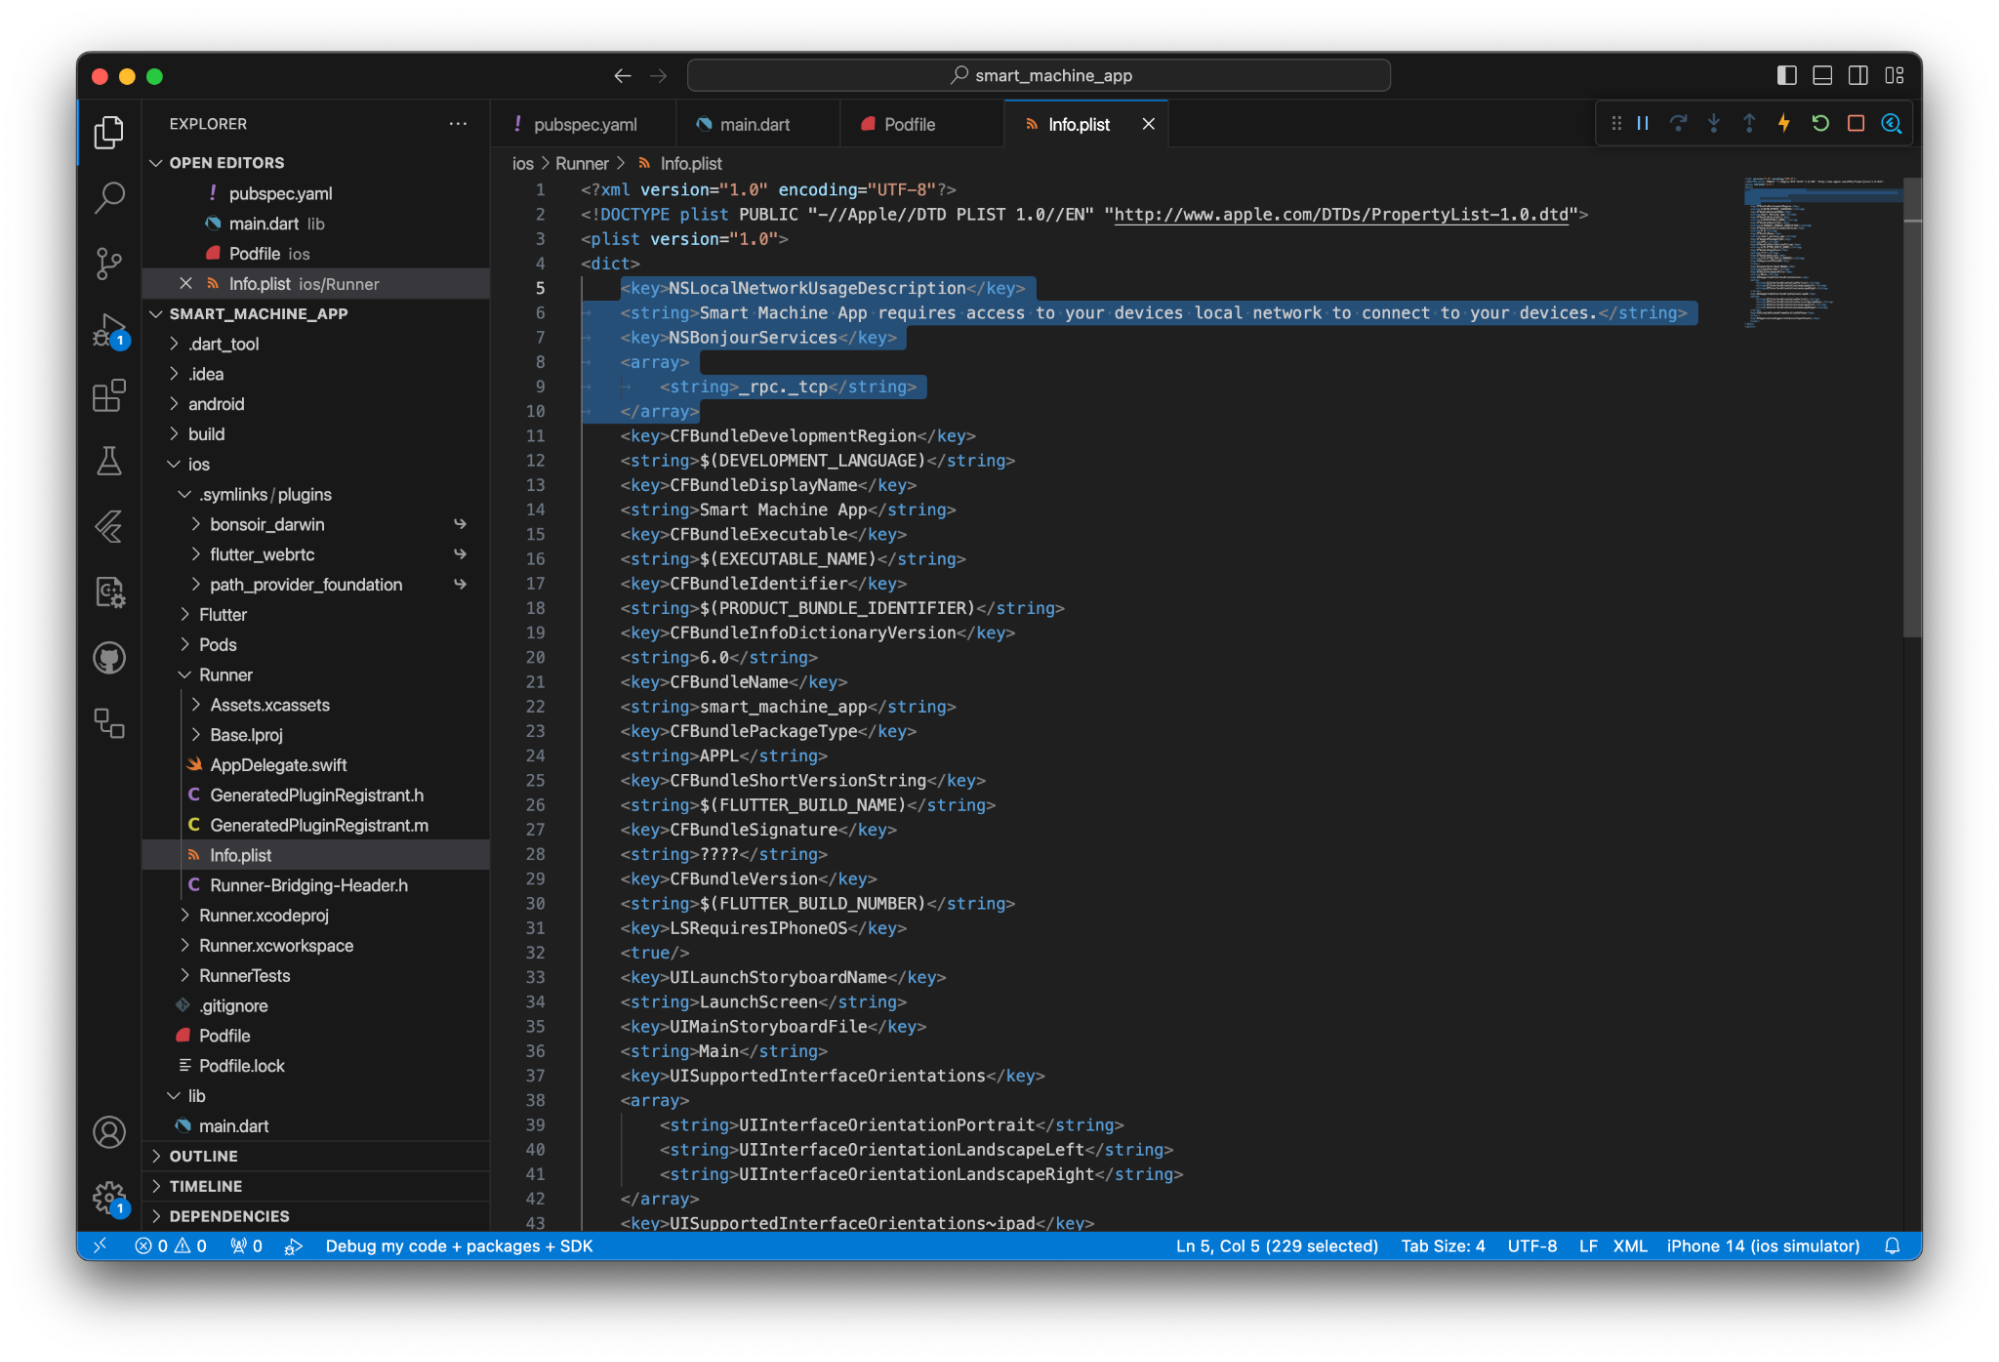
The file should now look like the following:


Edit the main file
Open the
lib/main.dart file.Replace the contents of this file with the following code, which creates the scaffold of your app’s login screen:
import 'package:flutter/material.dart';
import 'package:flutter_dotenv/flutter_dotenv.dart';

void main() async {
   // await dotenv.load(); // <-- This loads your API key; will un-comment later
   runApp(MyApp());
}

class MyApp extends StatelessWidget {
  const MyApp({super.key});

  @override
  Widget build(BuildContext context) {
    return MaterialApp(
      title: 'Smart Machine App',
      theme: ThemeData(
        colorScheme: ColorScheme.fromSeed(seedColor: Colors.purple),
      ),
      home: MyHomePage(),
    );
  }
}

class MyHomePage extends StatelessWidget {
  @override
  Widget build(BuildContext context) {
    return Scaffold(
      body: Center(
        child: Column(
          mainAxisAlignment: MainAxisAlignment.center,
          children: [
            Text('Smart Machine App'),
            SizedBox(height: 16),
            ElevatedButton(onPressed: null, child: Text('Login')),
          ],
        ),
      ),
    );
  }
}
If you chose a name other than
Smart Machine Appfor your project, edit lines 15 and 32 with your own app title.
Launch the app
You now have enough of your new app coded to be able to build and test a rendering of it.
Follow the steps below to build and preview the current state of your app.
Open
lib/main.dart . In the bottom right corner of VS Code, find the button that shows the current target device. Click the button to change your target device. Make sure that you have your target device selected before you continue.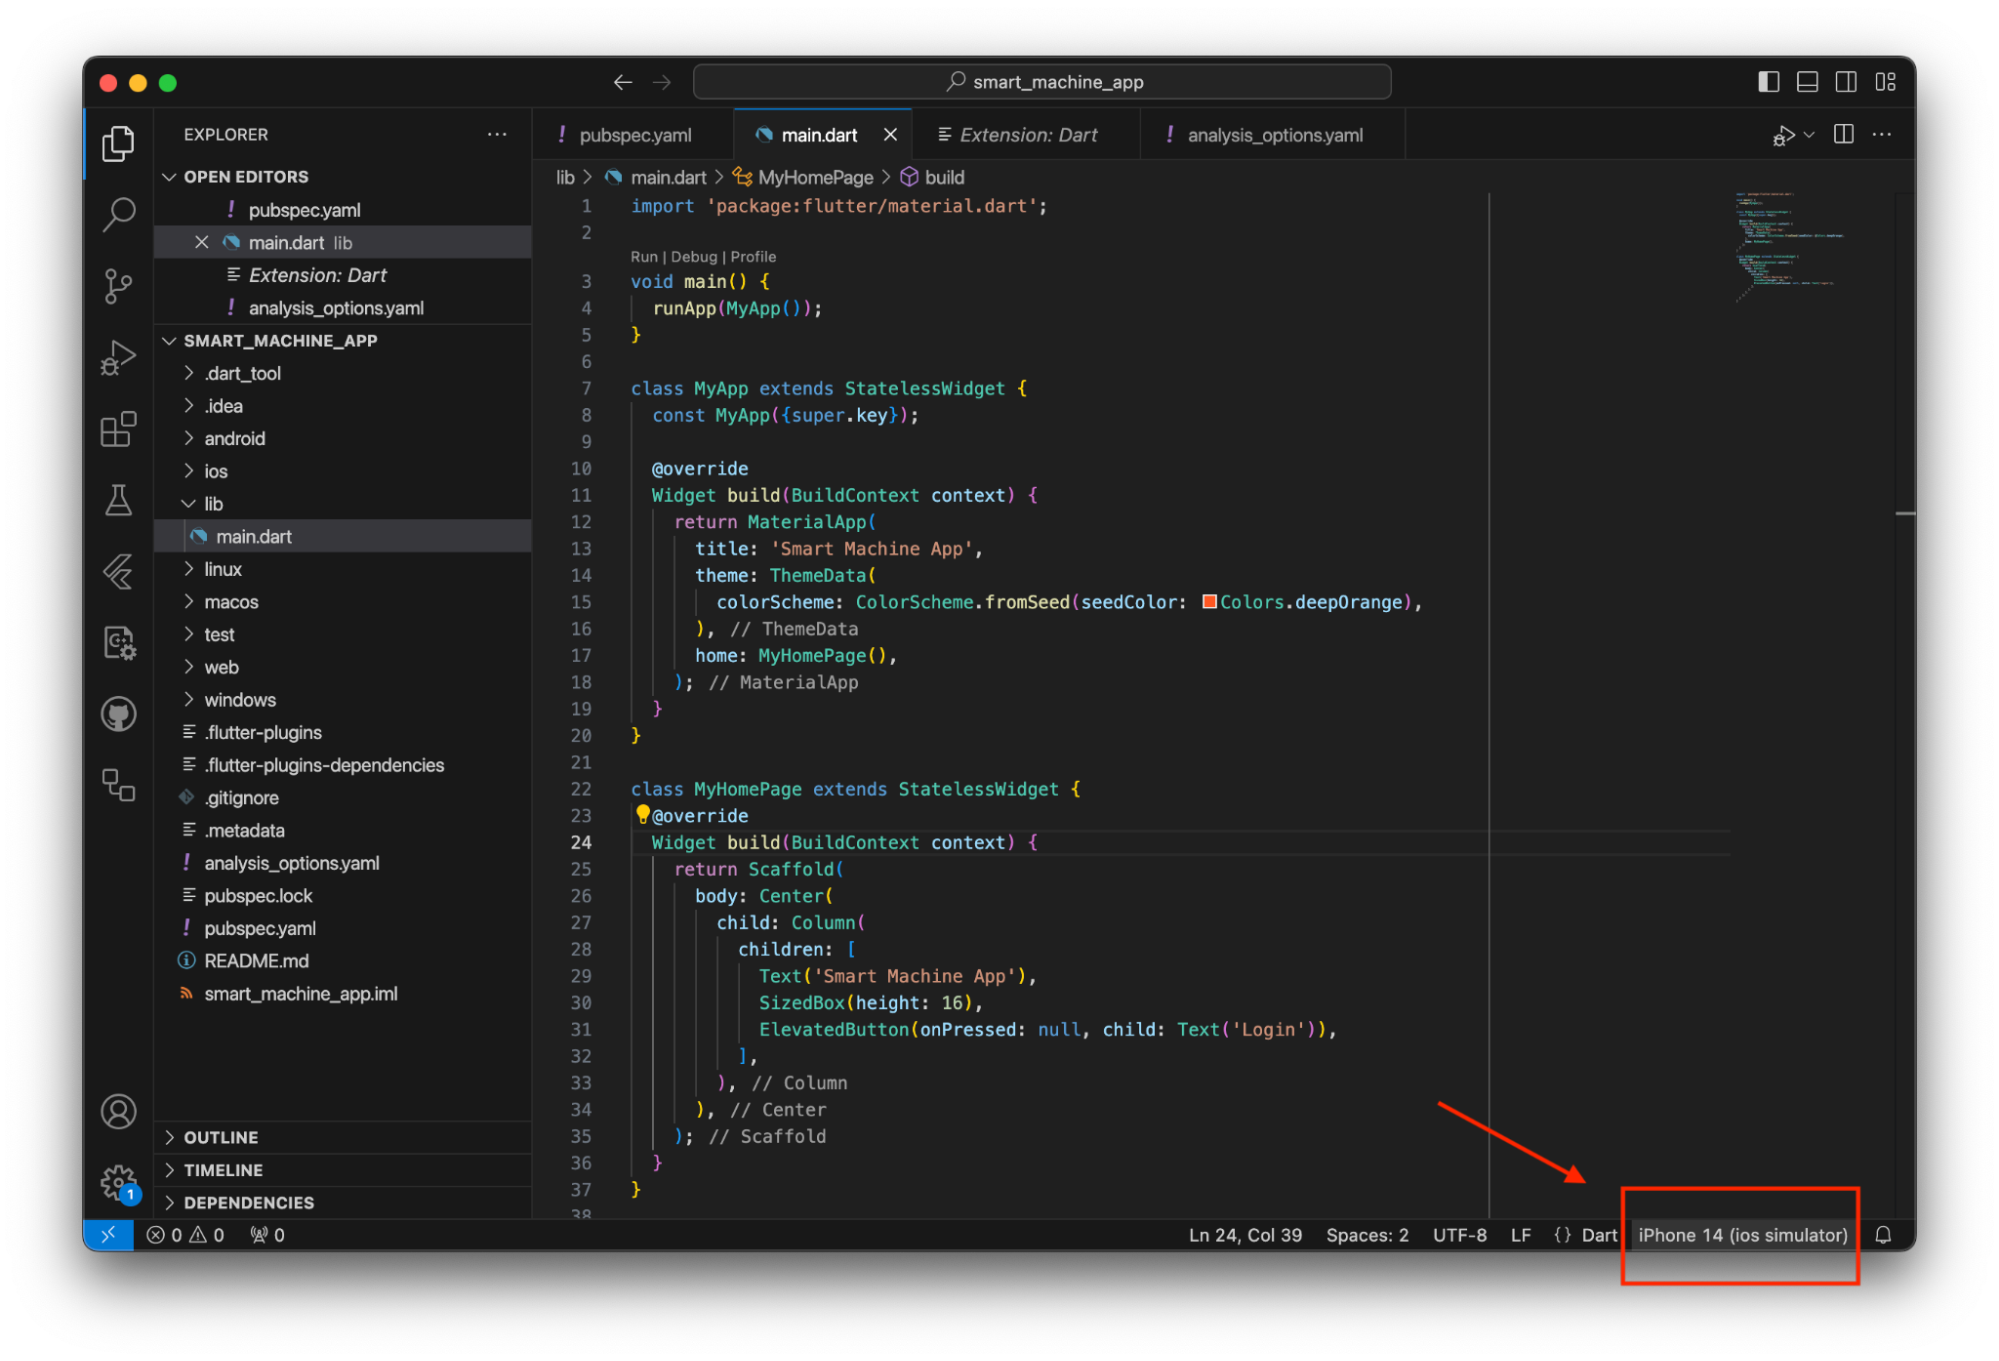
With
lib/main.dart still open, find the “Start Debugging” button in the upper right corner of the VS Code window. Click the button to build and render your app.
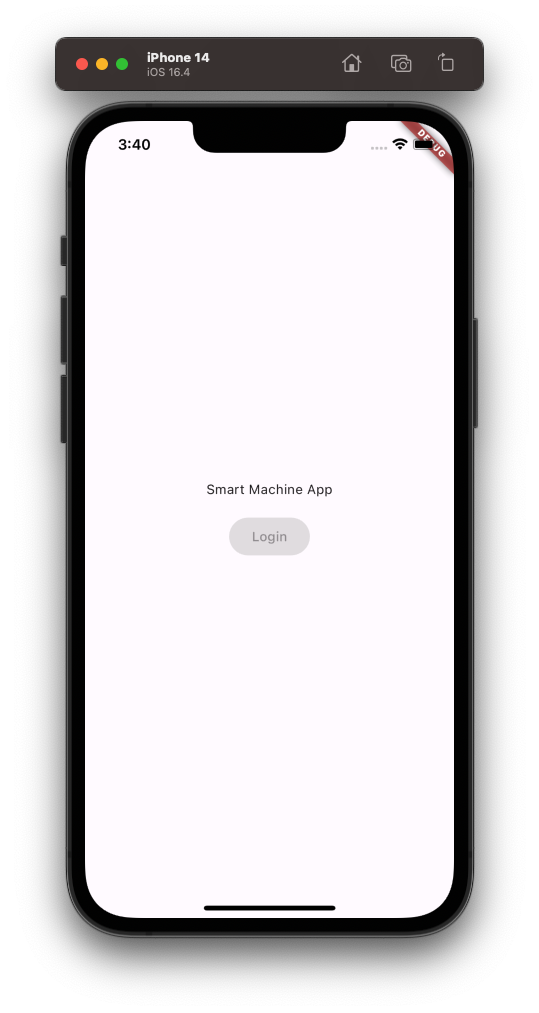
A window should open up, displaying a rendering of your smart machine app:


Add app navigation
Add a new screen
Great work so far! Your app is successfully running, with a single screen and an inactive button. Next, you will add a new screen that pulls in some information from your organization. This new screen will be accessed from the login button.
In the VS Code file explorer on the left-hand side, right click
Paste the following code into the
import 'package:flutter/material.dart';
import 'package:flutter_dotenv/flutter_dotenv.dart';
import 'package:viam_sdk/protos/app/app.dart';
import 'package:viam_sdk/viam_sdk.dart';

class HomeScreen extends StatefulWidget {
  const HomeScreen({super.key});

  @override
  State<HomeScreen> createState() => _HomeScreenState();
}

class _HomeScreenState extends State<HomeScreen> {
  late Viam _viam;
  late Organization _organization;
  List<Location> _locations = [];
  bool _loading = true;

  @override
  void initState() {
    _getData();
    super.initState();
  }

  void _getData() async {
    try {
      _viam = await Viam.withApiKey(dotenv.env['API_KEY_ID']?? '', dotenv.env['API_KEY']?? '');
      _organization = (await _viam.appClient.listOrganizations()).first;
      _locations = await _viam.appClient.listLocations(_organization.id);

      // in Flutter, setState tells the UI to rebuild the widgets whose state has changed,
      // this is how you change from showing a loading screen to a list of values
      setState(() {
        _loading = false;
      });
    } catch (e) {
      print(e);
    }
  }

  /// This method will navigate to a specific [Location].
  void _navigateToLocation(Location location) {
    // Navigator.of(context)
    //     .push(MaterialPageRoute(builder: (_) => LocationScreen(_viam, location)));
  }

  @override
  Widget build(BuildContext context) {
    return Scaffold(
      appBar: AppBar(title: const Text('Locations')),
      // If the list is loading, show a loading indicator.
      // Otherwise, show a list of [Locations]s.
      body: _loading
          ? Center(
              child: const CircularProgressIndicator.adaptive(),
            )
          : // Build a list from the [_locations] state.
          ListView.builder(
              itemCount: _locations.length,
              itemBuilder: (_, index) {
                final location = _locations[index];
                return ListTile(
                  title: Text(location.name),
                  onTap: () => _navigateToLocation(location),
                  trailing: const Icon(Icons.chevron_right),
                );
              },
            ),
    );
  }
}
Get the Viam API key
Notice in the file the following line:
_viam = await Viam.withApiKey(dotenv.env['API_KEY_ID']?? '', dotenv.env['API_KEY']?? '');
This line in the code defines how your Flutter app authenticates to the Viam platform, by referencing two environment variables that together comprise your Viam API key.
Follow the steps below to get your API key and create an environment variables file to store them in:
In your project folder, create a file to store your API keys. Name it
.env . Copy and paste these two lines into the file:API_KEY_ID="PASTE YOUR API KEY ID HERE" API_KEY="PASTE YOUR API KEY HERE"Log into Viam.
Click the organization dropdown menu on the right side of the top banner. If you’re not already in the organization you want to connect to, click the correct organization name to navigate to it.
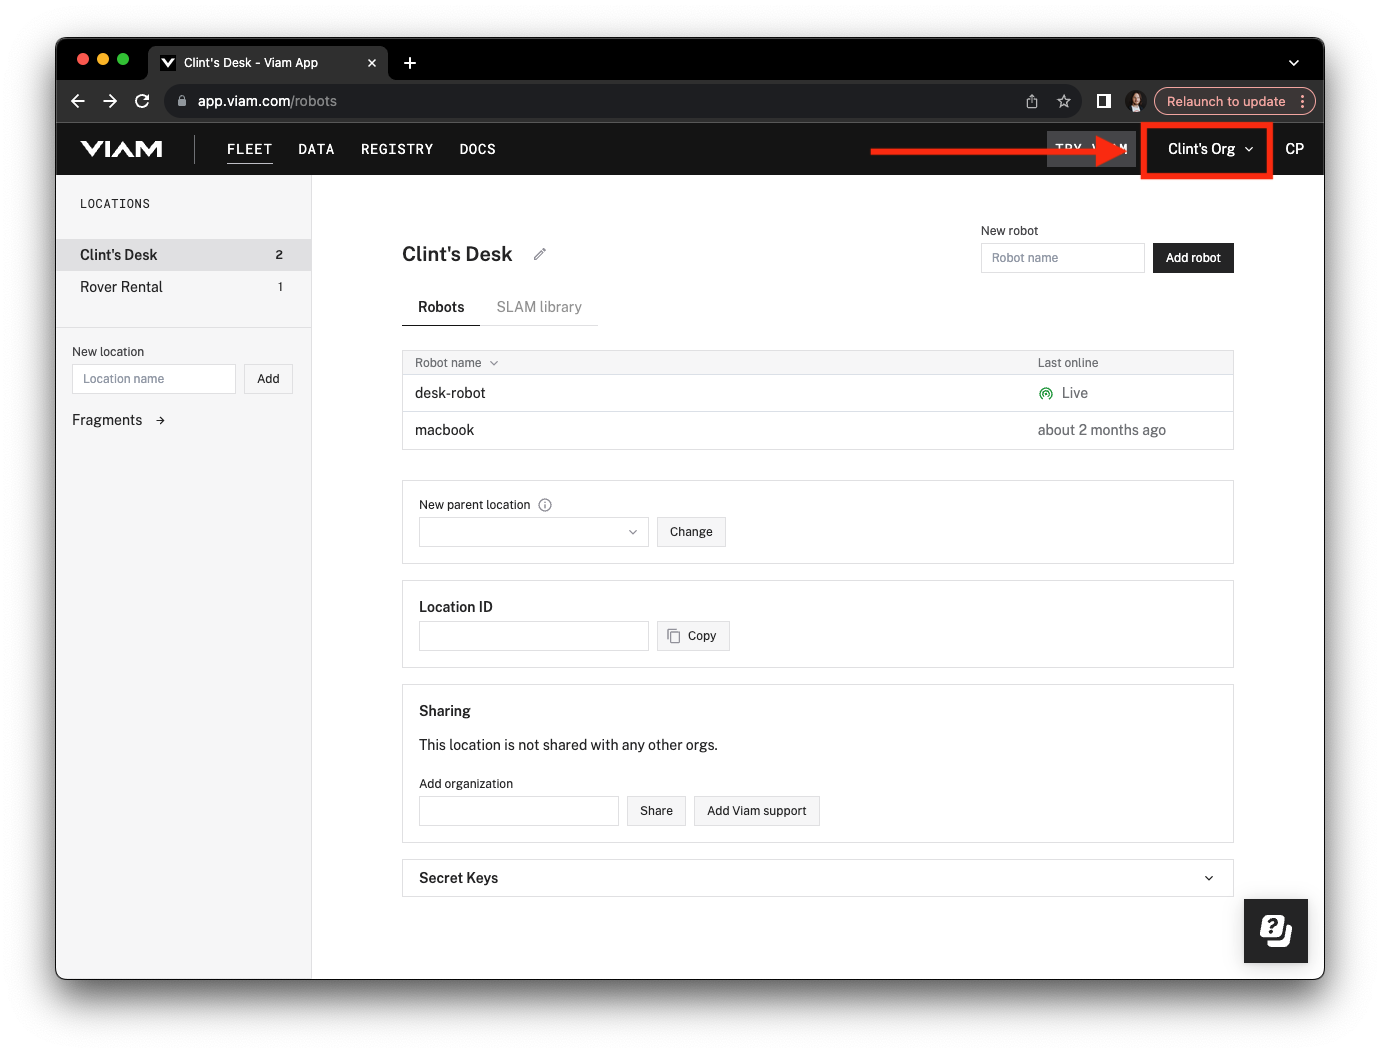
Click the organization dropdown menu again and click Settings.
Scroll to the API Keys section. You can find and use an existing API key for your smart machine, or you can create a new one for this application. To create a new one:
- Click Generate key.
- Give the key a name like “flutter-app-my-org-name.”
- Click the Entity dropdown and select your organization.
- Set Role to Owner.
- Click Generate key.
- Find your new key at the bottom of the list.
Use the copy buttons next to the API key ID and API key to copy each of them and paste them into your
.env file.

Caution: Keep your API key safe
We strongly recommend that you add your API key as an environment variable. Anyone with your API key can access your machine, and the computer running your machine.
In your
lib/main.dart , find line 5:void main() async { // await dotenv.load(); // <-- This loads your API key; will un-comment later runApp(MyApp()); }Now that you have a
.env file to load, un-comment that line so it loads the file. Yourmain()function should look like this:void main() async { await dotenv.load(); // <-- This loads your API key runApp(MyApp()); }Reopen your
pubspec.yaml file and paste the following two lines at the end of it, inside theflutter:section. Listing the.env among your app’s assets lets the app access the file.assets: - .envThe last few lines of your
pubspec.yaml file should now look like this:flutter: uses-material-design: true assets: - .env
Connect the login button to the home screen
In VS Code, reopen
Add the following line to the imports at the top of the file:
import 'home_screen.dart';
Change ElevatedButton in the Column to the following:
            ElevatedButton(
                onPressed: () => Navigator.of(context)
                    .push(MaterialPageRoute(builder: (_) => HomeScreen())),
                child: Text('Login'),
            ),
Run the mobile application simulator again to see how your changes have taken effect. Now, when you tap the login button, the app uses the API key to get the list of locations in your organization. It displays the names of the locations on a new screen:
Add more screens
Add a location screen
At this point, you have an app that displays a list of locations, but nothing happens when you tap a location name. In this step you will add functionality so that tapping a location name brings you to the list of smart machines in that location.
In VS Code create a new file in the same folder as
Paste the following code into the file:
import 'package:flutter/material.dart';
import 'package:viam_sdk/protos/app/app.dart';
import 'package:viam_sdk/viam_sdk.dart';

import 'robot_screen.dart';

class LocationScreen extends StatefulWidget {
  /// The authenticated Viam instance.
  /// See previous screens for more details.
  final Viam _viam;

  /// The [Location] to show details for
  final Location location;

  const LocationScreen(this._viam, this.location, {super.key});

  @override
  State<LocationScreen> createState() => _LocationScreenState();
}

class _LocationScreenState extends State<LocationScreen> {
  /// Similar to previous screens, start with [_isLoading] to true.
  bool _isLoading = true;

  /// A list of [Robot]s available in this [Location].
  List<Robot> robots = [];

  @override
  void initState() {
    super.initState();
    // Call our own _initState method to initialize our state.
    _initState();
  }

  /// This method will get called when the widget initializes its state.
  /// It exists outside the overridden [initState] function since it's async.
  Future<void> _initState() async {
    // Using the authenticated [Viam] client received as a parameter,
    // you can obtain a list of smart machines (robots) within this location.
    final robots = await widget._viam.appClient.listRobots(widget.location.id);
    setState(() {
      // Once you have the list of robots, you can set the state.
      this.robots = robots;
      _isLoading = false;
    });
  }

  void _navigateToRobot(Robot robot) {
    Navigator.of(context).push(
        MaterialPageRoute(builder: (_) => RobotScreen(widget._viam, robot)));
  }

  @override
  Widget build(BuildContext context) {
    return Scaffold(
      appBar: AppBar(
        title: Text(widget.location.name),
      ),
      // If the list is loading, show a loading indicator.
      // Otherwise, show a list of [Robot]s.
      body: _isLoading
          ? const CircularProgressIndicator.adaptive()
          : // Build a list from the [locations] state.
          ListView.builder(
              itemCount: robots.length,
              itemBuilder: (_, index) {
                final robot = robots[index];
                return ListTile(
                  title: Text(robot.name),
                  onTap: () => _navigateToRobot(robot),
                  trailing: const Icon(Icons.chevron_right),
                );
              }),
    );
  }
}
Add a robot screen
Create a new file named
/// This is the screen that shows the resources available on a robot (or smart machine).
/// It takes in a Viam app client instance, as well as a robot client.
/// It then uses the Viam client instance to create a connection to that robot client.
/// Once the connection is established, you can view the resources available
/// and send commands to them.

import 'package:flutter/material.dart';
import 'package:viam_sdk/protos/app/app.dart';
import 'package:viam_sdk/viam_sdk.dart';

class RobotScreen extends StatefulWidget {
  final Viam _viam;
  final Robot robot;

  const RobotScreen(this._viam, this.robot, {super.key});

  @override
  State<RobotScreen> createState() => _RobotScreenState();
}

class _RobotScreenState extends State<RobotScreen> {
  /// Similar to previous screens, start with [_isLoading] to true.
  bool _isLoading = true;

  /// This is the [RobotClient], which allows you to access
  /// all the resources of a Viam Smart Machine.
  /// This differs from the [Robot] provided to us in the widget constructor
  /// in that the [RobotClient] contains a direct connection to the Smart Machine
  /// and its resources. The [Robot] object simply contains information about
  /// the Smart Machine, but is not actually connected to the machine itself.
  ///
  /// This is initialized late because it requires an asynchronous
  /// network call to establish the connection.
  late RobotClient client;

  @override
  void initState() {
    super.initState();
    // Call our own _initState method to initialize our state.
    _initState();
  }

  @override
  void dispose() {
    // You should always close the [RobotClient] to free up resources.
    // Calling [RobotClient.close] will clean up any tasks and
    // resources created by Viam
    if (_isLoading == false) {
      client.close();
    }
    super.dispose();
  }

  /// This method will get called when the widget initializes its state.
  /// It exists outside the overridden [initState] function since it's async.
  Future<void> _initState() async {
    // Using the authenticated [Viam] the received as a parameter,
    // the app can obtain a connection to the Robot.
    // There is a helpful convenience method on the [Viam] instance for this.
    final robotClient = await widget._viam.getRobotClient(widget.robot);
    setState(() {
      client = robotClient;
      _isLoading = false;
    });
  }

  /// A computed variable that returns the available [ResourceName]s of
  /// this robot in an alphabetically sorted list.
  List<ResourceName> get _sortedResourceNames {
    return client.resourceNames..sort((a, b) => a.name.compareTo(b.name));
  }

  @override
  Widget build(BuildContext context) {
    return Scaffold(
        appBar: AppBar(title: Text(widget.robot.name)),
        body: _isLoading
            ? const Center(child: CircularProgressIndicator.adaptive())
            : ListView.builder(
                itemCount: client.resourceNames.length,
                itemBuilder: (_, index) {
                  final resourceName = _sortedResourceNames[index];
                  return ListTile(
                    title: Text(resourceName.name),
                    subtitle: Text(
                        '${resourceName.namespace}:${resourceName.type}:${resourceName.subtype}'),
                  );
                }));
  }
}
Connect the screens together
Now that you have the code for the screens in place, you can enable navigation between them.
Connect the home screen to the locations screen by un-commenting the following two lines in
 /// This method will navigate to a specific [Location]. <-- Leave this commented!
 void _navigateToLocation(Location location) {
    Navigator.of(context)                             // <-- Un-comment this
        .push(MaterialPageRoute(builder: (_) => LocationScreen(_viam, location))); // <-- And un-comment this
 }
Add the following import to the top of the file:
import 'location_screen.dart';
The whole
import 'package:flutter/material.dart';
import 'package:flutter_dotenv/flutter_dotenv.dart';
import 'package:viam_sdk/protos/app/app.dart';
import 'package:viam_sdk/viam_sdk.dart';

import 'location_screen.dart';          // <---- Added import

class HomeScreen extends StatefulWidget {
  const HomeScreen({super.key});

  @override
  State<HomeScreen> createState() => _HomeScreenState();
}

class _HomeScreenState extends State<HomeScreen> {

  late Viam _viam;
  late Organization _organization;
  List<Location> _locations = [];
  bool _loading = true;

  @override
  void initState() {
    _getData();
    super.initState();
  }

  void _getData() async {
    try {
      _viam = await Viam.withApiKey(dotenv.env['API_KEY_ID']?? '', dotenv.env['API_KEY']?? '');
      _organization = (await _viam.appClient.listOrganizations()).first;
      _locations = await _viam.appClient.listLocations(_organization.id);

      // In Flutter, setState tells the UI to rebuild the widgets whose state has changed,
      // this is how you change from showing a loading screen to a list of values
      setState(() {
        _loading = false;
      });
    } catch (e) {
      print(e);
    }
  }

  /// This method will navigate to a specific [Location].
  void _navigateToLocation(Location location) {
    Navigator.of(context).push(                                                                // <-- uncommented
        MaterialPageRoute(builder: (_) => LocationScreen(_viam, location)));
  }

  @override
  Widget build(BuildContext context) {
    return Scaffold(
        appBar: AppBar(title: const Text('Locations')),
        // If the list is loading, show a loading indicator.
        // Otherwise, show a list of [Locations]s.
        body: _loading
            ? Center(
                child: const CircularProgressIndicator.adaptive(),
              )
            : // Build a list from the [_locations] state.
            ListView.builder(
                itemCount: _locations.length,
                itemBuilder: (_, index) {
                  final location = _locations[index];
                  return ListTile(
                    title: Text(location.name),
                    onTap: () => _navigateToLocation(location),
                    trailing: const Icon(Icons.chevron_right),
                  );
                }));
  }
}
Try running your app. Now, when you tap a location, you’ll see a list of the smart machines in that location. When you tap one of them (if it is currently live), you’ll see a list of that machine’s resources:
Next steps
Nice work! You have successfully made a Flutter app integrated with Viam!
At this point you could customize the robot screen to have more functionality to control the machine or to show data from the robot in neat ways. The Viam Flutter SDK GitHub repo contains more example apps for your reference.
You can also stylize the look and feel of your app to match your brand. Look around the Flutter documentation to learn how.
If you’re planning to release your app for general use, you will need to add an authentication flow to your app instead of adding API keys as environment variables. If you need assistance with this, reach out to us on our Discord and we’ll be happy to help.
When you’re ready to publish your app to the app stores you can follow these articles from Flutter on the subject:
Was this page helpful?
Glad to hear it! If you have any other feedback please let us know:
We're sorry about that. To help us improve, please tell us what we can do better:
Thank you!