# Create a Modular Resource to Control a Rover like Intermode
Integrate an Intermode rover as a modular resource base component with CAN bus.
> Source: https://docs.viam.com/tutorials/custom/controlling-an-intermode-rover-canbus/ · Last updated: 2024-04-18
Viam supports most rovers with builtin models.
If your rover is not supported out of the box, this tutorial shows you how to add support for your rover or mobile robot.
To use a rover with the Viam platform, you have to [configure the rover's components](/tutorials/configure/configure-rover/).
One of the components you need to configure is called a [base](/reference/components/base/), which allows you to control a mobile robot using [commands](https://python.viam.dev/autoapi/viam/components/base/index.html#package-contents) like "move_straight", "spin", "set_velocity" and "stop".
You can think of the base component as an abstraction that coordinates the movement of the motors of your base for you so you can control the higher level object as a base.
For many robotic rovers you can use the [`wheeled`](/reference/components/base/wheeled/) base model.
Once you specify the circumference of the wheels and how far they are apart, you can then control your rover with the base component.
However, some rovers or other mobile robots do not expose direct motor control.
For these types of machines, this tutorial shows you how to create a [modular resource](/reference/glossary/#term-modular-resource)
.
Creating a modular resource for your robot allows you to issue commands using the same [`base` interface](/reference/apis/components/base/#api) as you would with builtin Viam components.
Once you have created the custom component, you can control both the Viam components and the modular resources using any of the [Viam SDKs](/reference/apis/).
Even if your modular resource is built in Golang, you can use the Python, C++, or any other Viam SDK to issue commands.
> **Tip:**
>
> You can follow the tutorial for any rover or mobile robot, but the tutorial will specifically use the [Intermode rover](https://www.intermode.io/) as an example for creating a modular resource to control your rover.
**Intermode** aims to make the hardware aspects of a mobile-robot-based business simple and worry-free.
This is a powerful pairing, since Viam simplifies the software aspects to revolutionize hardware.
The Intermode rover uses the [CAN bus](https://en.wikipedia.org/wiki/CAN_bus) protocol, a robust and prevalent vehicle communication standard used in most modern vehicles.
This tutorial shows you how to leverage this protocol and abstract it into the Viam base interface, so that your rover can be controlled securely from anywhere with the programming language of your choice.
## Hardware requirements
The tutorial uses the following hardware:
- Raspberry Pi with microSD card, with `viam-server` installed per [our Raspberry Pi setup guide](/reference/device-setup/rpi-setup/).
- [An Intermode rover](https://www.intermode.io/)
- [PiCAN 2 - Canbus interface for Raspberry Pi](https://copperhilltech.com/pican-2-can-bus-interface-for-raspberry-pi/)
- [12V to 5V Buck Converter](https://www.amazon.com/dp/B01M03288J)
- [USB-C Male Plug to Pigtail Cable](https://www.amazon.com/Type-C-Cable-10inch-22AWG-Pigtail/dp/B09C7SLHFP)
## Setup
### Machine setup
Before you can use Viam on your device, you must ensure it has a supported operating system.
See [Start a new machine](/set-up-a-machine/first-machine/) for platform requirements and instructions.
Add a new machine on [Viam](https://app.viam.com).
On the machine's page, follow the {{< glossary_tooltip term_id="setup" text="setup instructions" >}} to install `viam-server` on the computer you're using for your project.
Wait until your machine has successfully connected to Viam.
Next, install the PiCAN 2 driver software [following these instructions](https://copperhilltech.com/blog/pican2-pican3-and-picanm-driver-installation-for-raspberry-pi/).
> **Tip:**
>
> If you restart your Pi, you need to bring up the CAN interface again, as the above linked instructions do not set this process up to automatically start on system start.
### Hardware
> **Caution:**
>
> Always disconnect devices from power before plugging, unplugging or moving wires or otherwise modifying electrical circuits.
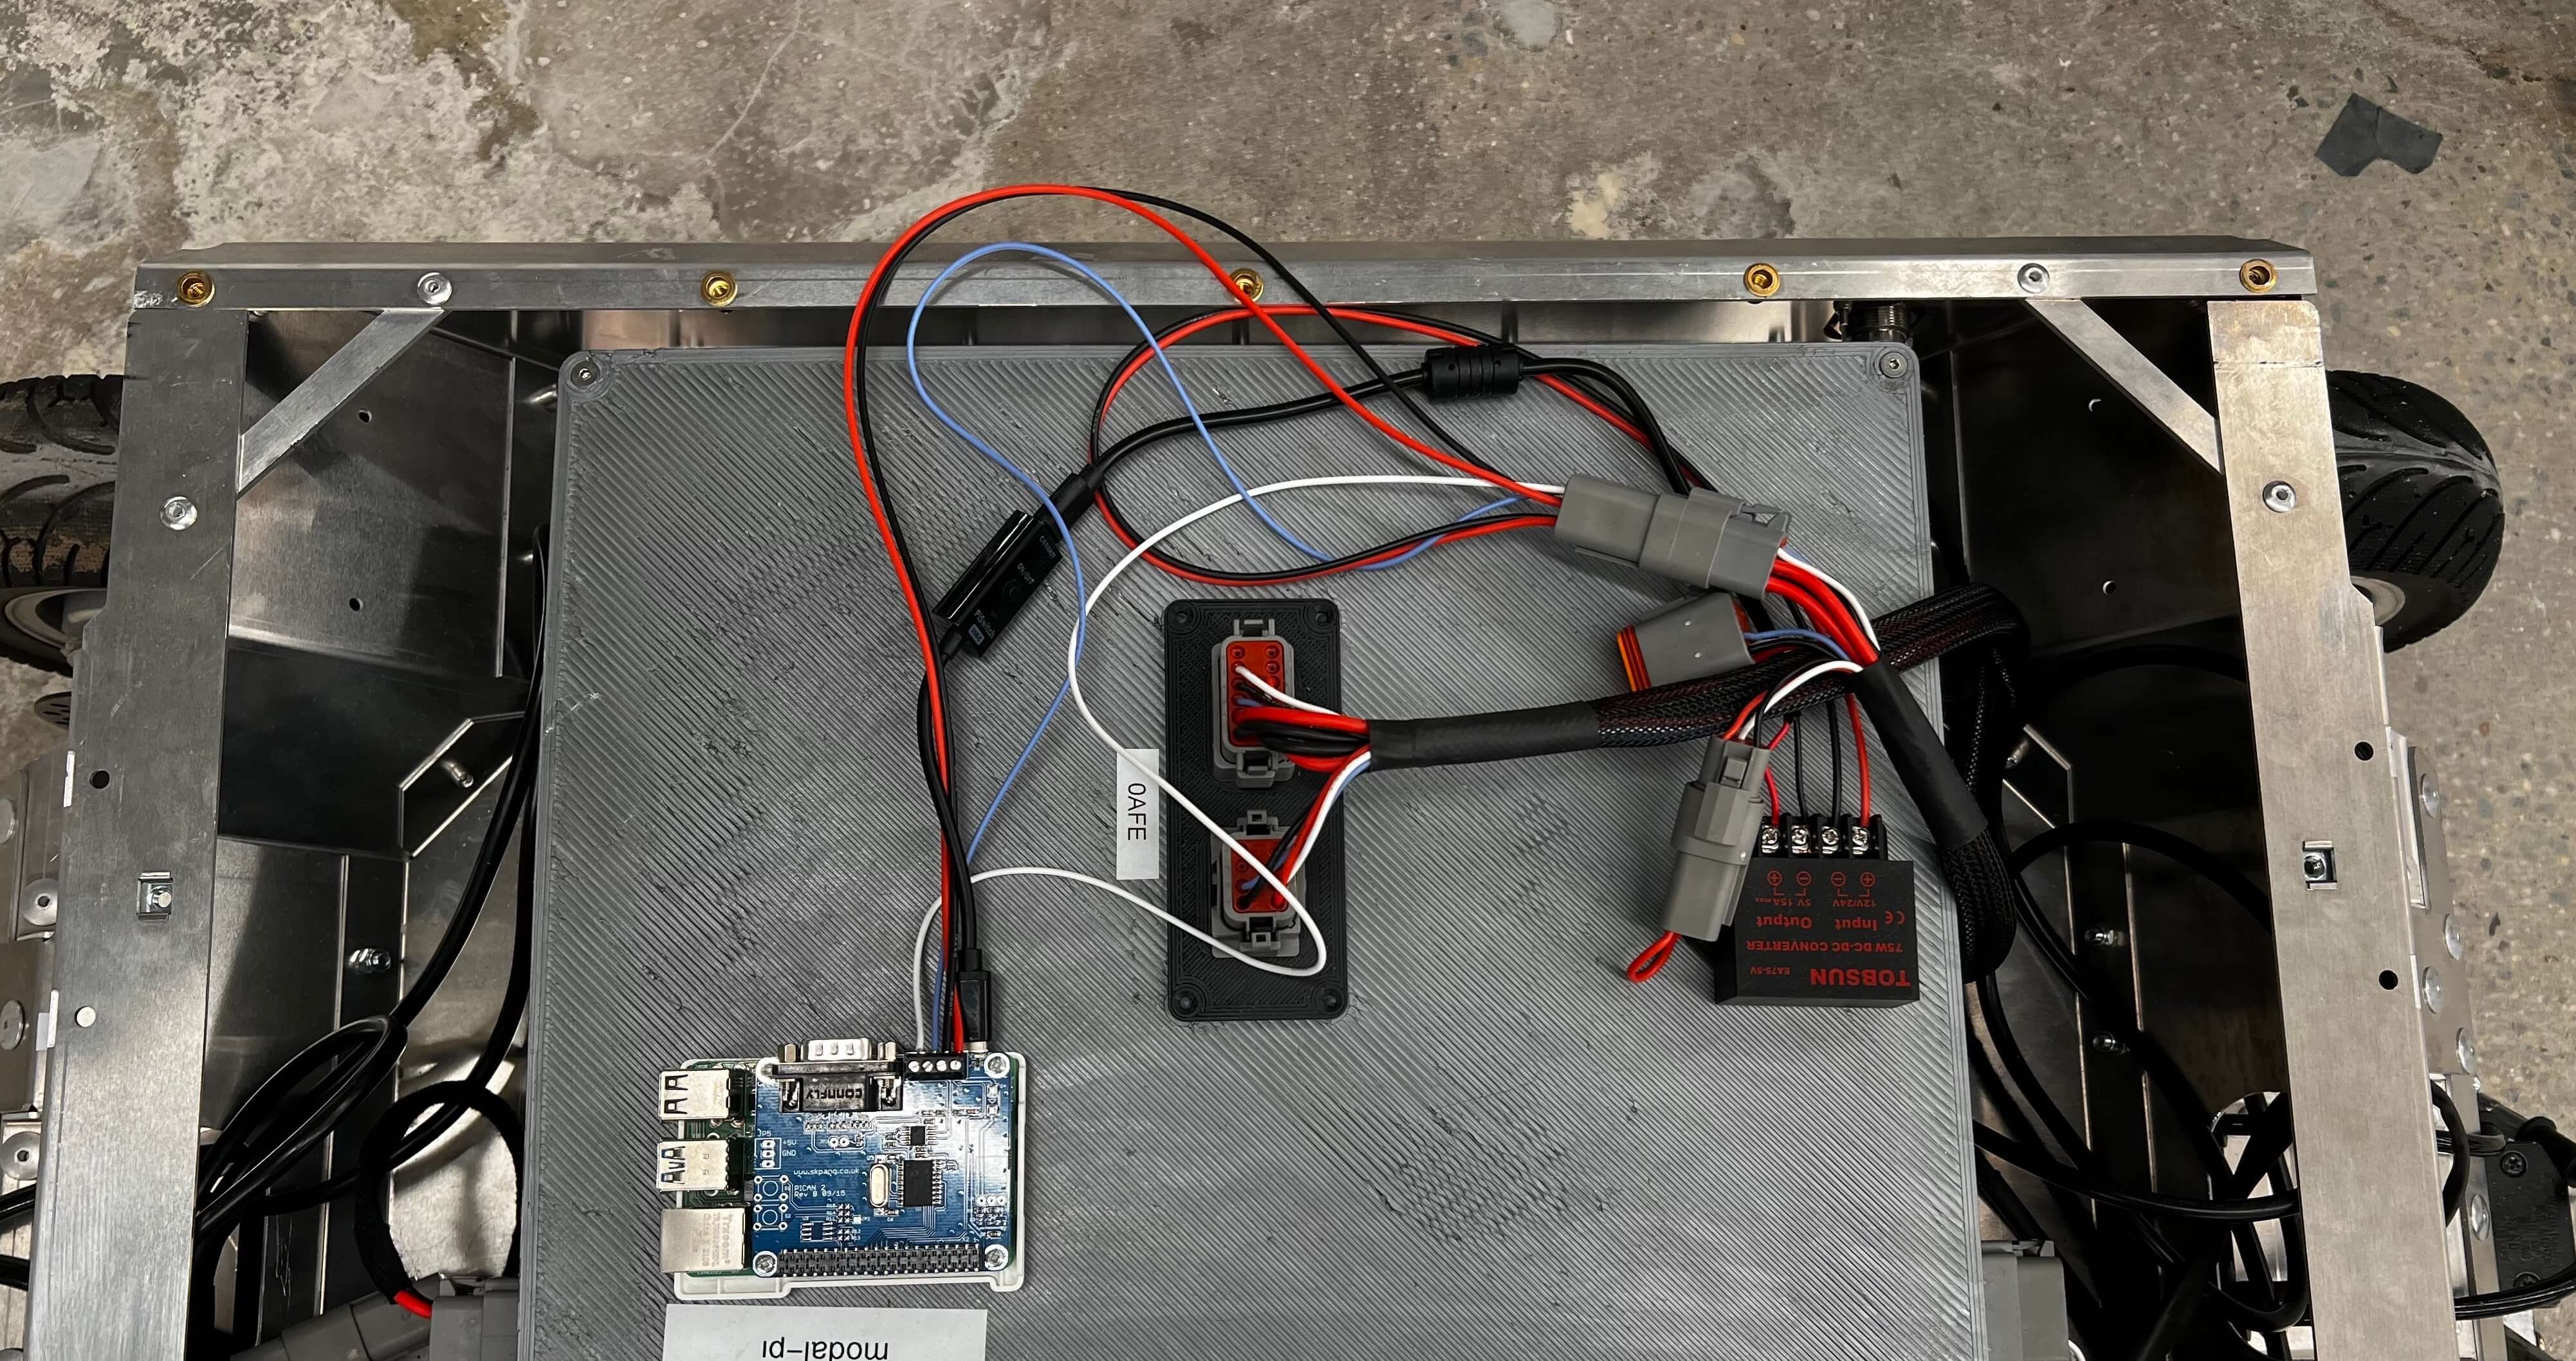
Power your Raspberry Pi off and attach the PiCAN 2 by aligning the 40 way connector and fitting it to the top of the Pi [using a spacer and a screw](https://copperhilltech.com/blog/pican2-pican3-and-picanm-driver-installation-for-raspberry-pi).
Next, with the Intermode rover powered down, connect the 6-wire amphenol connector that comes with the rover to the 4 screw terminal on PiCAN bus:
- Connect one of the 12V wires (red) to the +12V terminal
- Connect one of the ground wires (black) to the GND terminal
- Connect the CAN low wire (blue) to the CAN_L terminal
- Connect the CAN high wire (white) to the CAN_H terminal.
You have two remaining wires (12V and ground).
Connect the remaining two wires to the + (red) and - (black) **input** terminals on your buck converter.
Attach the USB-C adapter wires to the **output** of your buck converter, and plug the other end of the USB-C adapter into your Pi.
You can now power up the rover, which also provides power to your Pi and allows it to communicate with the rover using CAN bus!
## A modular resource for the Intermode base
The Viam platform provides [APIs](/reference/apis/) for common component types within `viam-server`.
For controlling a mobile robot's movements, the [base component](/reference/components/base/) exposes a useful interface.
In the rest of this tutorial, you'll learn how to use this API to create your own custom modular resource.
If you want to directly configure this modular resource code with your robot, skip to [using the intermode base resource](#use-the-intermode-base-modular-resource)
### Create a custom model using the Viam RDK base API
The [base](/reference/components/base/) component exposes an API for controlling a mobile robot’s movements.
To use it for the Intermode rover, you must create a new [model](/reference/glossary/#term-model)
with its own implementation of each method.
Generally modular resources are made up of two parts:
- The first part is the entry point for the module. It creates the model and registers it with `viam-server` which makes it usable by the Viam SDKs.
- The second part implements the functionality for the API.
The full code for the modular resource is available on [GitHub](https://github.com/viam-labs/tutorial-intermode/blob/main/intermode-base/module.go).
This is the code for the entry point:
```go {class="line-numbers linkable-line-numbers" data-line="30"}
// namespace, module-name, model
var model = resource.NewModel("viamlabs", "tutorial", "intermode")
func main() {
goutils.ContextualMain(mainWithArgs, logging.NewLogger("intermodeBaseModule"))
}
func mainWithArgs(ctx context.Context, args []string, logger logging.Logger) (err error) {
registerBase()
modalModule, err := module.NewModuleFromArgs(ctx, logger)
if err != nil {
return err
}
modalModule.AddModelFromRegistry(ctx, base.Subtype, model)
err = modalModule.Start(ctx)
defer modalModule.Close(ctx)
if err != nil {
return err
}
<-ctx.Done()
return nil
}
// helper function to add the base's constructor and metadata to the component registry, so that we can later construct it.
func registerBase() {
registry.RegisterComponent(
base.Subtype, // the "base" API: "rdk:component:base"
model,
registry.Component{Constructor: func(
ctx context.Context,
deps registry.Dependencies,
config config.Component,
logger logging.Logger,
) (interface{}, error) {
return newBase(config.Name, logger) // note: newBase() is not shown in this tutorial
}})
}
```
To support this new model of a base that you are creating, you need to give the model a name.
This tutorial uses the namespace `viamlabs`, an (arbitrary) module-name called `tutorial` and lastly, the model name `intermode`.
The complete triplet is:
`viamlabs:tutorial:intermode`.
The entry point code defines the model name and then registers it with `viam-server`.
When registering it, the code also provides the API that the new model supports.
That means in this case that the base should support the default [base API](/reference/apis/components/base/#api) with methods such as `MoveStraight` and `Spin`.
The **API** of any Viam resource is also represented as colon-separated triplets where the first element is a namespace.
Since you are using the default Viam API for a [base](/reference/components/base/), the [API namespace triplet](/reference/glossary/#term-api-namespace-triplet)
is:
`rdk:component:base`.
In the code this is specified on line 30 as `base.Subtype`.
### Implement base methods
Now that the modular resource code has registered the API it is using and its custom model, you can implement the methods provided by the base API.
Since the Intermode rover's commands are in the CAN bus format, you need the modular resource code to translate any commands sent from the base API, like _SetPower_, _SetVelocity_, or _Stop_ to [CAN bus frames](https://en.wikipedia.org/wiki/CAN_bus#Frames).
For reference, Intermode provides documentation on how its [CAN frames](https://github.com/viam-labs/tutorial-intermode/blob/main/can_interface.pdf) are formatted.
At a high level, the [tutorial code](https://github.com/viam-labs/tutorial-intermode/blob/main/intermode-base/module.go) does the following:
1. The `SetPower` command implements the SetPower interface from the _rdk:component:base_ API
2. The parameters sent to `SetPower` are formatted as a _driveCommand_
3. The _driveCommand_ is converted to a CAN frame, and set as the next command
4. _publishThread_ runs a loop continuously, sending the current command every 10ms (the Intermode base will otherwise time out)
```go
// this struct describes intermode base drive commands
type driveCommand struct {
Accelerator float64
Brake float64
SteeringAngle float64
Gear byte
SteerMode byte
}
func (base *interModeBase) setNextCommand(ctx context.Context, cmd modalCommand) error {
if err := ctx.Err(); err != nil {
return err
}
select {
case <-ctx.Done():
return ctx.Err()
case base.nextCommandCh <- cmd.toFrame(base.logger):
}
return nil
}
// toFrame convert the drive command to a CANBUS data frame.
func (cmd *driveCommand) toFrame(logger logging.Logger) canbus.Frame {
frame := canbus.Frame{
ID: driveId,
Data: make([]byte, 0, 8),
Kind: canbus.SFF,
}
frame.Data = append(frame.Data, calculateAccelAndBrakeBytes(cmd.Accelerator)...)
frame.Data = append(frame.Data, calculateSteeringAngleBytes(cmd.SteeringAngle)...)
if cmd.Accelerator < 0 {
cmd.Gear = gears[gearReverse]
}
frame.Data = append(frame.Data, cmd.Gear, cmd.SteerMode)
logger.Debugw("frame", "data", frame.Data)
return frame
}
func (base *interModeBase) SetPower(ctx context.Context, linear, angular r3.Vector, extra map[string]interface{}) error {
return base.setNextCommand(ctx, &driveCommand{
Accelerator: linear.Y * 100, // the base API provides linear.Y between -1 (full reverse) and 1 (full forward)
Brake: 0,
SteeringAngle: angular.Z * 100, // the base API provides angular.Z between -1 (full left) and 1 (full right)
Gear: gears[gearDrive],
SteerMode: steerModes[steerModeFourWheelDrive],
})
}
```
With this code, the intermode base can receive and execute `SetPower` commands using any Viam SDK.
### Leaving some methods unimplemented
In some cases, you may not want to implement specific methods provided by the resource type's API.
For example, some hardware may not support specific functionality.
When you want to leave a method unimplemented you must still create that method, but return an appropriate error message.
In this tutorial, the code leaves the _IsMoving_ method unimplemented (for illustrative purposes).
```go {class="line-numbers linkable-line-numbers"}
func (base *interModeBase) IsMoving(ctx context.Context) (bool, error) {
return false, errors.New("IsMoving(): unimplemented")
}
```
## Use the Intermode base modular resource
### Copy the modular resource binary
This tutorial's modular resource code leverages libraries (specifically a [CAN bus library](https://github.com/go-daq/canbus)) that run on Linux and interface with the PiCAN socket on your Raspberry Pi.
The tutorial repository includes a [compiled binary](https://github.com/viam-labs/tutorial-intermode/blob/main/intermode-base/intermode-model) that is ready to run on 64-bit [Raspberry Pi OS](https://www.raspberrypi.com/software/).
If you make changes to the tutorial code, you'll need to re-compile to create a new binary.
To run the modular resource, first copy the module binary to your Raspberry Pi.
### Configure the Intermode base resource
You will now deploy the module to your machine and add the base component it provides.
Go to the [machine you added during setup](#machine-setup).
1. If you have not already, [install the Viam CLI](/cli/reference/) and log in:
```sh {class="command-line" data-prompt="$"}
viam login
```
1. From the directory containing the [compiled binary](https://github.com/viam-labs/tutorial-intermode/blob/main/intermode-base/intermode-model), create a module entry in your Viam organization. Find your organization ID by running `viam organizations list`, or from your organization's **Settings** page in the Viam app:
```sh {class="command-line" data-prompt="$"}
viam module create --name=intermode-base --org-id=
```
1. Find your machine's part ID. At the top of the machine's page, click the **Live** or **Offline** status dropdown, then click **Part ID** to copy it.
1. Deploy the module and add the base component in one step:
```sh {class="command-line" data-prompt="$"}
viam module reload-local --part-id \
--model-name viamlabs:tutorial:intermode --resource-name base-1
```
Replace `` with the part ID you copied.
1. Click **Save** in the top right corner of the **CONFIGURE** tab.
For more information on modules and how they work, see [Create a module](/build-modules/write-a-driver-module/).
### Control the rover
After you configured the base, go to the [**CONTROL**](/monitor/default-interface/#web-ui) tab and expand the base component to view the controls to enable keyboard or discrete control over your machine's movement.
> **Caution:**
>
>
> Be careful, the Intermode is a large and powerful rover - make sure you have the shutoff key in hand for emergencies and make sure your rover has sufficient space to drive around without hitting anyone or anything.
>
On the **Keyboard** tab, you can toggle the keyboard control to active.
With the **Keyboard** toggle active, use **W** and **S** to go forward and back, and **A** and **D** to arc and spin.
Try driving your base around using the WASD keyboard controls.
If you navigate to the **Discrete** tab, you can use movement modes such as `Straight` and `Spin` and different movement types such as `Continuous` and `Discrete` and directions such as `Forwards` and `Backwards`.
If you do not see the base card in the **CONTROL** tab, check the **LOGS** tab for possible setup or configuration errors.
## Full code for the Intermode base modular resource
Check out this [GitHub repository](https://github.com/viam-labs/tutorial-intermode) for the working modular resource implementation example which we use in this tutorial.
## Next steps
Now that you have integrated your rover or mobile base with Viam, you can use the [Viam SDKs](/reference/sdks/) to operate your rover.
If your rover has a [`camera`](/reference/components/camera/) or a [`movement_sensor`](/reference/components/movement-sensor/), you can try the following tutorials:

