> For AI agents: guidance on navigating Viam documentation is available at https://docs.viam.com/llms.txt.
# Control a Robot Dog with a Custom Viam Base Component
Integrate a custom base component with the Viam Python SDK.
> Source: https://docs.viam.com/tutorials/custom/custom-base-dog/ · Last updated: 2024-05-07
The [base component type](/reference/components/base/) is useful for controlling mobile robots because it gives users intuitive steering controls to use in code as well as from the machine's **CONTROL** tab.
Viam natively supports a wheeled base model, but if you have a quadruped or other form of base that requires a different underlying implementation, you can create a custom component as a [modular resource](/reference/glossary/#term-modular-resource)
.
This tutorial demonstrates how to add a custom base using [this robot dog kit and its open source code](https://github.com/Freenove/Freenove_Robot_Dog_Kit_for_Raspberry_Pi) as an example.
By the end of the tutorial, you will be able to drive this dog around using the Viam base methods: `MoveStraight`, `Spin`, `SetPower`, `SetVelocity`, and `Stop`.
You will also be able to use the machine's **CONTROL** tab to remotely drive the dog around using your keyboard while viewing the camera feed.
You’ll learn to implement a custom component type in Viam, and you’ll be equipped to implement other sorts of custom components in the future for whatever robots you dream up.
## Code used in this tutorial
- [Module Generator](https://github.com/viam-labs/generator-viam-module)
- [Robot Dog Base Code on GitHub](https://github.com/viam-labs/robot-dog-module)
- [Freenove Robot Dog Kit for Raspberry Pi Code on GitHub](https://github.com/Freenove/Freenove_Robot_Dog_Kit_for_Raspberry_Pi/tree/master/Code)
## Hardware requirements
- [Freenove Robot Dog Kit for Raspberry Pi](https://github.com/Freenove/Freenove_Robot_Dog_Kit_for_Raspberry_Pi)
- Currently (05 July 2023) [available on Amazon](https://www.amazon.com/gp/product/B08C254F73/ref=ppx_yo_dt_b_asin_title_o00_s00?ie=UTF8&psc=1)
- Significant assembly is required.
Follow Freenove hardware assembly instructions before starting this tutorial.
- Raspberry Pi 4B
## Raspberry Pi setup
Freenove documentation includes Raspberry Pi setup instructions but we recommend the following steps to make sure the Pi is set up for this tutorial:
Follow the steps in our [Raspberry Pi Setup Guide](/reference/device-setup/rpi-setup/) to install Raspberry Pi OS.
> **Note:**
>
> If you choose to install the full Raspberry Pi OS (64 bit) including the desktop environment and recommended software (as Freenove instructs in Chapter 0 of their tutorial), that will also work.
Add a new machine on [Viam](https://app.viam.com).
On the machine's page, follow the {{< glossary_tooltip term_id="setup" text="setup instructions" >}} to install `viam-server` on the computer you're using for your project.
Wait until your machine has successfully connected to Viam.
1. SSH into the Pi to complete the following steps.
1. Install pip and then git:
```sh {class="command-line" data-prompt="$"}
sudo apt install pip
```
```sh {class="command-line" data-prompt="$"}
sudo apt install git
```
1. Navigate to the directory on the Pi where you'd like to install the Freenove robot dog code (for example `/home/fido/`).
Get the code by running the following command:
```sh {class="command-line" data-prompt="$"}
git clone https://github.com/Freenove/Freenove_Robot_Dog_Kit_for_Raspberry_Pi
```
> **Important:**
>
> This tutorial uses `/home/fido/` as an example home directory in various example filepaths and code snippets.
> If the name of the directory where you store and run your code is different, be sure to use the correct filepath when running these commands.
1. Check which version of Python you have installed on the Pi:
```sh {class="command-line" data-prompt="$"}
python --version
```
If it isn’t Python 3.8 or later, install an updated version of Python and double-check that you're running the latest Raspberry Pi OS.
1. Install the Viam Python SDK in a virtual environment by following [Install the Python SDK](/reference/sdks/python/python-venv/).
1. Enable I2C on your Pi using `sudo raspi-config`.
1. Alter the I2C baud rate according to [Chapter 1, Step 2 in the Freenove instructions](https://github.com/Freenove/Freenove_Robot_Dog_Kit_for_Raspberry_Pi/blob/master/Tutorial.pdf) (page 40 as of January 24, 2023).
1. Install smbus so that the servo code works:
```sh {class="command-line" data-prompt="$"}
sudo apt-get install python3-smbus
```
1. Follow Chapter 1, Step 3 (page 42 as of January 24, 2023) of the Freenove tutorial to complete the software installation:
```sh {class="command-line" data-prompt="$"}
cd /home/fido/Freenove_Robot_Dog_Kit_for_Raspberry_Pi/Code
sudo python setup.py
```
1. Restart the Raspberry Pi:
```sh {class="command-line" data-prompt="$"}
sudo reboot
```
## Hardware setup
Follow the Freenove hardware assembly instructions, including servo setup (all of Chapters 2 and 3, and the section of Chapter 4 about calibration) before proceeding.
## Check connection between the robot dog server and the midlayer
Before proceeding with the custom component implementation, follow the instructions in this section to test the connection between the Freenove server running on your robot dog and the code running on your development machine (laptop or desktop).
This way, you can isolate any client-server connection problems if they exist.
### Create a connection test file
In a convenient directory on your development machine, create a Python file and open it in your favorite IDE.
We named ours dog_test.py and opened it in Visual Studio Code.
Paste the following code snippet into the file you created:
```python {class="line-numbers linkable-line-numbers"}
# dog_test.py is for testing the connection
import socket
import time
s = socket.socket(socket.AF_INET, socket.SOCK_STREAM)
s.connect(("PASTE DOG IP ADDRESS HERE", 5001))
cmd = "CMD_MOVE_FORWARD#15"
s.send(cmd.encode("utf-8"))
time.sleep(7)
cmd = "CMD_MOVE_STOP"
s.send(cmd.encode("utf-8"))
cmd = "CMD_RELAX"
s.send(cmd.encode("utf-8"))
```
Save the file.
### Find IP address
Go to the [machine page](https://app.viam.com/robots) for your robot dog that you created when installing `viam-server` on the Pi.
Open the part status dropdown in the top left of the page.
If your machine is connected to the app, this should say **Live**.
The IP address of the robot dog Pi is displayed under **IPs**.
Click the copy icon to copy the IP address to your clipboard.
Inside dog_test.py, replace `PASTE DOG IP ADDRESS HERE` with the copied IP.
Save the file.
### Test the connection
Place the robot dog on a flat, open surface where it has room to take a few steps.
Make sure it is powered on.
Now you are ready to run the connection test file.
Open two terminal windows on your development machine: one for the robot dog Pi and one for the development machine.
In one terminal, SSH into the Pi using the username and hostname you set up when imaging the Pi, for example:
```sh {class="command-line" data-prompt="$"}
ssh fido@robotdog.local
```
Navigate to the /home/fido/Freenove_Robot_Dog_Kit_for_Raspberry_Pi/Code/Server directory.
Start the robot dog server by running:
```sh {class="command-line" data-prompt="$"}
sudo python main.py -tn
```
In the other terminal window, navigate to the directory on your development machine where you saved dog_test.py.
Run the connection test file with the following command:
```sh {class="command-line" data-prompt="$"}
python dog_test.py
```
If the dog walks forward for a few seconds and then stops, the connection works and you can successfully send commands to the robot dog server.
Continue on to implement the base.
If the robot dog did not respond, double check your IP address, make sure the robot dog server is still running, and make sure the robot has adequate power.
You can also try turning the robot off and on again, and then retrying the process.
## Implement the custom base code
Now that the Freenove server is set up, you will follow the [process for creating modular resources](/build-modules/write-a-driver-module/).
### Prerequisites
**Install the Viam CLI and authenticate**
Install the Viam CLI and authenticate to Viam, from the same machine that you intend to upload your module from.
{{< tabs >}}
{{% tab name="macOS" %}}
To download the Viam CLI on a macOS computer, install [brew](https://brew.sh/) and run the following commands:
```sh {class="command-line" data-prompt="$"}
brew trust viamrobotics/brews
brew tap viamrobotics/brews
brew install viam
```
{{% /tab %}}
{{% tab name="Linux aarch64" %}}
On Debian-based distributions (Debian, Ubuntu, Raspberry Pi OS 64-bit), install the Viam CLI from Viam's apt repository so `apt upgrade` keeps it up to date:
```sh {class="command-line" data-prompt="$"}
curl -fsSL https://us-apt.pkg.dev/doc/repo-signing-key.gpg | sudo gpg --dearmor -o /usr/share/keyrings/viam.gpg
echo "deb [signed-by=/usr/share/keyrings/viam.gpg] https://us-apt.pkg.dev/projects/static-file-server-310021 viam main" | sudo tee /etc/apt/sources.list.d/viam.list
sudo apt update && sudo apt install viam-cli
```
The package is named `viam-cli`; the installed command is `viam` (a `viam-cli` alias also works).
On other distributions, download the binary directly:
```sh {class="command-line" data-prompt="$"}
sudo curl --compressed -o /usr/local/bin/viam https://storage.googleapis.com/packages.viam.com/apps/viam-cli/viam-cli-stable-linux-arm64
sudo chmod a+rx /usr/local/bin/viam
```
{{% /tab %}}
{{% tab name="Linux x86_64" %}}
On Debian-based distributions (Debian, Ubuntu), install the Viam CLI from Viam's apt repository so `apt upgrade` keeps it up to date:
```sh {class="command-line" data-prompt="$"}
curl -fsSL https://us-apt.pkg.dev/doc/repo-signing-key.gpg | sudo gpg --dearmor -o /usr/share/keyrings/viam.gpg
echo "deb [signed-by=/usr/share/keyrings/viam.gpg] https://us-apt.pkg.dev/projects/static-file-server-310021 viam main" | sudo tee /etc/apt/sources.list.d/viam.list
sudo apt update && sudo apt install viam-cli
```
The package is named `viam-cli`; the installed command is `viam` (a `viam-cli` alias also works).
On other distributions, download the binary directly:
```sh {class="command-line" data-prompt="$"}
sudo curl --compressed -o /usr/local/bin/viam https://storage.googleapis.com/packages.viam.com/apps/viam-cli/viam-cli-stable-linux-amd64
sudo chmod a+rx /usr/local/bin/viam
```
{{% /tab %}}
{{% tab name="Windows" %}}
[Download the binary](https://storage.googleapis.com/packages.viam.com/apps/viam-cli/viam-cli-stable-windows-amd64.exe) and run it directly to use the Viam CLI on a Windows computer.
{{% /tab %}}
{{% tab name="Source" %}}
If you have [Go installed](https://go.dev/doc/install), you can build the Viam CLI from source. Clone the repository and build it with `make`:
```sh {class="command-line" data-prompt="$"}
git clone --depth 1 https://github.com/viamrobotics/rdk.git
cd rdk
make cli
sudo cp "bin/$(go env GOOS)-$(go env GOARCH)/viam-cli" /usr/local/bin/viam
```
To confirm `viam` is installed and ready to use, run `viam version` from your terminal.
{{< alert title="Why not `go install`?" color="caution" >}}
The RDK module replaces one of its dependencies, and Go refuses `go install @` for a module carrying replace directives.
{{< /alert >}}
{{% /tab %}}
{{< /tabs >}}
For more information see [install the Viam CLI](/cli/).
Authenticate your CLI session with Viam using one of the following options:
{{< tabs >}}
{{% tab name="Personal access token" %}}
```sh {class="command-line" data-prompt="$"}
viam login
```
This will open a new browser window with a prompt to start the authentication process. If a browser window does not open, the CLI will present a URL for you to manually open in your browser. Follow the instructions to complete the authentication process.
{{% /tab %}}
{{% tab name="API key" %}}
Use your organization, location, or machine part API key and corresponding API key ID in the following command:
```sh {class="command-line" data-prompt="$"}
viam login api-key --key-id --key
```
{{% /tab %}}
{{< /tabs >}}
### Create the module files
The CLI module generator generates the files for your modular resource.
1. Run the following command in your terminal:
```sh {class="command-line" data-prompt="$"}
viam module generate
```
2. Follow the prompts, selecting the following options:
- Module name: `base`
- Language: `Python`
- Visibility: `Private`
- Namespace/Organization ID:
- Navigate to your organization settings through the menu in upper right corner of the page.
Find the **Public namespace** (or create one if you haven't already) and copy that string.
In the example snippets below, the namespace is `viamlabs`.
- Resource to add to the module (API): `Base Component`.
- Model name: `robotdog`
- Enable cloud build: `No`
- Register module: `Yes`
It's a good idea to use the same names, aside from the namespace.
That way your code will match the example code.
You can use a different model name, module namespace, and module name, but you need to use the existing API triplet `rdk:component:base` in order for your custom base to work properly as a base.
3. Hit your Enter key and the generator will generate a folder called robotdog containing stub files for your modular base component.
Look inside the src subdirectory which now contains main.py.
main.py is the file that defines the behavior of your custom base.
This is the file you will modify in the next steps.
### Connect the module to the Freenove server
When you send a command to the robot using the Viam [base API](/reference/apis/components/base/#api), you need a way to pass the corresponding command to the Freenove dog server.
In your code, establish a socket and then create a `send_data` helper method to send the command from `viam-server` to the Freenove server.
Start by importing socket:
```python
import socket
```
Then add `ip_address` and `port` attributes to your custom base so you can configure the correct connection details in your machine's config later.
Modify the `validate` and `reconfigure` methods to use these attributes, and define the `send_data` method.
The code below shows what the top of your class definition should look like.
```python {class="line-numbers linkable-line-numbers"}
class robotdog(Base):
MODEL: ClassVar[Model] = Model(ModelFamily("viamlabs", "base"), "robotdog")
# Class parameters
ip_address: str
port: int
# Constructor
@classmethod
def new(cls,
config: ComponentConfig,
dependencies: Mapping[ResourceName, ResourceBase]) -> Self:
my_class = cls(config.name)
my_class.reconfigure(config, dependencies)
return my_class
# Validates JSON Configuration
@classmethod
def validate(cls, config: ComponentConfig):
# Here we validate config, ensuring that an IP address was provided
ip_address = config.attributes.fields["ip_address"].string_value
if ip_address == "":
raise ValueError("No IP address provided")
port = config.attributes.fields["port"].number_value
# Per the Freenove code, 5001 is for sending/receiving instructions.
# Port 8001 is used for video.
if port == "":
port = 5001
return
# Define a way to send commands to the robot dog server
def send_data(self, data):
try:
self.client_socket.send(data.encode("utf-8"))
except Exception as e:
LOGGER.error(e)
# Handles attribute reconfiguration
def reconfigure(self,
config: ComponentConfig,
dependencies: Mapping[ResourceName, ResourceBase]):
# Here we initialize the resource instance
ip_address = config.attributes.fields["ip_address"].string_value
port = config.attributes.fields["port"].number_value
self.client_socket = socket.socket(socket.AF_INET, socket.SOCK_STREAM)
self.client_socket.connect((ip_address, port))
return
```
### Define the custom base interface
To create a custom base model, you need a script that defines what each base component method (for example `set_power`) makes the robot dog do.
Open your newly created robotdog.py file.
It contains stubs of all the [base API methods](/reference/apis/components/base/#api), but you need to modify these method definitions to actually send commands to the robot dog.
Take a look at [robotdog.py](https://github.com/viam-labs/robot-dog-module/blob/main/robotdog/src/robotdog.py).
It defines each method by specifying which corresponding commands to send to the Freenove dog server when the method is called.
For example, the `stop` method sends a command (`CMD_MOVE_STOP#8`) to the robot dog server to stop the dog from moving:
```python
async def stop(self, extra: Optional[Dict[str, Any]] = None, **kwargs):
self.is_stopped = True
command = "CMD_MOVE_STOP#8\n"
self.send_data(command)
```
Copy and paste that code into your robotdog.py file.
Feel free to tweak the specific contents of each of the [base method definitions](/reference/apis/components/base/#api) to do things like make the dog move faster.
Don't forget to save.
### Make your module executable
Now that you defined the methods for the custom component, you need to set up an [executable file](https://en.wikipedia.org/wiki/Executable) to run your custom component module.
You can find more information in [Create a module](/build-modules/write-a-driver-module/).
Since the command line tool already created a run.sh for you, all you need to do is make that shell script executable by running this command from your robotdog directory:
```sh {class="command-line" data-prompt="$"}
sudo chmod +x run.sh
```
## Deploy the module to your robot
You need to tell your robot how to access the module you created.
1. If you have not already, [install the Viam CLI](/cli/reference/) and log in:
```sh {class="command-line" data-prompt="$"}
viam login
```
1. From the module directory, create a module entry in your Viam organization. Find your organization ID by running `viam organizations list`, or from your organization's **Settings** page in the Viam app:
```sh {class="command-line" data-prompt="$"}
viam module create --name=my-custom-base --org-id=
```
1. Find your machine's part ID. At the top of the machine's page, click the **Live** or **Offline** status dropdown, then click **Part ID** to copy it.
1. Deploy the module and add the base component in one step:
```sh {class="command-line" data-prompt="$"}
viam module reload-local --part-id \
--model-name viamlabs:base:robotdog --resource-name quadruped
```
Replace `` with the part ID you copied.
## Configure the components
Now that the module is deployed, configure your hardware components.
### Configure the camera
Configure the ribbon camera on the dog as a `webcam` following our [webcam documentation](/reference/components/camera/webcam/).
Click **Save**.
### Configure the base
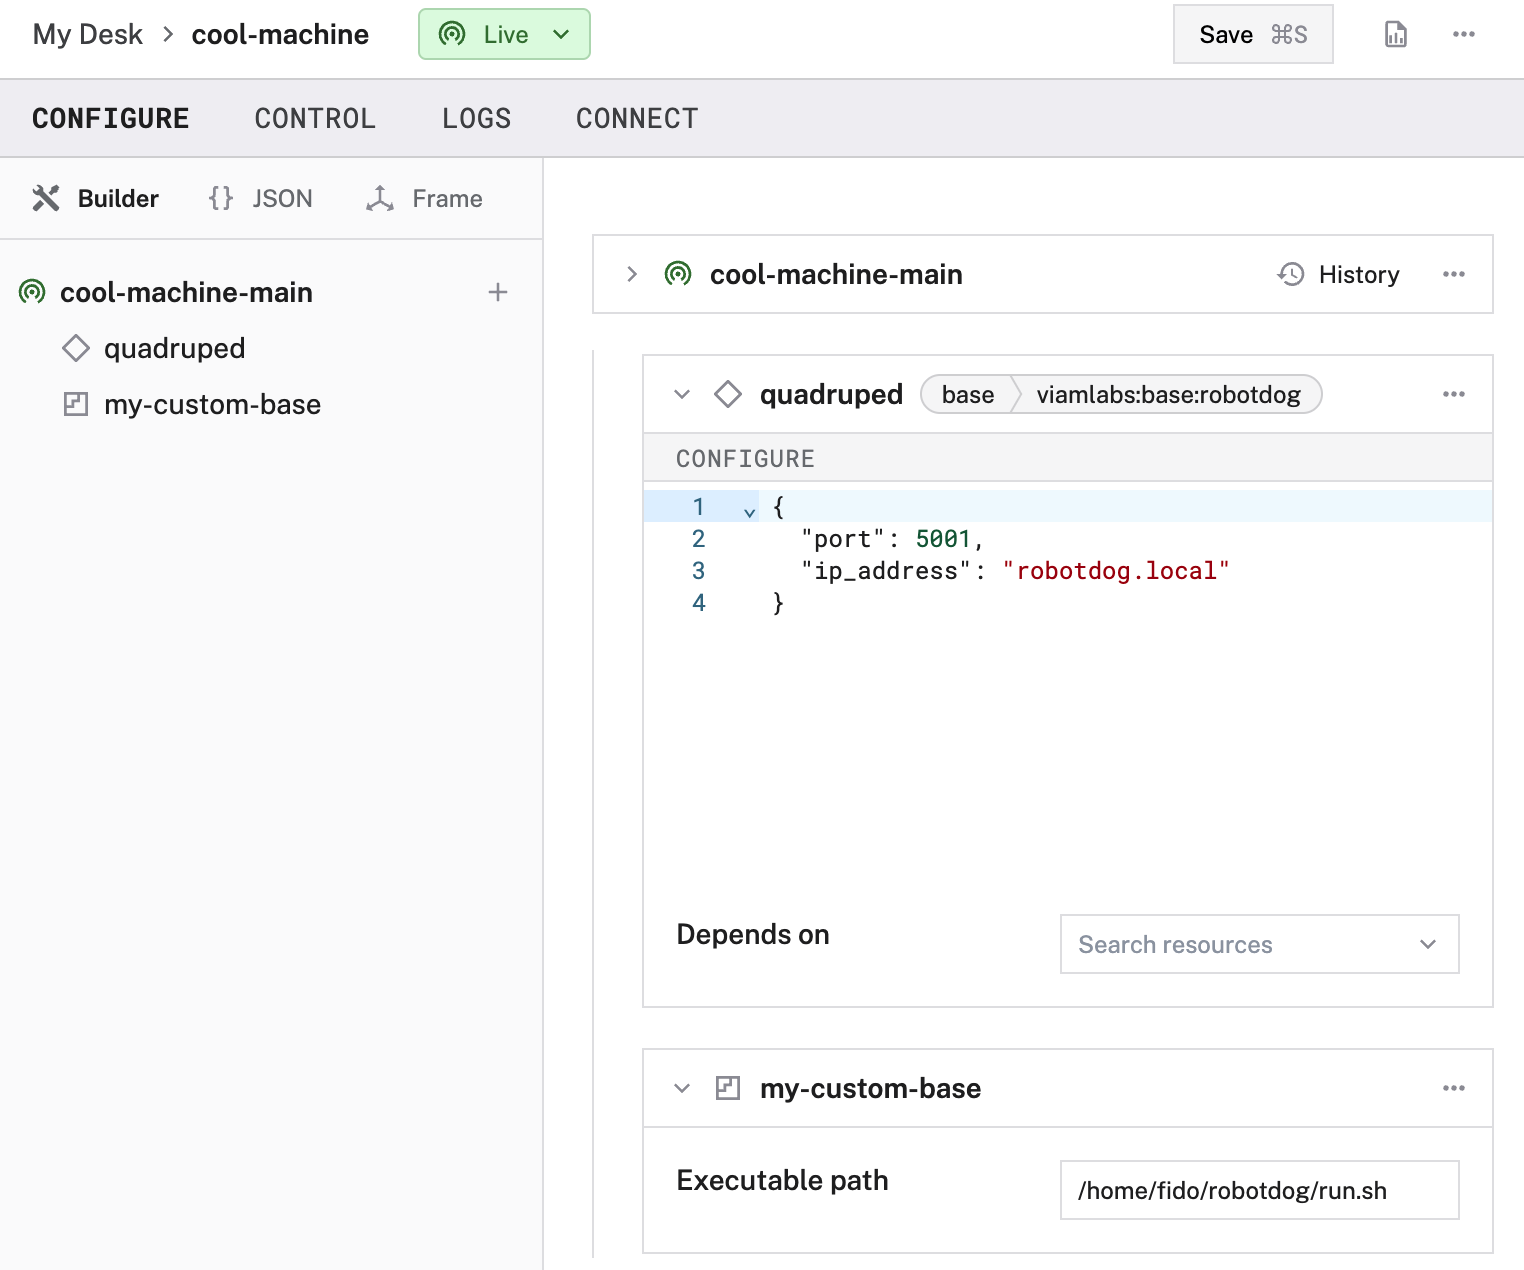
Open the **CONFIGURE** tab and click the `quadruped` component (added by `reload-local`) to expand its configuration.
Add the following attributes:
```json
{
"ip_address": ".local",
"port": 5001
}
```
Edit the `ip_address` attribute to match your machine's hostname, replacing `` with your Pi's hostname (for example, `"ip_address": "robotdog.local"`).
If this doesn't work, you can instead try using the IP address of the machine where the module is running, for example, `"ip_address": "10.0.0.123"`.
If you are using a port other than `5001`, edit the `port` attribute.
`5001` is the default port for sending and receiving instructions to and from the Freenove server.
Click **Save**.
Your local component configuration should look similar to the following:
## Start the Freenove server
To operate the dog, you need to start the Freenove robot dog server (which you saved as /home/fido/Freenove_Robot_Dog_Kit_for_Raspberry_Pi/Code/Server/main.py).
You can do this manually by SSHing into the Pi and running the following command from the home/fido/Freenove_Robot_Dog_Kit_for_Raspberry_Pi/Code/Server/ directory:
```sh {class="command-line" data-prompt="$"}
sudo python main.py -tn
```
Alternatively you can add this command to your module's `run.sh` file.
That way the Freenove robot dog server will start running when the module starts.
> **Tip:**
>
>
## Driving the robot with Viam
Navigate to the **CONTROL** tab.
Click the **quadruped** component panel to expand it and reveal the controls.
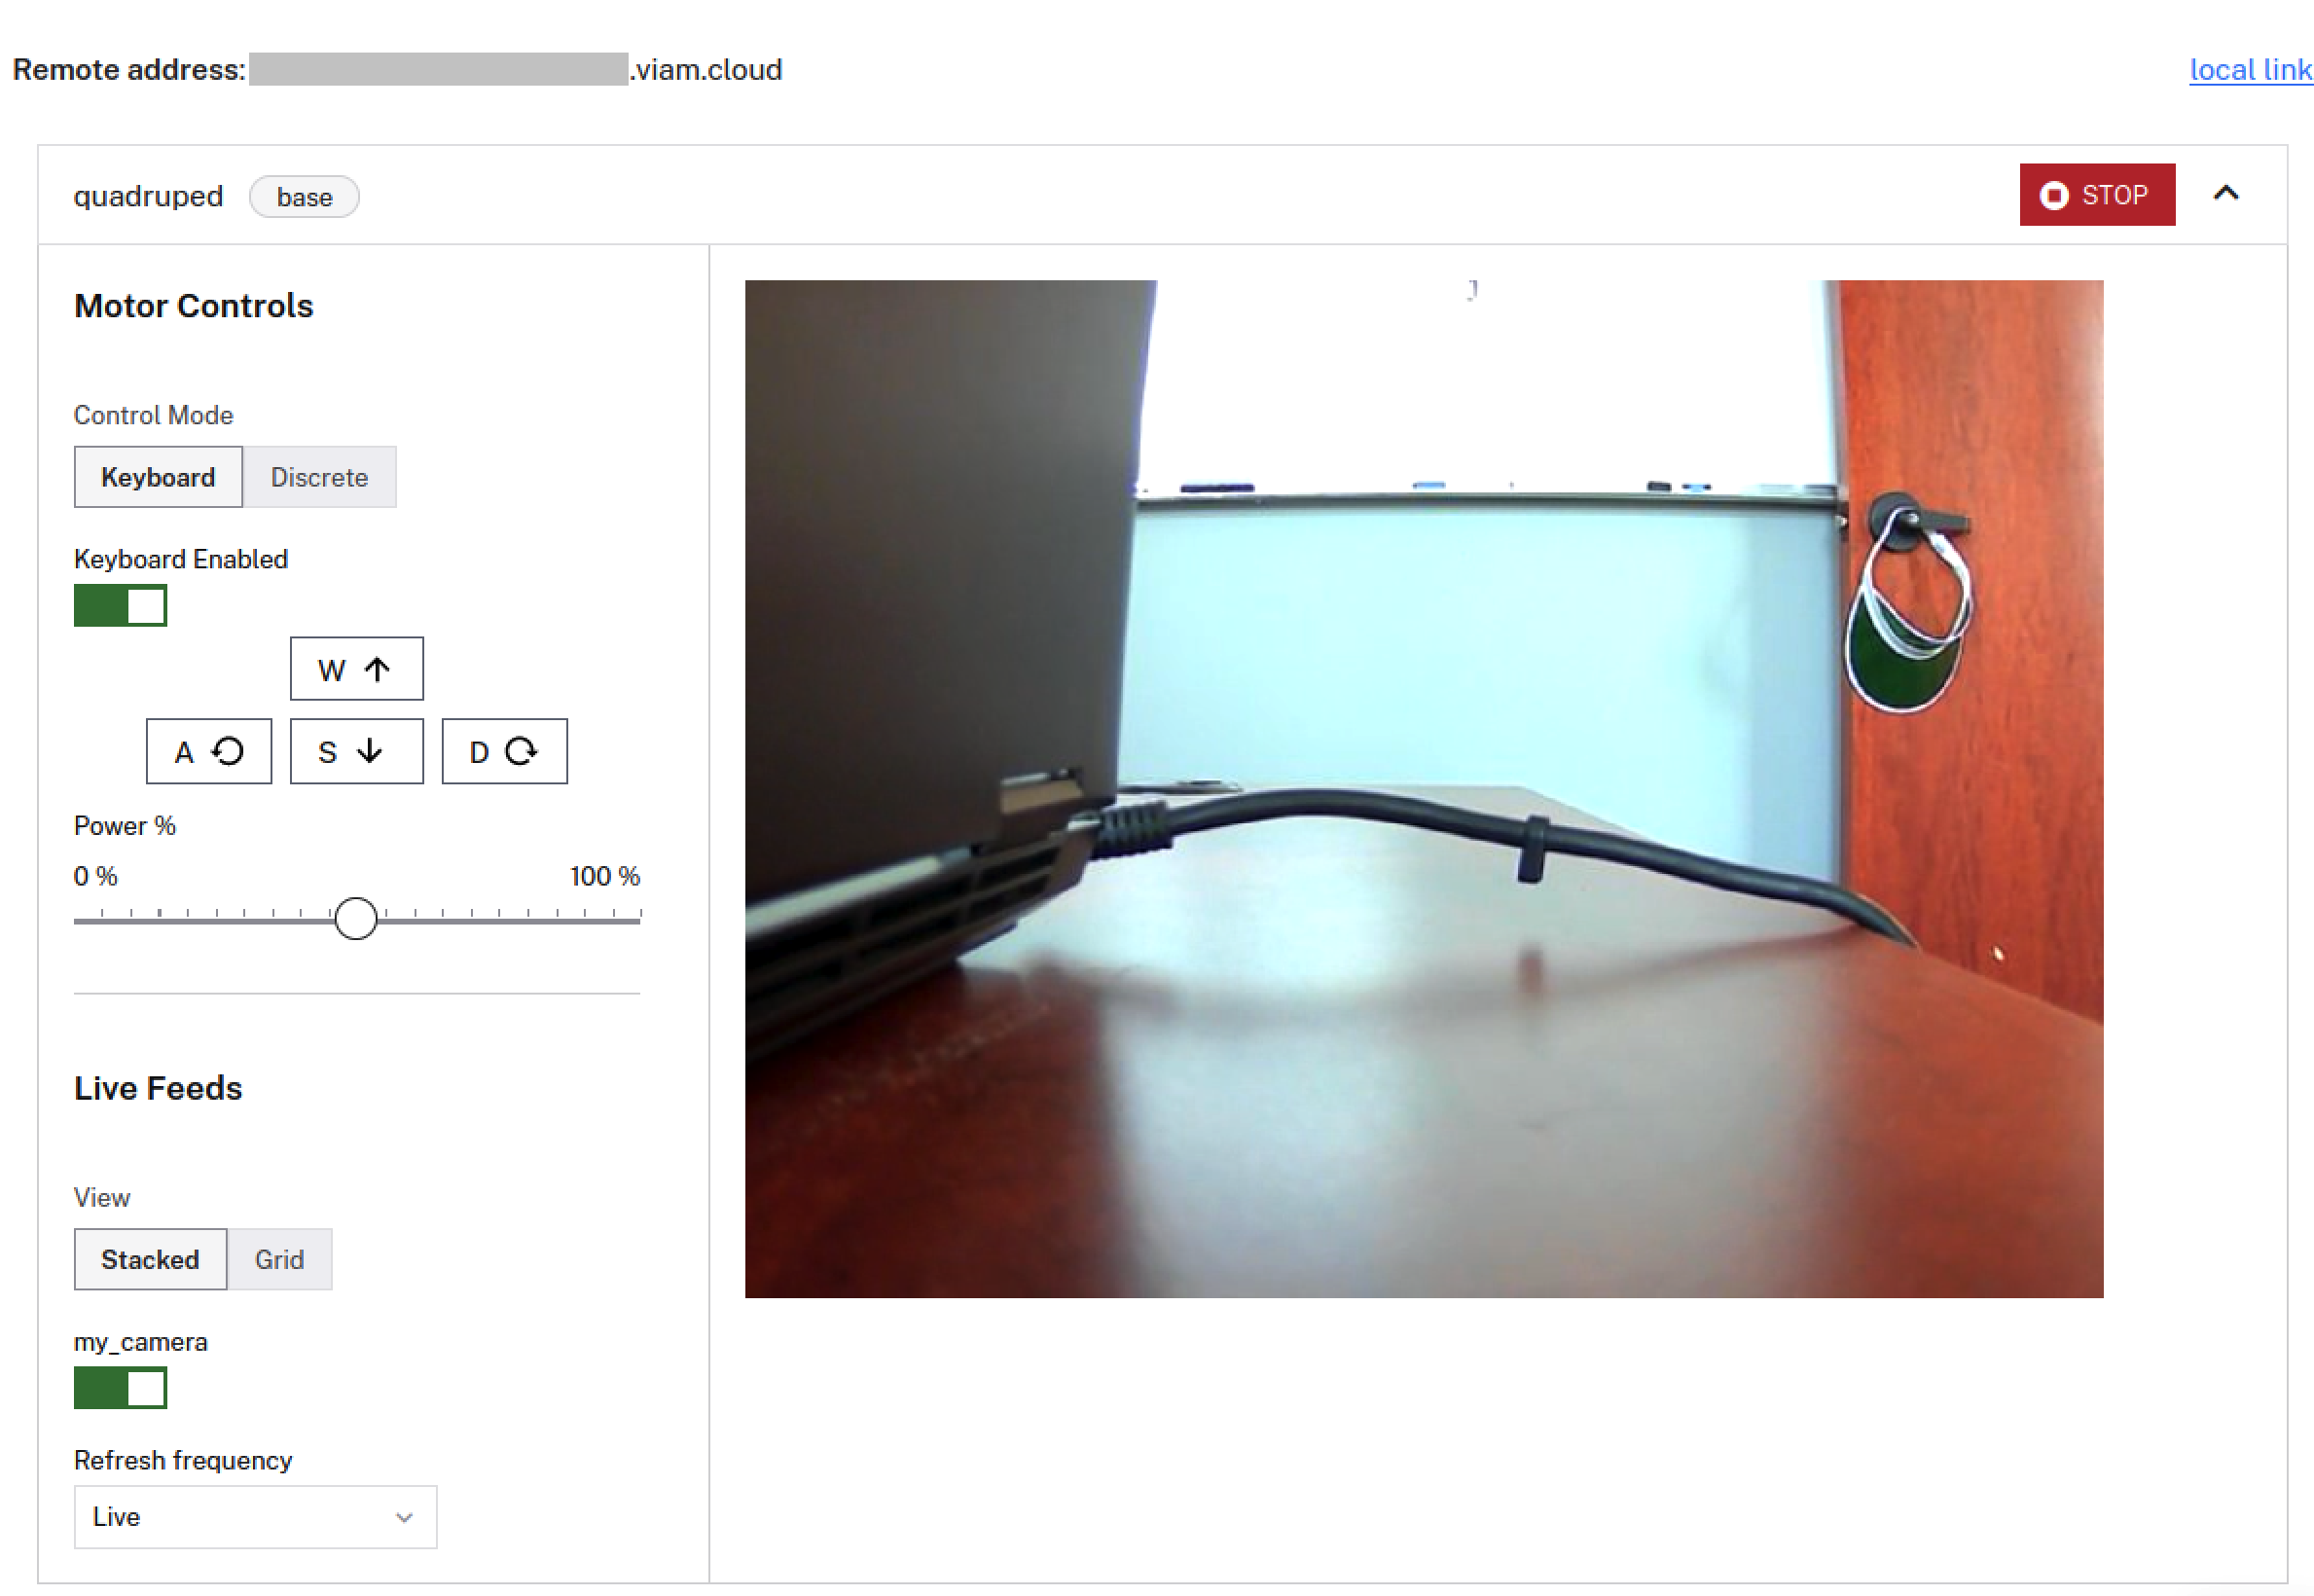
1. Enable the camera stream from the **Select Cameras** dropdown.
2. Toggle the **Keyboard Disabled** switch to **Keyboard Enabled** to use the WASD keys on your keyboard.
3. Use the **W**, **A**, **S** and **D** buttons to make the robot walk forward, turn left, walk backward or turn right.
> **Tip:**
>
> Depending on the speed of your server connection, you may need to hold down the base control button/key for a second or two before anything happens.
## Troubleshooting
- If your servos aren't moving as expected or at all, try turning the whole robot off for a while to let them cool down.
- Make sure the machine's batteries have adequate charge.
If you have otherwise unexplained connection errors, try powering things off and charging the batteries for a while before attempting to SSH to the Pi again.
- If certain sensors or servos aren't being found by the software, turn off the robot and make sure all wires are fully connected before turning it back on.
- If you want to send commands directly to the dog server instead of running robotdog.py (which may be helpful for debugging specific commands, especially if you're adding your own functionality and need to calibrate servo speeds/positions) you can do the following:
1. Install Netcat if it isn't already installed:
```sh {class="command-line" data-prompt="$"}
sudo apt install netcat
```
2. Connect directly to the robot dog by running the following command (replacing with the correct IP address, for example `nc 10.0.0.123`) from the command line while SSHed into the Pi:
```sh {class="command-line" data-prompt="$"}
nc 5001
```
3. You can now type commands ([list of available commands](https://github.com/Freenove/Freenove_Robot_Dog_Kit_for_Raspberry_Pi/blob/master/Code/Client/Command.py)) and hit enter to send them to the Freenove robot dog server.
For example:
```sh {class="command-line" data-prompt="$"}
CMD_TURN_LEFT#30
CMD_STOP
```
## Next steps
In this tutorial you learned how to implement a custom component model and control it.
You learned about configuring modules and processes.
You drove the robot dog around using the Viam **CONTROL** tab.
To add more functionality, try using the generic `do_command` method to add different behaviors to your robot dog.
You could also use the Viam [vision service](/reference/services/vision/) with the robot dog's [camera component](/reference/components/camera/).
For example, you could write code to tell the robot dog to [move towards a colored target](/tutorials/services/color-detection-scuttle/) or to [follow a colored line](/tutorials/services/webcam-line-follower-robot/), similarly to how these tasks are done with wheeled bases in the tutorials linked here.