> For AI agents: guidance on navigating Viam documentation is available at https://docs.viam.com/llms.txt.

# How to Create a Mouse Mover Using a Servo

Use the Python SDK to move a continuous servo to keep a computer screen from sleeping.
> Source: https://docs.viam.com/tutorials/get-started/servo-mousemover/


<!-- LEARNING GOALS
After following this tutorial, you will know when to use a motor component and be able to configure a servo component and control it using Viam the Viam SDKs.

Notes: Also point out that a reader can use fake components if they don't have real ones.-->

Have you ever been working from home and needed to step out for a moment?
Maybe it was to clear your head, grab your lunch, answer the door, and you get in trouble because it showed you as offline?

<div class="alert cookieconsent-optout-marketing" role="alert">
  Please <a href="javascript:Cookiebot.renew()">accept marketing cookies</a> to watch the following <a href="https://www.youtube-nocookie.com/embed/JVtZ7aU4k68">YouTube video.</a>
</div>


<picture>

  
<img src="/error.svg" alt="Error" class="embed-responsive embed-responsive-16by9 cookieconsent-optout-marketing" id="" style="" loading="lazy">
  

</picture>

<div class="cookieconsent-optin-marketing">
<div class="embed-responsive embed-responsive-16by9">
  <iframe class="embed-responsive-item cookieconsent-optin-marketing" data-src="https://www.youtube-nocookie.com/embed/JVtZ7aU4k68" data-cookieconsent="marketing" allowfullscreen>
  </iframe>
</div>
</div>


This tutorial will show you how to build a mouse mover using Viam, a Raspberry Pi, a servo, and an optical mouse.
This machine will turn the continuous servo that's secured inside the box, which will turn the circle under the optical mouse.
This will keep your computer from falling asleep.

This project is a good place to begin if you're new to robotics and would like to learn how to use a [servo component](/reference/components/servo/) with Viam and Viam's [Python SDK](https://python.viam.dev/).

<div style="display:flex;" class="aligncenter">
<div style="border:1px solid gray;">


<div class="gif">
  <video autoplay loop muted playsinline alt="A computer mouse moving erratically" width="100%" style="width: 600px" class="alignleft lozad"><source data-src="/tutorials/single-component-tutorials-servo-mousemover/moving-2.webm" type="video/webm"><source data-src="/tutorials/single-component-tutorials-servo-mousemover/moving-2.mp4" type="video/mp4">There should have been a video here but your browser does not seem to support it.
  </video>
  <noscript>
    <video autoplay loop muted playsinline alt="A computer mouse moving erratically" width="100%" style="width: 600px" class="alignleft"><source data-src="/tutorials/single-component-tutorials-servo-mousemover/moving-2.webm" type="video/webm"><source data-src="/tutorials/single-component-tutorials-servo-mousemover/moving-2.mp4" type="video/mp4">There should have been a video here but your browser does not seem to support it.
    </video>
  </noscript>
</div>
</div>
<div style="width: 250px;">


<div class="gif">
  <video autoplay loop muted playsinline alt="The servo mouse mover in action." width="100%" style="width: " class="alignright lozad"><source data-src="/tutorials/single-component-tutorials-servo-mousemover/moving-mouse.webm" type="video/webm"><source data-src="/tutorials/single-component-tutorials-servo-mousemover/moving-mouse.webm" type="video/mp4">There should have been a video here but your browser does not seem to support it.
  </video>
  <noscript>
    <video autoplay loop muted playsinline alt="The servo mouse mover in action." width="100%" style="width: " class="alignright"><source data-src="/tutorials/single-component-tutorials-servo-mousemover/moving-mouse.webm" type="video/webm"><source data-src="/tutorials/single-component-tutorials-servo-mousemover/moving-mouse.webm" type="video/mp4">There should have been a video here but your browser does not seem to support it.
    </video>
  </noscript>
</div>
</div>
</div>

## Requirements

### Hardware

- [Raspberry Pi with microSD card](https://a.co/d/bxEdcAT), with `viam-server` installed per our [installation guide](/set-up-a-machine/first-machine/)
- microSD card reader
- [Continuous rotation servo](https://a.co/d/2w0u6rK) (we used the FS90R servo)
- Wheel or arm for the servo (this comes in some of the FS90R packages)
- [Jumper wires](https://www.amazon.com/EDGELEC-Breadboard-Optional-Assorted-Multicolored/dp/B07GD2BWPY)
- Optical mouse - corded or uncorded

### Tools and consumables

- Suitable sized box (box should allow servo with wheel/arm with circle cut out on top of wheel/arm to sit flush with the top of the box)
- Double sided tape
- Tape to seal the box (we used black gaffers tape)
- Box cutters
- Marker

### Software

- [Python3](https://www.python.org/download/releases/3.0/)
- [Pip](https://pip.pypa.io/en/stable/#)
- [viam-server](https://github.com/viamrobotics/rdk/tree/0c550c246739b87b4d5a9e8d96d2b6fdb3948e2b)
- [Viam Python SDK](https://python.viam.dev/)
- [Mousemover tutorial code](https://github.com/viam-labs/tutorial-mousemover)

## Install Viam software

First, prepare your Raspberry Pi according to our [setup guide](/reference/device-setup/rpi-setup/).
Then connect to your Raspberry Pi with SSH.

Add a new machine on [Viam](https://app.viam.com).
On the machine's page, follow the {{< glossary_tooltip term_id="setup" text="setup instructions" >}} to install `viam-server` on the computer you're using for your project.
Wait until your machine has successfully connected to Viam.


Next, run this command in your Raspberry Pi terminal to install the pip package manager.
Select "yes" when asked if you want to continue.

```sh {class="command-line" data-prompt="$"}
sudo apt-get install pip
```

The command above installs the latest version of `python3` and `pip3` on your Raspberry Pi.
To verify and get the version of the package, you can run the command:

```sh {class="command-line" data-prompt="$"}
pip3 --version
```

The [Viam Python SDK](https://python.viam.dev/) (Software Development Kit) allows you to write programs in the Python programming language to operate machines using Viam.
To get the Python SDK working on the Raspberry Pi, follow [Install the Python SDK](/reference/sdks/python/python-venv/).

## Test the SDK with your machine

On your machine's page, select the **CONNECT** tab, then select **Python** as your language.

![The word Language with four boxes below it with Python, Golang, Typescript (Web), and Remotes in each one. Python has a black background with white text and a checkmark, the other three have white backgrounds with black text.](/tutorials/single-component-tutorials-servo-mousemover/choose-python.png)

Since you already installed the Python SDK, skip the first step.
Copy the sample Python code under step 2.

To show your machine's API key in the sample code, toggle **Include API key**.

{{< alert title="Caution: Keep your API key safe" color="caution" >}}
We strongly recommend that you add your API key as an environment variable.
Anyone with your API key can access your machine, and the computer running your machine.
{{< /alert >}}


The copied code needs to go in a Python file on the Raspberry Pi.
You can do so by creating a file on the Raspberry Pi and editing the file with nano.

Inside the Raspberry Pi Terminal, run the following command to create a folder to put your files in (name this folder whatever you want).

```sh {class="command-line" data-prompt="$"}
mkdir mousefolder
```

Go into mousefolder.

```sh {class="command-line" data-prompt="$"}
cd mousefolder
```

Create a file using nano with the .py which is the python file extension, (name this file whatever you want).

```sh {class="command-line" data-prompt="$"}
nano anyname.py
```

Paste the code you got from the **CONNECT** tab. Press CTRL+O, then CTRL+M, then CTRL+X to save the code and exit.
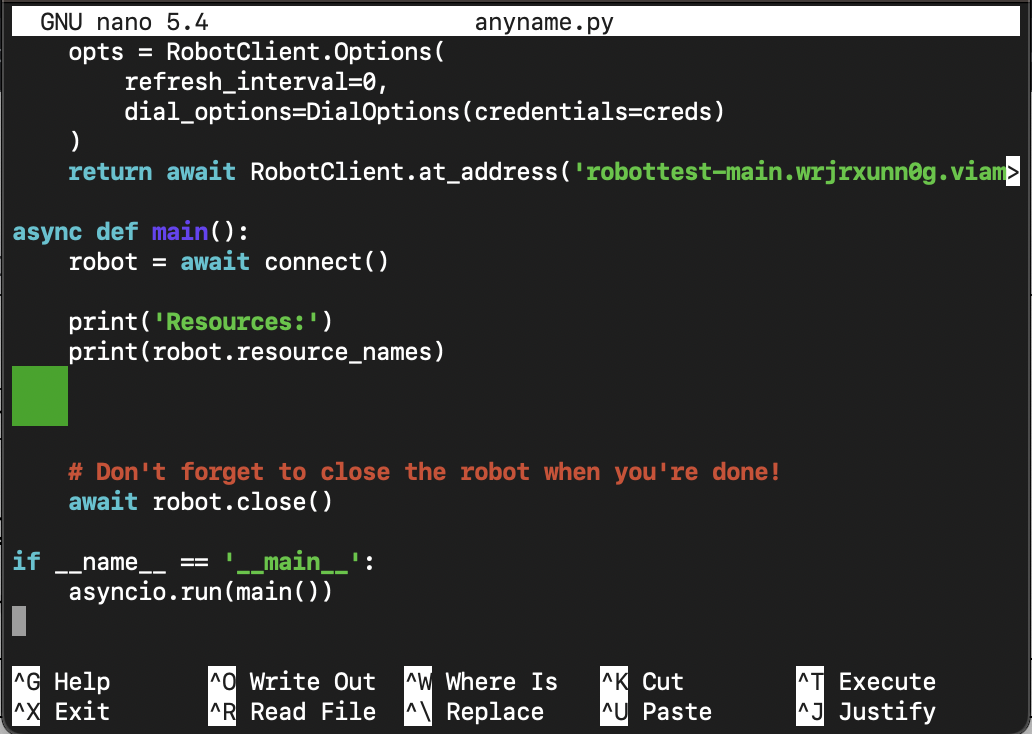
![Raspberry Pi terminal showing the connect code from the previous example.](/tutorials/single-component-tutorials-servo-mousemover/sample-code.png)

Now, run the code using the below command to get the resource information that lets us know if the connection is good or if there are any errors.

```sh {class="command-line" data-prompt="$"}
python3 anyname.py
```
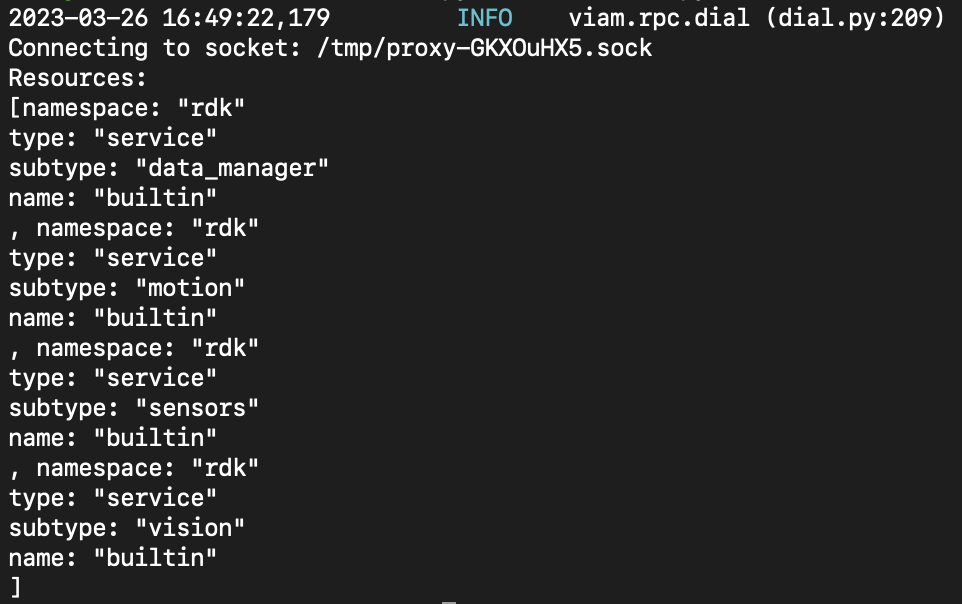
![The output of the code showing a list of the resources.](/tutorials/single-component-tutorials-servo-mousemover/resources-printed.png)

There are no errors in the resources above, so we have confirmed a good software connection between the Python SDK and your machine!

## Connect the servo

First, **turn off your Raspberry Pi**.
This will help prevent any accidents when connecting the hardware.

Now, follow this schematic diagram to attach jumper wires to the servo and Raspberry Pi.

- **GND** on servo attached to pin 6 on Pi
- **5V** on servo attached to pin 2 on Pi
- **PWM** on servo attached to pin 12 on Pi
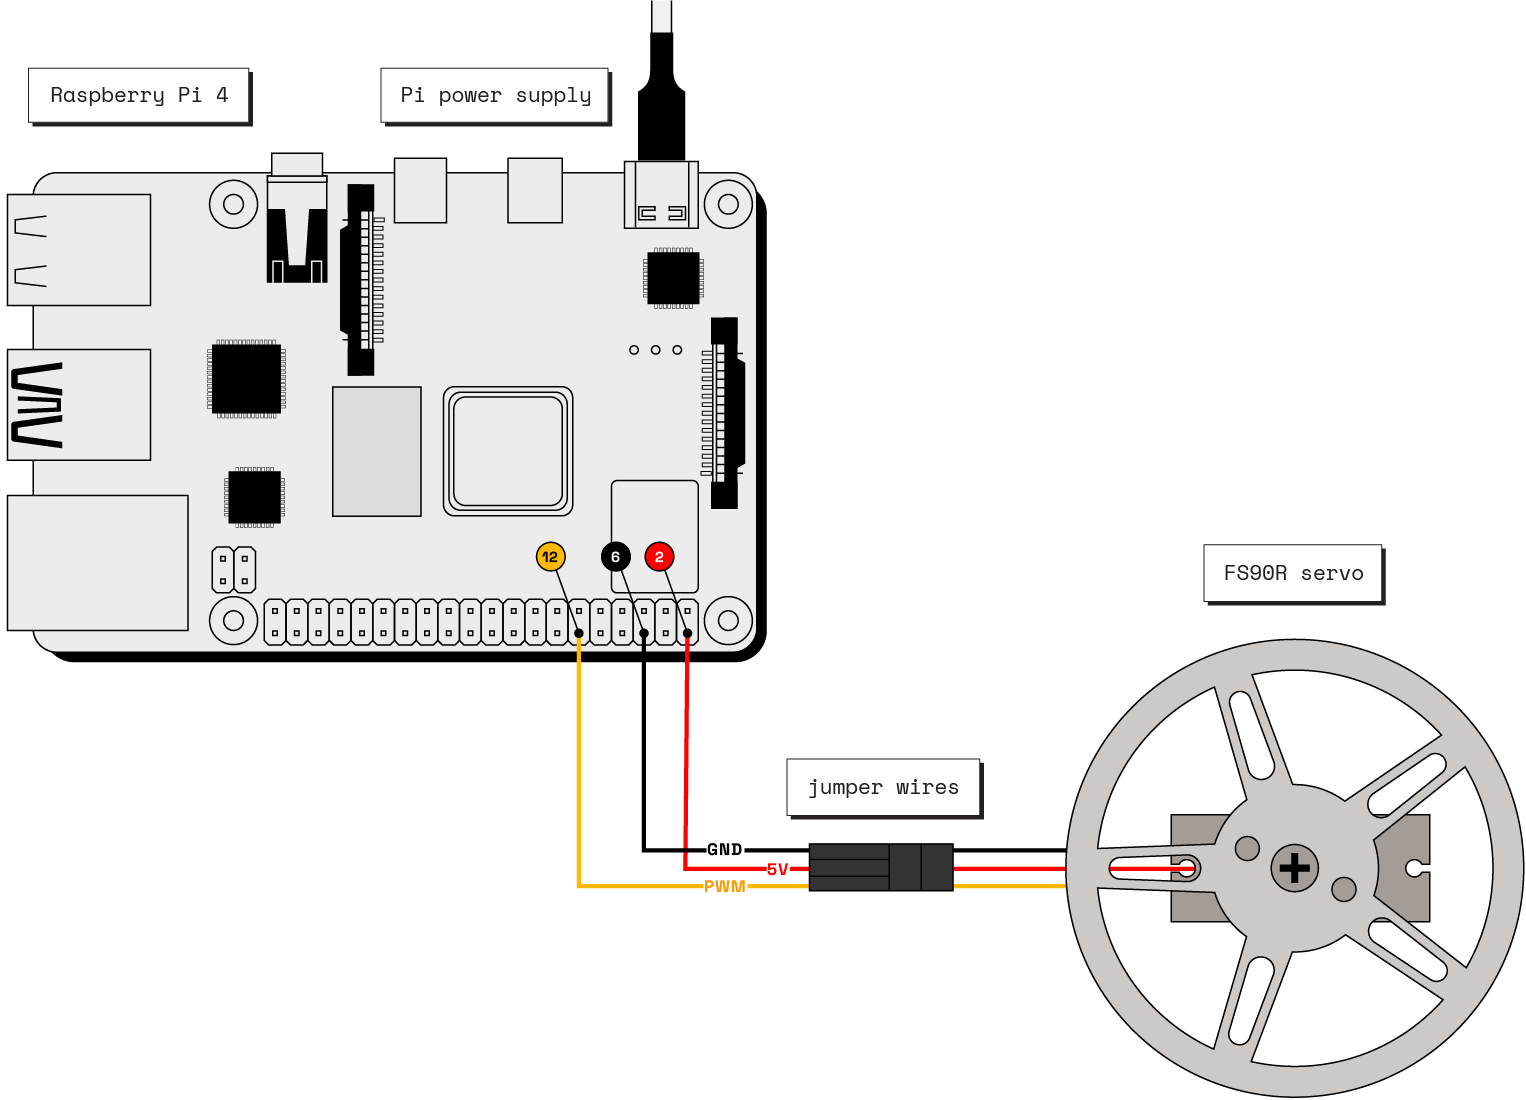
![Computer-drawn photo schematic of a Raspberry Pi connected to a FS90R servo. It shows the yellow wire coming from the servo as the PWM wire and it's attached to pin twelve on the raspberry pi. The red wire coming from the servo is a five-volt wire and it's attached to pin two. The black wire coming from the servo is the ground wire and it's attached to pin eight.](/tutorials/single-component-tutorials-servo-mousemover/servo-wiring-diagram.png)

Once you have the wires connected, attach the wheel/arm to servo and turn on the Raspberry Pi.

## Configure your machine

The servo is now physically connected to the Raspberry Pi, but Viam is not yet configured with the components to use it, so it's not able to control the servo.

Navigate to the **CONFIGURE** tab.

### Board component

Create a [board component](/reference/components/board/):

1. Navigate to the **CONFIGURE** tab of your machine's page.
1. Click the **+** icon next to your machine part in the left-hand menu and select **Blocks**.
1. Search for `raspberry pi`, then select the `raspberry-pi/rpi` block if you are using a Raspberry Pi 4, Raspberry Pi 3 or Raspberry Pi Zero 2 W.
   If you are using a Raspberry Pi 5, use the `raspberry-pi/rpi5` block instead.

1. Enter the name `local` for your board and click **Add to machine**.

> **Tip:**
> 
> You can name the board whatever you want, but if you change the name you must update the references to the board in the code we use later.

### Servo component

Create a [servo component](/reference/components/servo/):

1. Navigate to the **CONFIGURE** tab of your machine's page.
1. Click the **+** icon next to your machine part in the left-hand menu and select **Blocks**.
1. Search for `rpi-servo`, then select the `raspberry-pi/rpi-servo` block.
1. Enter the name `fs90f` for your servo and click **Add to machine**.

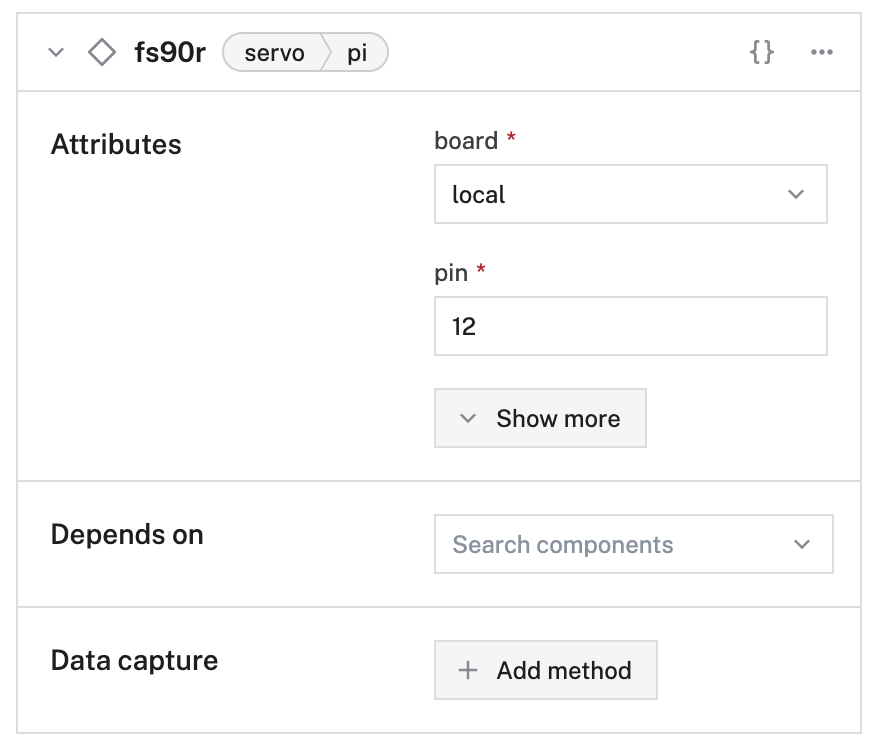
After clicking **Add to machine**, you see where you can put in attributes for the servo.
This is where you tell Viam which hardware pin to use to control the servo.

- For `"pin"` use `12` - this is the pin you attached the PWM (Pulse Width Modulation) jumper wire to.
- For `"board"` select `"local"`.

The attribute section will look like this:
![The servo configuration panel It shows attributes. 'Pin' is filled in with '12' and 'Board' is filled in with 'local'. Pin and board are required fields.](/tutorials/single-component-tutorials-servo-mousemover/servo-config.png)

Click the **Save** button in the upper right corner of the screen to save your config.

## Control the servo with the web UI

If everything went well, the servo started to move.

<div class="td-max-width-on-larger-screens">


  <div class="gif">
    <video autoplay loop muted playsinline alt="Black and white frankenstein clip with man with brown hair in lab coat frantically looking around and yelling while text that says &#34;IT&#39;S ALIVE! IT&#39;S ALIVE!&#34; is on screen. There&#39;s a very tall man with something on his head on a table behind him and another man sitting on a chair behind the table." width="100%" style="width: 400px" class=" lozad"><source data-src="/tutorials/single-component-tutorials-servo-mousemover/its-alive.webm" type="video/webm"><source data-src="/tutorials/single-component-tutorials-servo-mousemover/its-alive.mp4" type="video/mp4">There should have been a video here but your browser does not seem to support it.
    </video>
    <noscript>
      <video autoplay loop muted playsinline alt="Black and white frankenstein clip with man with brown hair in lab coat frantically looking around and yelling while text that says &#34;IT&#39;S ALIVE! IT&#39;S ALIVE!&#34; is on screen. There&#39;s a very tall man with something on his head on a table behind him and another man sitting on a chair behind the table." width="100%" style="width: 400px" class=""><source data-src="/tutorials/single-component-tutorials-servo-mousemover/its-alive.webm" type="video/webm"><source data-src="/tutorials/single-component-tutorials-servo-mousemover/its-alive.mp4" type="video/mp4">There should have been a video here but your browser does not seem to support it.
      </video>
    </noscript>
  </div>
</div>

Navigate to the **CONTROL** tab and press the **STOP** button on the servo card (matching what you named the servo) to stop the servo.

<div class="td-max-width-on-larger-screens">


  <div class="gif">
    <video autoplay loop muted playsinline alt="Red square button with the word STOP on it with an animation of a finger mouse pointer clicking it." width="100%" style="width: 150px" class=" lozad"><source data-src="/tutorials/single-component-tutorials-servo-mousemover/stop.webm" type="video/webm"><source data-src="/tutorials/single-component-tutorials-servo-mousemover/stop.mp4" type="video/mp4">There should have been a video here but your browser does not seem to support it.
    </video>
    <noscript>
      <video autoplay loop muted playsinline alt="Red square button with the word STOP on it with an animation of a finger mouse pointer clicking it." width="100%" style="width: 150px" class=""><source data-src="/tutorials/single-component-tutorials-servo-mousemover/stop.webm" type="video/webm"><source data-src="/tutorials/single-component-tutorials-servo-mousemover/stop.mp4" type="video/mp4">There should have been a video here but your browser does not seem to support it.
      </video>
    </noscript>
  </div>
</div>

Click on the top of the servo card to open the servo controls.

**Angle** will determine what speed your servo goes and in what direction.
90 degrees is the midway point and is the stopping point.
Try changing the angle to a few different settings.

<div class="td-max-width-on-larger-screens">


  <div class="gif">
    <video autoplay loop muted playsinline alt="Animation of the servo&#39;s angle being changed with the web UI." width="100%" style="width: " class=" lozad"><source data-src="/tutorials/single-component-tutorials-servo-mousemover/angle-100.webm" type="video/webm"><source data-src="/tutorials/single-component-tutorials-servo-mousemover/angle-100.mp4" type="video/mp4">There should have been a video here but your browser does not seem to support it.
    </video>
    <noscript>
      <video autoplay loop muted playsinline alt="Animation of the servo&#39;s angle being changed with the web UI." width="100%" style="width: " class=""><source data-src="/tutorials/single-component-tutorials-servo-mousemover/angle-100.webm" type="video/webm"><source data-src="/tutorials/single-component-tutorials-servo-mousemover/angle-100.mp4" type="video/mp4">There should have been a video here but your browser does not seem to support it.
      </video>
    </noscript>
  </div>
</div>

## Assemble the mouse mover

Now that you've confirmed that the software and hardware are connected and working correctly with Viam, let's assemble the mouse mover.

### Position the Raspberry Pi and servo in the box

Put the Raspberry Pi and servo in the box and mark out where each should be, then take the Raspberry Pi out.
Now, make sure the servo is close to level with the top (leaving a tiny bit of room for the circle cut out and tape).
Tape the servo in place.

<div class="td-max-width-on-larger-screens">


  <div class="gif">
    <video autoplay loop muted playsinline alt="One hand holds a shallow box while the other holds a servo against the bottom and turns it to show the audience how flush the servo is to the top." width="100%" style="width: " class=" lozad"><source data-src="/tutorials/single-component-tutorials-servo-mousemover/servo-in-box.webm" type="video/webm"><source data-src="/tutorials/single-component-tutorials-servo-mousemover/servo-in-box.mp4" type="video/mp4">There should have been a video here but your browser does not seem to support it.
    </video>
    <noscript>
      <video autoplay loop muted playsinline alt="One hand holds a shallow box while the other holds a servo against the bottom and turns it to show the audience how flush the servo is to the top." width="100%" style="width: " class=""><source data-src="/tutorials/single-component-tutorials-servo-mousemover/servo-in-box.webm" type="video/webm"><source data-src="/tutorials/single-component-tutorials-servo-mousemover/servo-in-box.mp4" type="video/mp4">There should have been a video here but your browser does not seem to support it.
      </video>
    </noscript>
  </div>
</div>

### Cut a holes in the box for the Pi

Place the Raspberry Pi back in the box and mark where the USB-C plug is so that you know where it is on the outside of the box.
Take out the Raspberry Pi.
Grab a box cutter and cut out a power hole.

<div class="td-max-width-on-larger-screens">


  <div class="gif">
    <video autoplay loop muted playsinline alt="This is a sped up gif of cutting a hole for the raspberry pi. First the person puts the raspberry pi inside to mark where the power holes are, then a mark is made on the lateral side of the box, then they pull out the raspberry pi and use boxcutters to cut a hole." width="100%" style="width: " class=" lozad"><source data-src="/tutorials/single-component-tutorials-servo-mousemover/pi-hole.webm" type="video/webm"><source data-src="/tutorials/single-component-tutorials-servo-mousemover/pi-hole.mp4" type="video/mp4">There should have been a video here but your browser does not seem to support it.
    </video>
    <noscript>
      <video autoplay loop muted playsinline alt="This is a sped up gif of cutting a hole for the raspberry pi. First the person puts the raspberry pi inside to mark where the power holes are, then a mark is made on the lateral side of the box, then they pull out the raspberry pi and use boxcutters to cut a hole." width="100%" style="width: " class=""><source data-src="/tutorials/single-component-tutorials-servo-mousemover/pi-hole.webm" type="video/webm"><source data-src="/tutorials/single-component-tutorials-servo-mousemover/pi-hole.mp4" type="video/mp4">There should have been a video here but your browser does not seem to support it.
      </video>
    </noscript>
  </div>
</div>

Since the Raspberry Pi will be in a box and won't have much ventilation, cutting a courtesy hole to allow for it to vent is the least we could do to keep it from frying.

<div class="td-max-width-on-larger-screens">


  <div class="gif">
    <video autoplay loop muted playsinline alt="This is sped up gif showing cutting the heat hole for the Raspberry Pi. First, they put the Raspberry Pi inside and identify where they need to cut on the bottom of the box, they then pull the Raspberry Pi out. Then they use box cutters to cut a one-inch by two-inch hole." width="100%" style="width: " class=" lozad"><source data-src="/tutorials/single-component-tutorials-servo-mousemover/vent-box.webm" type="video/webm"><source data-src="/tutorials/single-component-tutorials-servo-mousemover/vent-box.mp4" type="video/mp4">There should have been a video here but your browser does not seem to support it.
    </video>
    <noscript>
      <video autoplay loop muted playsinline alt="This is sped up gif showing cutting the heat hole for the Raspberry Pi. First, they put the Raspberry Pi inside and identify where they need to cut on the bottom of the box, they then pull the Raspberry Pi out. Then they use box cutters to cut a one-inch by two-inch hole." width="100%" style="width: " class=""><source data-src="/tutorials/single-component-tutorials-servo-mousemover/vent-box.webm" type="video/webm"><source data-src="/tutorials/single-component-tutorials-servo-mousemover/vent-box.mp4" type="video/mp4">There should have been a video here but your browser does not seem to support it.
      </video>
    </noscript>
  </div>
</div>

Be sure to tape the jumper wires out of the way of the servo.

### Cut the mouse mover circle out of the box and tape to servo

The technique we used to find the center of the circle was to mark the screw on the servo.
Gently push on the box to get a mark on the inside of the box, then create a cut we could see from the other side.

<div class="td-max-width-on-larger-screens">


  <div class="gif">
    <video autoplay loop muted playsinline alt="This is sped up gif showing using a marker and marking the screw of the servo, then shutting the box quick and getting the marker on the lid, then opening it back up. Then using that mark to make a cut with a box cutter, and on the other side of the lid which is the outside, marking that cut hole and putting a large roll of tape down to draw a circle. Finally, cutting the circle out with box cutters." width="100%" style="width: " class=" lozad"><source data-src="/tutorials/single-component-tutorials-servo-mousemover/cut-box.webm" type="video/webm"><source data-src="/tutorials/single-component-tutorials-servo-mousemover/cut-box.mp4" type="video/mp4">There should have been a video here but your browser does not seem to support it.
    </video>
    <noscript>
      <video autoplay loop muted playsinline alt="This is sped up gif showing using a marker and marking the screw of the servo, then shutting the box quick and getting the marker on the lid, then opening it back up. Then using that mark to make a cut with a box cutter, and on the other side of the lid which is the outside, marking that cut hole and putting a large roll of tape down to draw a circle. Finally, cutting the circle out with box cutters." width="100%" style="width: " class=""><source data-src="/tutorials/single-component-tutorials-servo-mousemover/cut-box.webm" type="video/webm"><source data-src="/tutorials/single-component-tutorials-servo-mousemover/cut-box.mp4" type="video/mp4">There should have been a video here but your browser does not seem to support it.
      </video>
    </noscript>
  </div>
</div>

### Tape the box shut, add "baby gates", and plug in the Raspberry Pi

When taping the box shut be sure the servo with the circle cut out sits fairly flush to the top of the box.
Add "baby gates" or rails to keep the mouse from wandering off if it catches some friction.

<div class="td-max-width-on-larger-screens">


  <div class="gif">
    <video autoplay loop muted playsinline alt="This is sped up gif showing a person plugging in the power cable to the raspberry pi through the power hole made earlier, then pushing the rocker switch to turn it on. When the Raspberry Pi is turned on, the circle turns for a millisecond. Then they draw a swirl design on the circle. Then they make the circle spin and put a mouse on it and it falls off immediately. The next thing they do is they put cardboard on two sides of the box and at the end, they place the mouse on top." width="100%" style="width: " class=" lozad"><source data-src="/tutorials/single-component-tutorials-servo-mousemover/finish-box.webm" type="video/webm"><source data-src="/tutorials/single-component-tutorials-servo-mousemover/finish-box.mp4" type="video/mp4">There should have been a video here but your browser does not seem to support it.
    </video>
    <noscript>
      <video autoplay loop muted playsinline alt="This is sped up gif showing a person plugging in the power cable to the raspberry pi through the power hole made earlier, then pushing the rocker switch to turn it on. When the Raspberry Pi is turned on, the circle turns for a millisecond. Then they draw a swirl design on the circle. Then they make the circle spin and put a mouse on it and it falls off immediately. The next thing they do is they put cardboard on two sides of the box and at the end, they place the mouse on top." width="100%" style="width: " class=""><source data-src="/tutorials/single-component-tutorials-servo-mousemover/finish-box.webm" type="video/webm"><source data-src="/tutorials/single-component-tutorials-servo-mousemover/finish-box.mp4" type="video/mp4">There should have been a video here but your browser does not seem to support it.
      </video>
    </noscript>
  </div>
</div>

### Control your machine with code

Copy the code from the [mousemover GitHub repository](https://github.com/viam-labs/tutorial-mousemover) into your nano file, save it, and run it.

The code uses the Python SDK to securely connect to your machine.
Then, it enters a for loop in which **position** tells us the servo to move to positions (angles) between 80 and 93 degrees as specified in the **sequence** list.
The code uses **pause_time** to wait for a random amount of time between 5 and 20 seconds to stay at that position.

You can adjust the range (or speed/direction) by changing the two numbers in the position statement. (Currently set at 80 and 93).
You can also change the time that the servo is allowed to spin in any direction by changing the two numbers in the pause_time statement.
Experiment and have fun.

## Next steps

If you want to build more machines, take a look at our other [tutorials](/tutorials/).
And if you didn't like this tutorial and would like to speak to my manager, their name is

![Fuzzy box meant to censor text.](/tutorials/single-component-tutorials-servo-mousemover/censor.jpg) (Update: apparently that's a big no no.)

You can also join us in [Viam's Discord](https://discord.gg/viam) for any issues, comments, hardware chats, banter, and debates on if pineapple belongs on pizza or not.