Monitor Job Site Helmet Usage with Computer Vision

Personal protective equipment (PPE) helps keep us safe, but sometimes we need a reminder to use it consistently. If you want to monitor the usage of PPE equipment, you can address this problem using computer vision and a machine learning model that can detect if someone is wearing a hard hat.
By following this tutorial you will build a system that can monitor camera feeds and detect situations that require review. In other words, this system performs anomaly detection. Whenever the system detects an anomaly, like someone not wearing a hard hat, it will send an email notification.
First, you’ll set up and test the computer vision functionality that can detect people wearing a hard hat and wearing no hard hat. Next, you’ll set up data capture and sync to record images of people without hard hats and upload them to the cloud. Then, you’ll write a serverless function capable of sending email notifications. Finally, you’ll configure a trigger to trigger the serverless function when someone isn’t wearing a hard hat.
Learning Goals
After completing this tutorial, you will:
- know how the ML model service and the vision service work together
- be able to use the ML model service and the vision service on a machine with an existing model to interpret the world around the machine
- be able to use data capture and triggers to set up notifications based on a machine’s perception of the world around it
Requirements
Required hardware
- A camera such as a standard USB webcam. You can also test the hard hat detection system using the webcam built into your laptop.
- A computer capable of running
viam-server.
Optional hardware
If you want to set up your camera far away from your personal computer, you can use a webcam plugged into a single-board computer, powered by batteries. You could mount your machine in a stationary location like on a pole, or you could mount it on a rover. This tutorial covers the software side; you can get creative with the hardware.
Note that your machine must be connected to the internet for data sync and email notifications to work.
Required software
viam-server- Ultralytics YOLOv8, integrated with Viam using the YOLOv8 modular service
- YOLOv8 Hard Hat Detection model
objectfilter-cameramodular resource- Google Cloud Functions
- Python 3.8 or newer
- SendGrid
Set up your helmet monitor
Get your hardware ready and connected to the Viam platform:
Plug your webcam into your computer. Then, make sure your computer (whether it’s a personal computer or an SBC) is connected to adequate power, and turn it on.
Add a new machine on Viam.
On the machine’s page, follow the setup instructions to install viam-server on the computer you’re using for your project.
Wait until your machine has successfully connected to Viam.
Configure the camera and computer vision
Configure your physical camera
Configure your webcam so that your machine can get the video stream from the camera:
Navigate to your machine’s page. Check that the part status dropdown in the upper left of the page, next to your machine’s name, reads “Live”; this indicates that your machine is turned on and that its instance of
viam-serveris in contact with Viam.Click the + (Create) button next to your main part in the left-hand menu and select Blocks. Start typing “webcam” and select camera / webcam. Give your camera a name. This tutorial uses the name
my_webcamin all example code. Click Add to machine.Leave the video_path blank and the camera will use the default video path for your machine. If this doesn’t work when you test your camera later, you can try a different video path by following the prompt on the camera’s configuration panel.
Click Save in the top right corner of the screen to save your changes.
Test your physical camera
To test your camera, go to the CONTROL tab and click to expand your camera’s panel.
Toggle View my_webcam to the “on” position.
The video feed should display.
If it doesn’t, double-check that your config is saved correctly, and check the LOGS tab for errors.
Configure the vision service
Now that you know the camera is properly connected to your machine, it is time to add computer vision by configuring the vision service on your machine.
Viam’s built-in mlmodel vision service works with TensorFlow Lite models, but since this tutorial uses a YOLOv8 model, we will use a module from the modular resource registry that augments Viam with YOLOv8 integration.
The YOLOv8 module enables you to use any YOLOv8 model with your Viam machines.
Navigate to your machine’s CONFIGURE tab.
Click the + (Create) button next to your main part in the left-hand menu and select Blocks. Start typing
yoloand select vision / yolov8 from the registry options. Click Add module.Give your vision service a name, for example
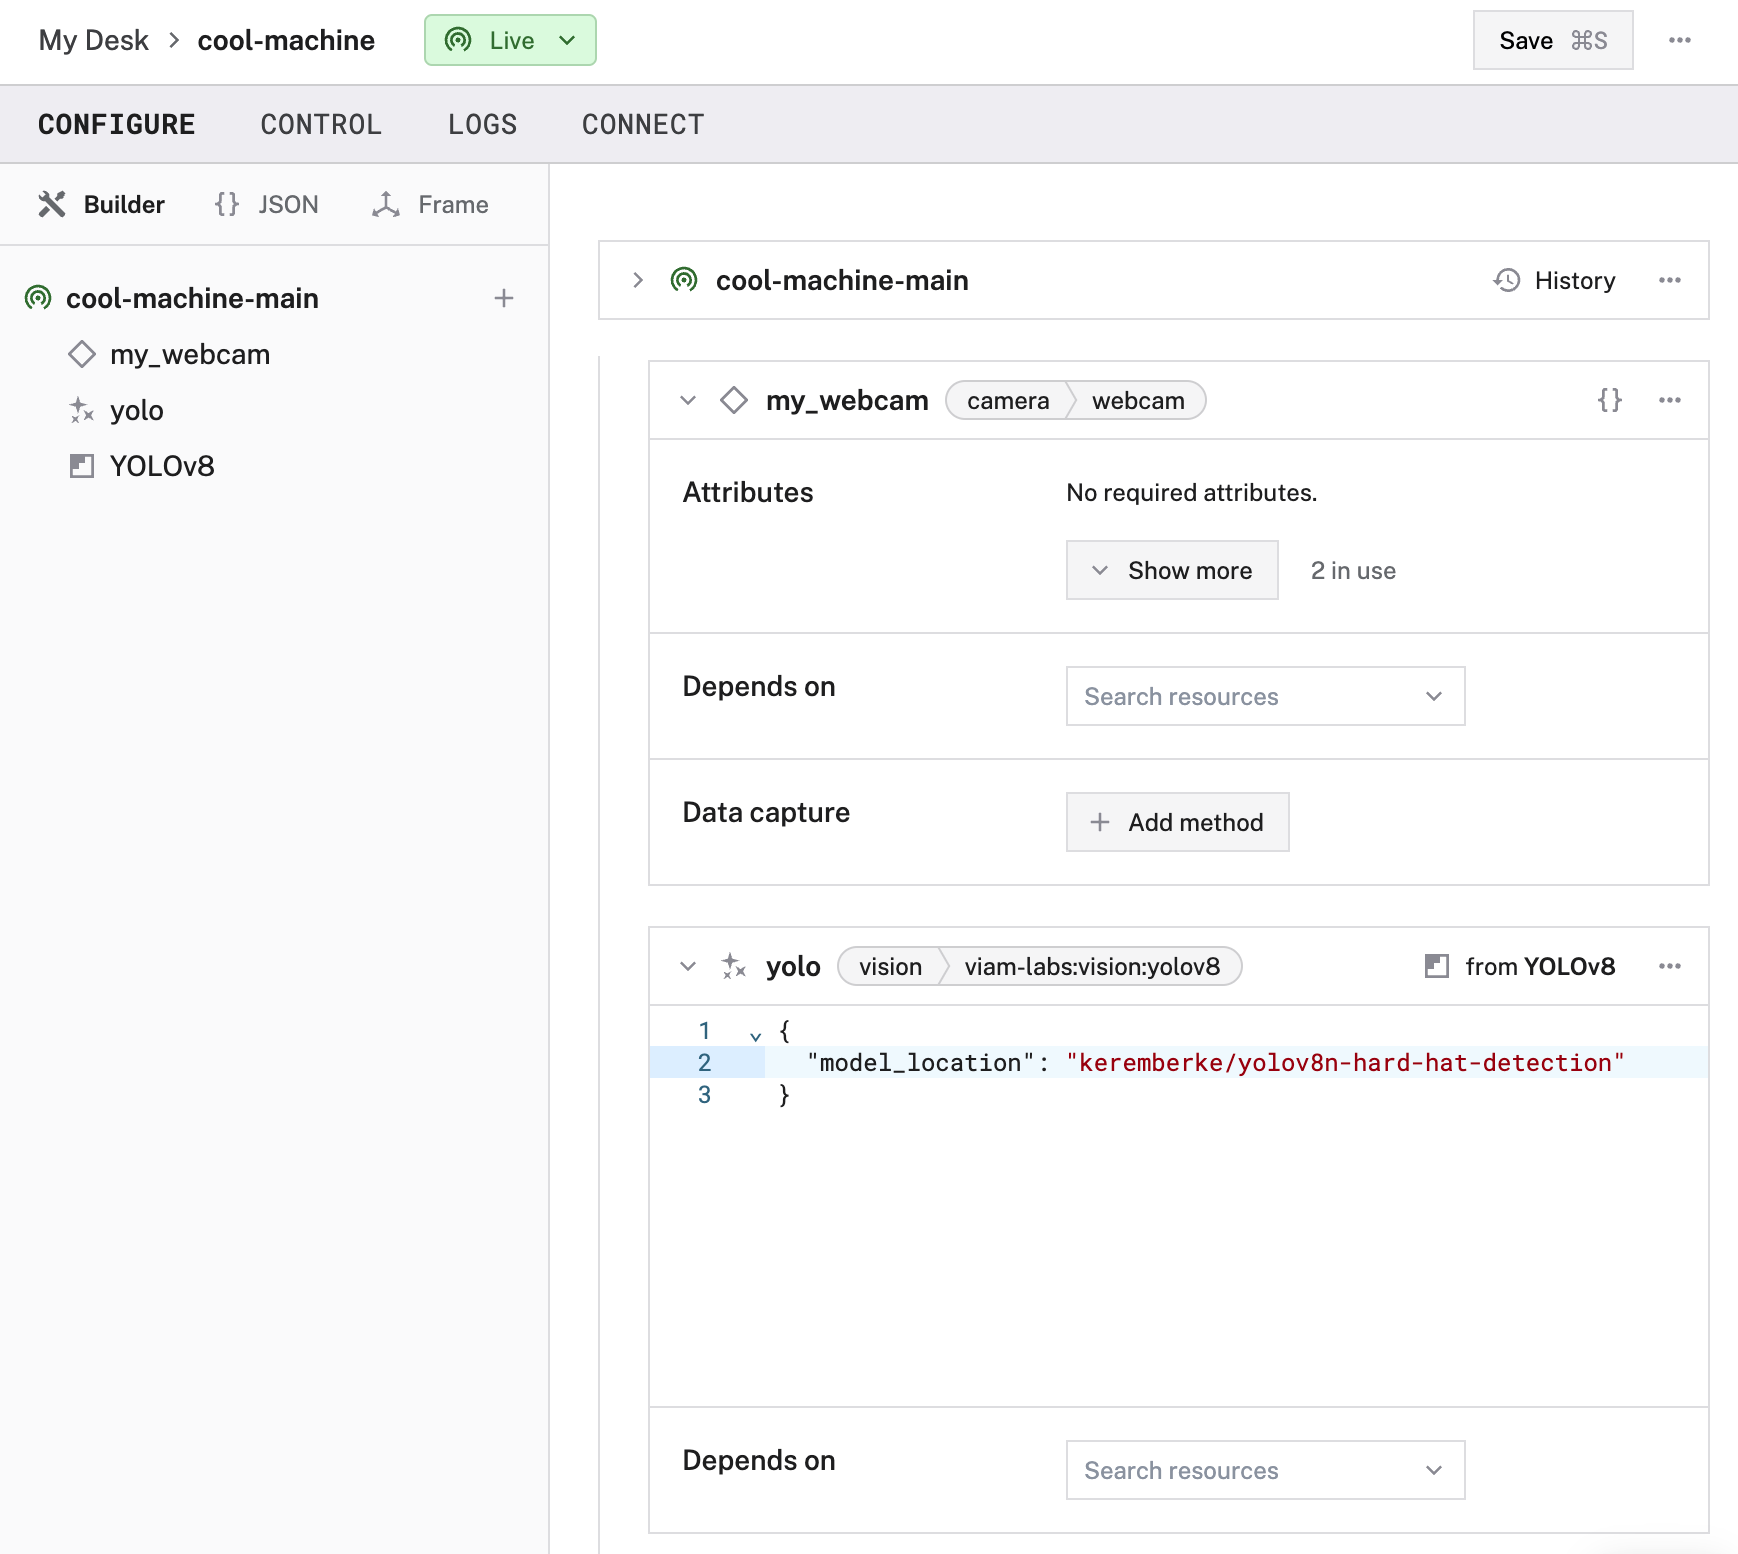
yolo, and click Add to machine.In the attributes field of your new vision service, paste the following JSON:
{
  "model_location": "keremberke/yolov8n-hard-hat-detection"
}
This tells the vision service where to look for the hard hat detection model we are using for this tutorial.
Your vision service config should now resemble the following:
Click Save in the top right corner of the screen to save your changes.

Configure the objectfilter module
The physical camera is working and the vision service is set up.
Now you will pull them together with the objectfilter module.
This module takes a vision service (in this case, your hard hat detector) and applies it to your webcam feed.
It outputs a stream with bounding boxes around the hard hats (and people without hard hats) in your camera’s view so that you can see the detector working.
This module also filters the output so that later, when you configure data management, you can save only the images that contain people without hard hats rather than all images the camera captures.
Navigate to your machine’s CONFIGURE tab.
Click the + (Create) button next to your main part in the left-hand menu and select Blocks. Start typing
objectfilterand select camera / objectfilter from the results. Click Add module.Name your filtering camera something like
objectfilter-camand click Add to machine.Paste the following into the attributes field:
{
  "filter_data": true,
  "camera": "my_webcam",
  "vision_services": ["yolo"],
  "labels": ["Hardhat", "NO-Hardhat"],
  "confidence": 0.5,
  "display_boxes": true
}
If you named your detector something other than “yolo,” edit the
vision_servicesvalue accordingly. You can also edit the confidence threshold. If you change it to0.6for example, theobjectfiltercamera will only return labeled bounding boxes when the vision model indicates at least 60% confidence that the object is a hard hat or a person without a hard hat.Setting the
filter_dataattribute totruemeans that later, when you configure data capture on this camera, only images that have one or more of the labels will be captured and sent to the cloud. For testing purposes, leave both labels in the array for now. We will remove the"Hardhat"label from the configuration later so that the camera only captures and saves images when someone isn’t wearing a hard hat.Your
objectfiltercamera configuration should now resemble the following: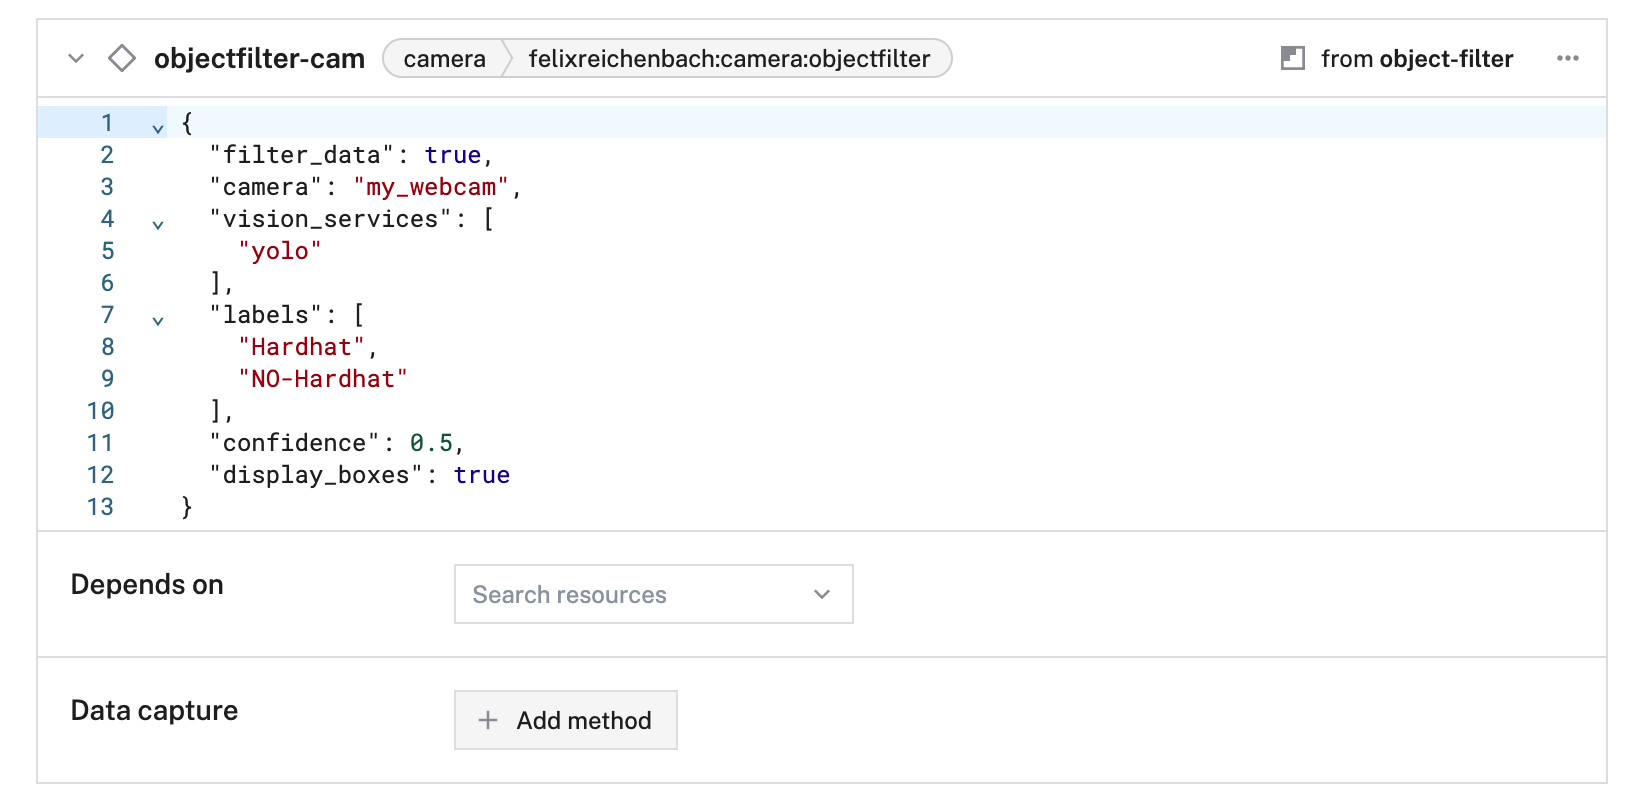
Click Save in the top right corner of the screen to save your changes.

Test the detector
Now that the detector is configured, it’s time to test it!
Navigate to the CONTROL tab.
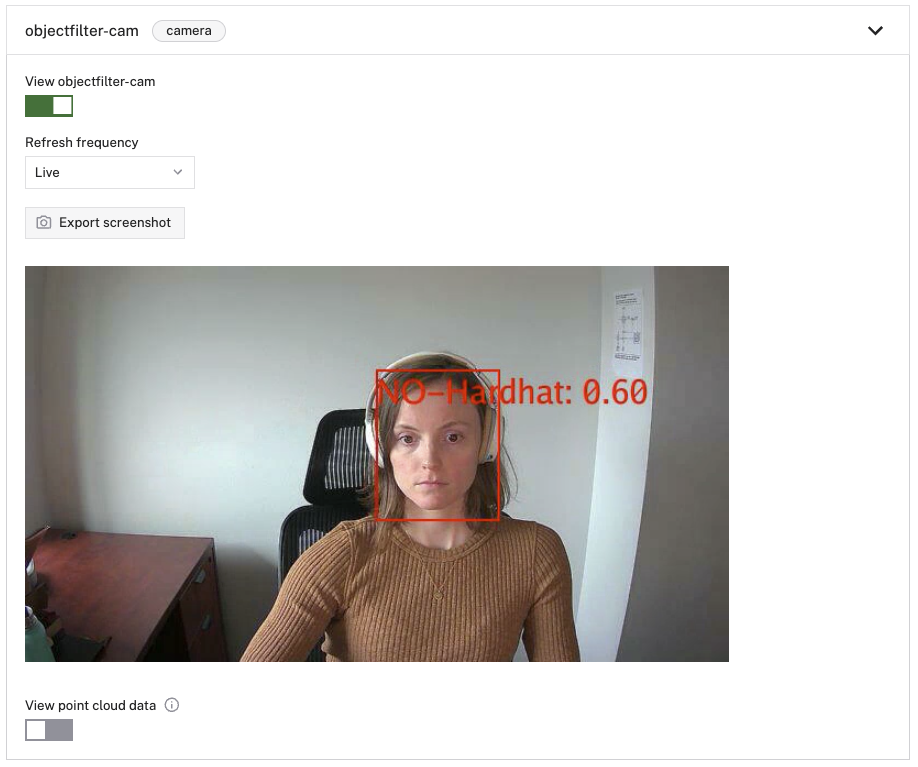
Click the objectfilter_cam panel to open your detector camera controls.
Toggle View objectfilter_cam to the “on” position. This displays a live feed from your webcam with detection bounding boxes overlaid on it.
The detector can recognize humans with and without hard hats on. Try positioning yourself in front of the camera without anything on your head, and then with a helmet on, and watch the bounding boxes appear.

Configure data capture and sync
Viam’s built-in data management service allows you to, among other things, capture images and sync them to the cloud.
For this project, you will capture images of people without hard hats so that you can see who wasn’t wearing one, and so that you can trigger notifications when these images are captured and synced.
Configure data capture on the objectfilter camera to capture images of people without hard hats:
First, you need to add the data service to your machine to make it available to capture data on your camera.
Navigate to your machine’s CONFIGURE tab.
Click the + (Create) button next to your main part in the left-hand menu and select Blocks. Type “data” and click data management / RDK. Name your data management service
data-managerand click Add to machine.Leave all the default data service attributes as they are and click Save in the top right corner of the screen to save your changes.
Now you’re ready to enable data capture on your detector camera. Locate the
objectfilter-campanel.Click Add method. Click the Type dropdown and select GetImages. Set the capture frequency to
0.2images per second (equivalent to one image every 5 seconds). You can always change the frequency to suit your use case. Set the MIME type toimage/jpeg.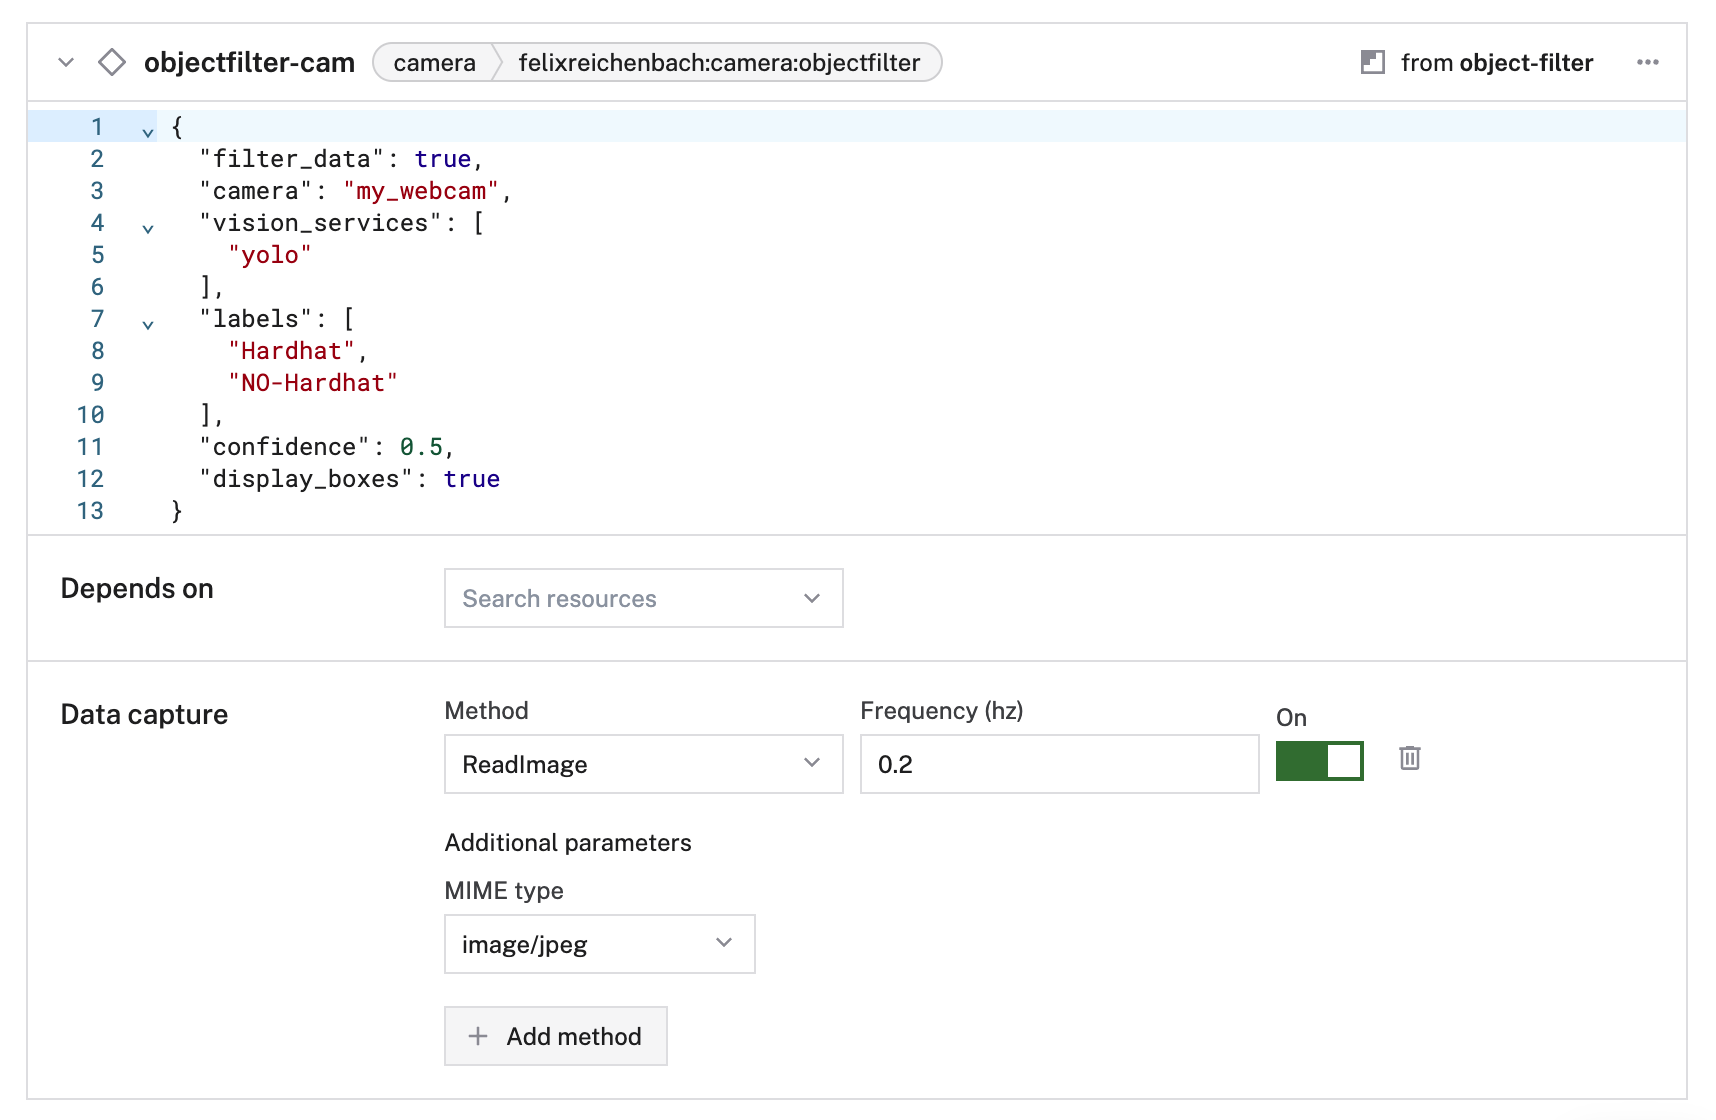

Test data capture and sync
To make sure the detector camera is capturing and syncing labeled images:
Position yourself in front of your webcam for approximately 30 seconds to let it capture a few images of a person without a hard hat on.
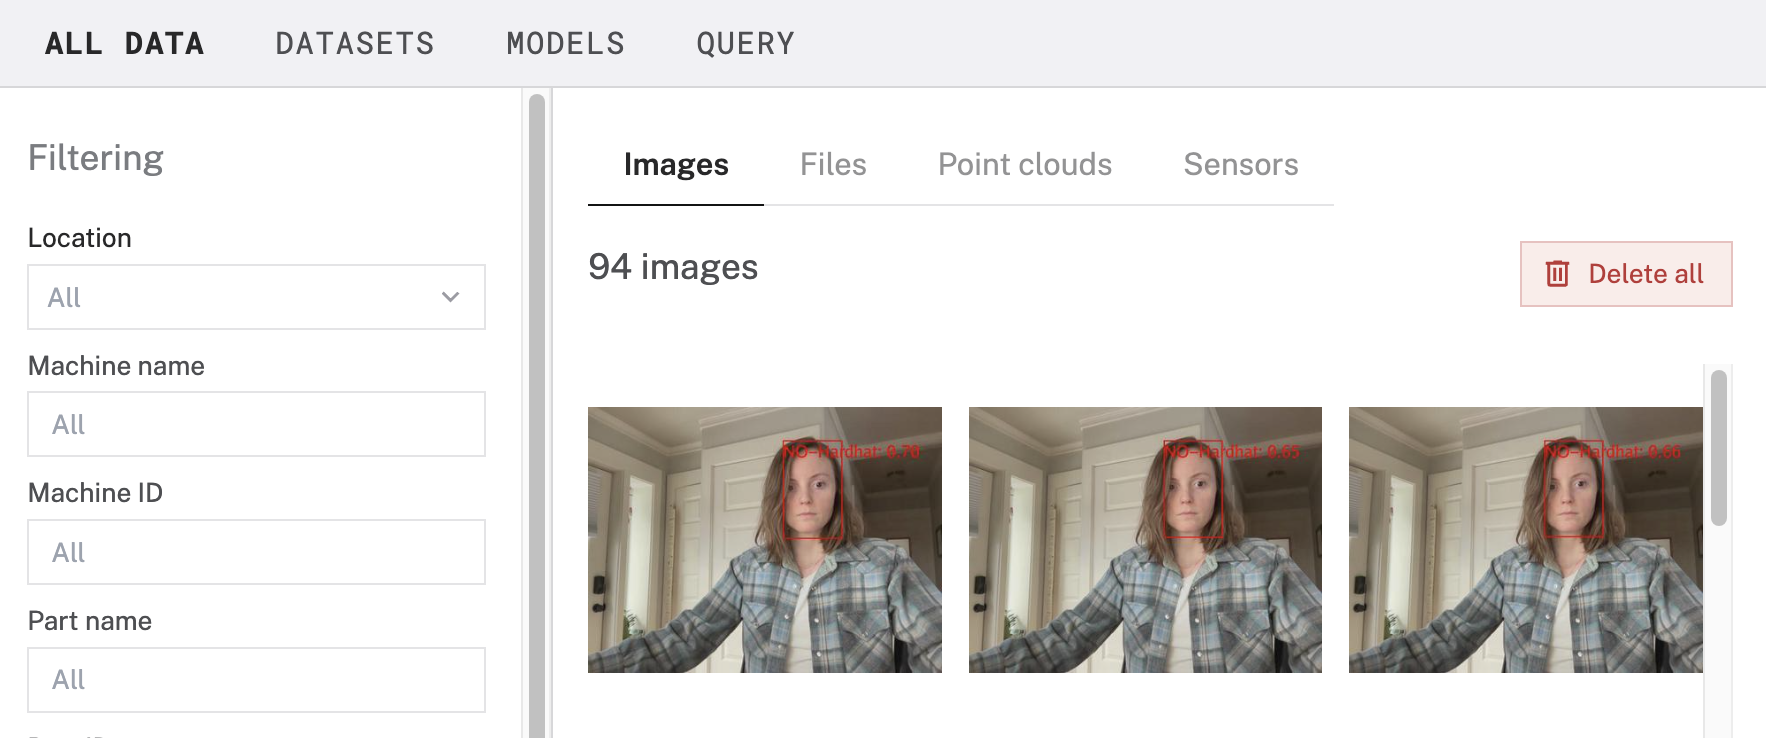
Navigate to your DATA page. You should see some images with bounding boxes on them. If you do not, try refreshing the page.
You can also try this with a hard hat on your head.


Modify the detector config to sync only images without hard hats
Until now, you’ve been identifying people without hard hats as well as people with hard hats. Now that you have verified that the detector and data sync are working, modify your config so that only images with people without hard hats are captured:
Navigate to your
objectfilter-camcard on the CONFIGURE tab.Delete the
"Hardhat",line from the"labels"array.Click Save in the top right corner of the screen to save your changes.
Set up email notifications
Triggers allow you to send webhook requests or email notifications when certain events happen.
For example, you can set up a trigger to perform an action whenever an image of someone without a hard hat is uploaded to the cloud.
You can set up the trigger with a serverless function which sends you a customized email or with Viam’s built-in email alerts which sends a generic email letting you know that data has been synced.
If you wish to use Viam’s built-in email alerts, skip ahead to configuring a trigger on your machine. To set up a serverless function, continue reading.
Create a serverless function
Before you configure a trigger on your machine, you need to create a serverless function for the trigger to call. A serverless function is a simple script that is hosted by a service such as Google Cloud Functions or AWS Lambda. You don’t need to host it on your machine; instead, it is always available and runs only when an event triggers it.
Set up your cloud function scaffold
For this project, we used Google Cloud Functions, and wrote our function in Python. If you are new to cloud functions, you may find this getting started guide useful.
- Create a Google Cloud (GCP) account.
- Create a project, then search for Cloud Functions in the Google Cloud console search bar.
- Click CREATE FUNCTION.
- Choose
1st genas the Environment. - Give your function a name. We called ours “hat-email.”
- Choose your region.
- For trigger type, choose
HTTP. - Click NEXT.
- For Runtime, choose
Python 3.8. - Click Deploy. The demo function won’t do anything exciting yet; keep going through the next few sections before testing it.
Configure email credentials
To write a function that sends an email, you need a service that can send emails. For this project we used SendGrid (which has a free tier) to make configuration of your email notifications simpler. Follow these instructions to create a SendGrid account and configure the SendGrid API credentials for your Google Cloud Function:
- Enable SendGrid Email API through the Google Cloud Marketplace.
- Create a SendGrid account and confirm your email.
- Create a SendGrid API key with Mail Send > Full Access permissions.
- Store your API key with the Google Cloud Function console:
- In the top banner of your console, click Edit.
- Click to expand Runtime, build, connections and security settings.
- Under Runtime environment variables, click ADD VARIABLE.
For the name, enter
EMAIL_API_KEY. For the value, paste the API key you generated with SendGrid. - Click NEXT.
Write the cloud function code
SendGrid’s Email API Quickstart contains more information about the functionality of the SendGrid API. The following code is adapted from that example.
Copy and paste the following code into your cloud function source code
main.pyfile and change the email address parametersfrom_emailandto_emails:import functions_framework import os import sendgrid from sendgrid import SendGridAPIClient from sendgrid.helpers.mail import Mail, Email, To, Content from python_http_client.exceptions import HTTPError def email(request): sg = sendgrid.SendGridAPIClient(api_key=os.environ.get('EMAIL_API_KEY')) message = Mail( # TODO: Change to the email you created the API key for from_email='youremailaddresstosendfrom@example.com', # TODO: Change to whichever email should receive the notification to_emails='youremailaddresstosendto@example.com', subject='Put on a helmet!', html_content='Hello!<br><br>Please remember to keep \ hard hats on where required. Thank you! \ <br><br>You can view captured images in \ <a href="https://app.viam.com/data/all?view=images">\ the DATA tab</a>.' ) # Get a JSON-ready representation of the Mail object mail_json = message.get() # Send an HTTP POST request to /mail/send response = sg.client.mail.send.post(request_body=mail_json)Edit the Entry point field from
hello_worldtoemailto match the function name.Select
requirements.txt (belowmain.py on the SOURCE console tab) and add the required dependencies:# Function dependencies, for example: # package>=version sendgrid functions-framework
Register an HTTP function
The trigger you will configure with Viam invokes the function with an HTTP request. You can learn more about HTTP functions in Google’s Write HTTP functions guide.
You need to add @functions_framework.http at the top of your function to register the HTTP function, and you need to add a return statement at the bottom to return an HTTP response.
Your final code should look like this:
import functions_framework
import os
import sendgrid
from sendgrid import SendGridAPIClient
from sendgrid.helpers.mail import Mail, Email, To, Content
from python_http_client.exceptions import HTTPError


@functions_framework.http
def email(request):

    sg = sendgrid.SendGridAPIClient(api_key=os.environ.get('EMAIL_API_KEY'))

    message = Mail(
        # Change to the email you created the API key for
        from_email='youremailaddresstosendfrom@example.com',
        # Change to whichever email should receive the notification
        to_emails='youremailaddresstosendto@example.com',
        subject='Put on a helmet!',
        html_content='Hello!<br><br>Please remember to keep \
        hard hats on where required. Thank you! \
        <br><br>You can view captured images in \
        <a href="https://app.viam.com/data/all?view=images">\
        the DATA tab</a>.'
    )

    # Get a JSON-ready representation of the Mail object
    mail_json = message.get()

    # Send an HTTP POST request to /mail/send
    response = sg.client.mail.send.post(request_body=mail_json)

    return 'Notification sent.'
Click DEPLOY.
For simplicity while developing and testing your code, you can allow unauthenticated HTTP function invocation, though we recommend that you ultimately set up proper authentication for better security.
Test the cloud function
Now you can test the script:
Navigate to the TRIGGER tab in the Google Cloud console.
Click the copy button to copy the trigger URL. Paste it into a new browser window and hit your Enter key. The browser should display “Notification sent.” If it displays an error, double-check your code, and double-check your access authorization.
Check your email inbox.
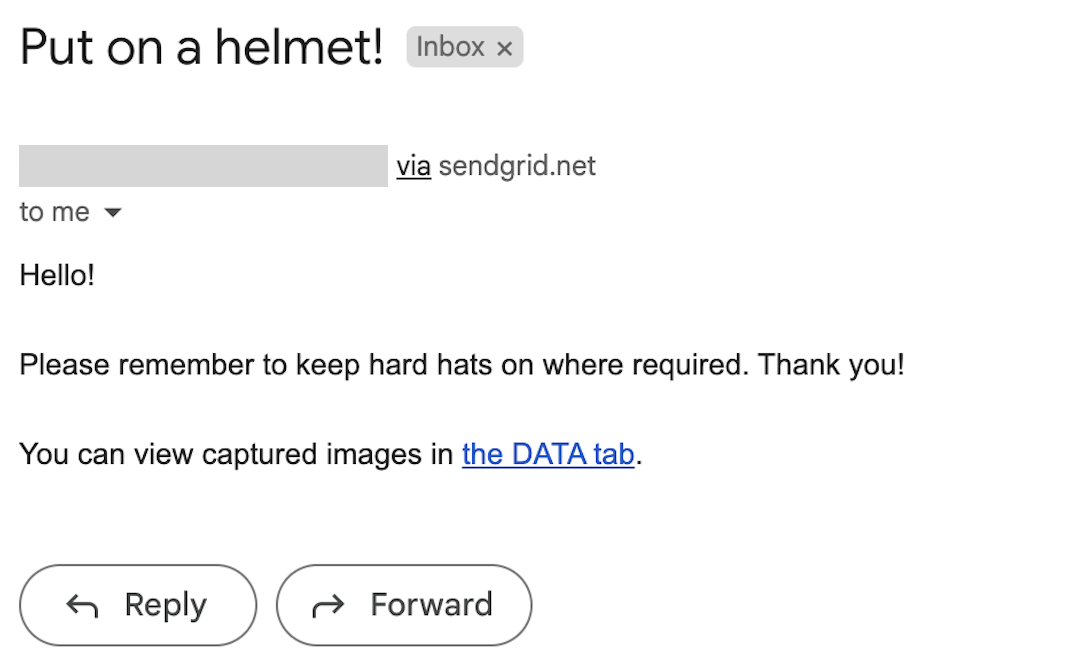
If you don’t see an email, check your spam folder. If you still don’t see an email, make sure your SendGrid account is fully set up (2FA enabled, email confirmed) and that your email API key is correctly configured.

Configure a trigger on your machine
Now it’s time to configure a trigger so that you get an email when a person is not wearing a hard hat. Since you configured data to sync only when an image of a person without a hard hat is captured, configuring the trigger to trigger each time an image is synced to the cloud will produce the desired result.
Go to the CONFIGURE tab of your machine. Click the + (Create) button in the left side menu and select Trigger.
Name the trigger and click Create.
Select trigger Type as Data has been synced to the cloud and Data Types as Binary (image).

To configure notifications, either
- add a webhook and enter the URL of your custom cloud function, if you created one
- add an email address to use Viam’s built-in email notifications
For both options also configure the time between notifications.
Click Save in the top right corner of the screen to save your changes.
Test the whole system
You’ve built all the pieces of the system and connected them together. Now it’s time to test the whole thing.
Make sure viam-server is running on your machine.
Position yourself, without a hard hat, in front of your camera.
Wait a couple of minutes for the email to arrive in your inbox.
Congratulations, you’ve successfully built your hard hat monitor!
Next steps
Here are some ways you could expand on this project:
Mount a camera on a rover and either drive it manually using remote control, or use the motion and navigation services to plan paths for the rover. Or, mount cameras in multiple places.
Change your cloud function to send a different kind of notification, or trigger some other action. For an example demonstrating how to configure text notifications, see the Detect a Person and Send a Photo tutorial.
Use a different existing model or train your own, to detect and send notifications about something else such as forklifts appearing in your camera stream.

Was this page helpful?
Glad to hear it! If you have any other feedback please let us know:
We're sorry about that. To help us improve, please tell us what we can do better:
Thank you!