> For AI agents: guidance on navigating Viam documentation is available at https://docs.viam.com/llms.txt.
# Integrate Viam with ChatGPT to Create a Companion Robot
Harness AI and use ChatGPT to add life to your Viam rover and turn it into a companion robot.
> Source: https://docs.viam.com/tutorials/projects/integrating-viam-with-openai/
When we think of robots, most of us tend to group them into categories:
- useful robots
- bad or scary robots
- good robots

One type of “good” robot is a companion robot - a robot created for the purposes of providing real or apparent companionship for human beings.
While some [examples](https://www.google.com/search?q=companion+robot) have recently been brought to market, primarily marketed towards children and the elderly, we are all familiar with robots from popular movies that ultimately have proven to be endearing companions and became embedded in our culture.
Think [C-3P0](https://en.wikipedia.org/wiki/C-3PO), [Baymax](https://en.wikipedia.org/wiki/Baymax!), and [Rosie](https://en.wikipedia.org/wiki/List_of_The_Jetsons_characters#Rosie) from the Jetsons.
AI language models like OpenAI's [ChatGPT](https://openai.com/blog/chatgpt/) are making companion robots with realistic, human-like speech a potential reality.
By combining ChatGPT with the Viam platform’s built-in [computer vision service](/reference/services/vision/), ML model support, and [locomotion](/reference/components/base/), you can within a few hours create a basic companion robot that:
- Listens with a microphone, converts speech-to-text, gets a response from ChatGPT.
- Converts GPT response text to speech and "speaks" the response through a speaker.
- Follows commands like "move forward" and "spin".
- Makes observations about its environment when asked questions like "What do you see?".
This tutorial will show you how to use the Viam platform to create an AI-integrated robot with less than 200 lines of code.
## Hardware list
- [Raspberry Pi with microSD card](https://a.co/d/bxEdcAT), with [`viam-server` installed](/reference/device-setup/rpi-setup/).
- A configured rover with a webcam and a microphone, such as the [Viam Rover](https://www.viam.com/resources/rover)
- [270 degree servo](https://www.amazon.com/ANNIMOS-Digital-Waterproof-DS3218MG-Control/dp/B076CNKQX4/)
- [USB powered speaker](https://www.amazon.com/Bluetooth-Portable-Wireless-Speakers-Playtime/dp/B07PLFCP3W/) (with included 3.5mm audio cable and USB power cable)
- A servo mounting bracket - [3D printed](https://www.thingiverse.com/thing:3995995) or [purchased](https://www.amazon.com/Bolsen-Servos-Bracket-Sensor-Compatible/dp/B07HQB95VY/)
- A servo disc - [3D printed](https://github.com/viam-labs/tutorial-openai-integration/blob/main/servo_disc_large.stl) (preferred, as it is an ideal size) or [purchased](https://www.amazon.com/outstanding-Silvery-Aluminum-Steering-Screws/dp/B0BDDZW1FG/)
## Rover setup
This tutorial assumes that you have already set up your Viam Rover.
If not, first follow the Viam Rover [setup instructions](/reference/device-setup/viam-rover/setup/).
If you are not using a Viam Rover, add a new machine.
Then follow the [setup instructions](/reference/glossary/#term-setup)
to install `viam-server` on the computer you're using for your project and connect to Viam.
Wait until your machine has successfully connected.
Then configure your machine with the [hardware components](/reference/glossary/#term-component)
.
If you are using a different rover, the [Configure a Rover like Yahboom or SCUTTLE](/tutorials/configure/configure-rover/) may help you configure your rover.
### 1. Connect the servo
We'll use a [servo](/reference/components/servo/) in this project to indicate emotion, by rotating the servo to a position that shows a happy, sad, or angry emoji.
> **Caution:**
>
> Always disconnect devices from power before plugging, unplugging, moving wires, or otherwise modifying electrical circuits.
Power off your rover.
Wire your servo to the Pi by attaching the black wire to ground, red wire to [an available 5V pin](https://pinout.xyz/pinout/5v_power), and signal wire (often yellow) to [pin 8](https://pinout.xyz/pinout/pin8_gpio14).
If your servo wires are attached to one another and the order does not match the pins on the board, you can use male-female jumper wires to connect them.
### 2. Mount the servo to your rover
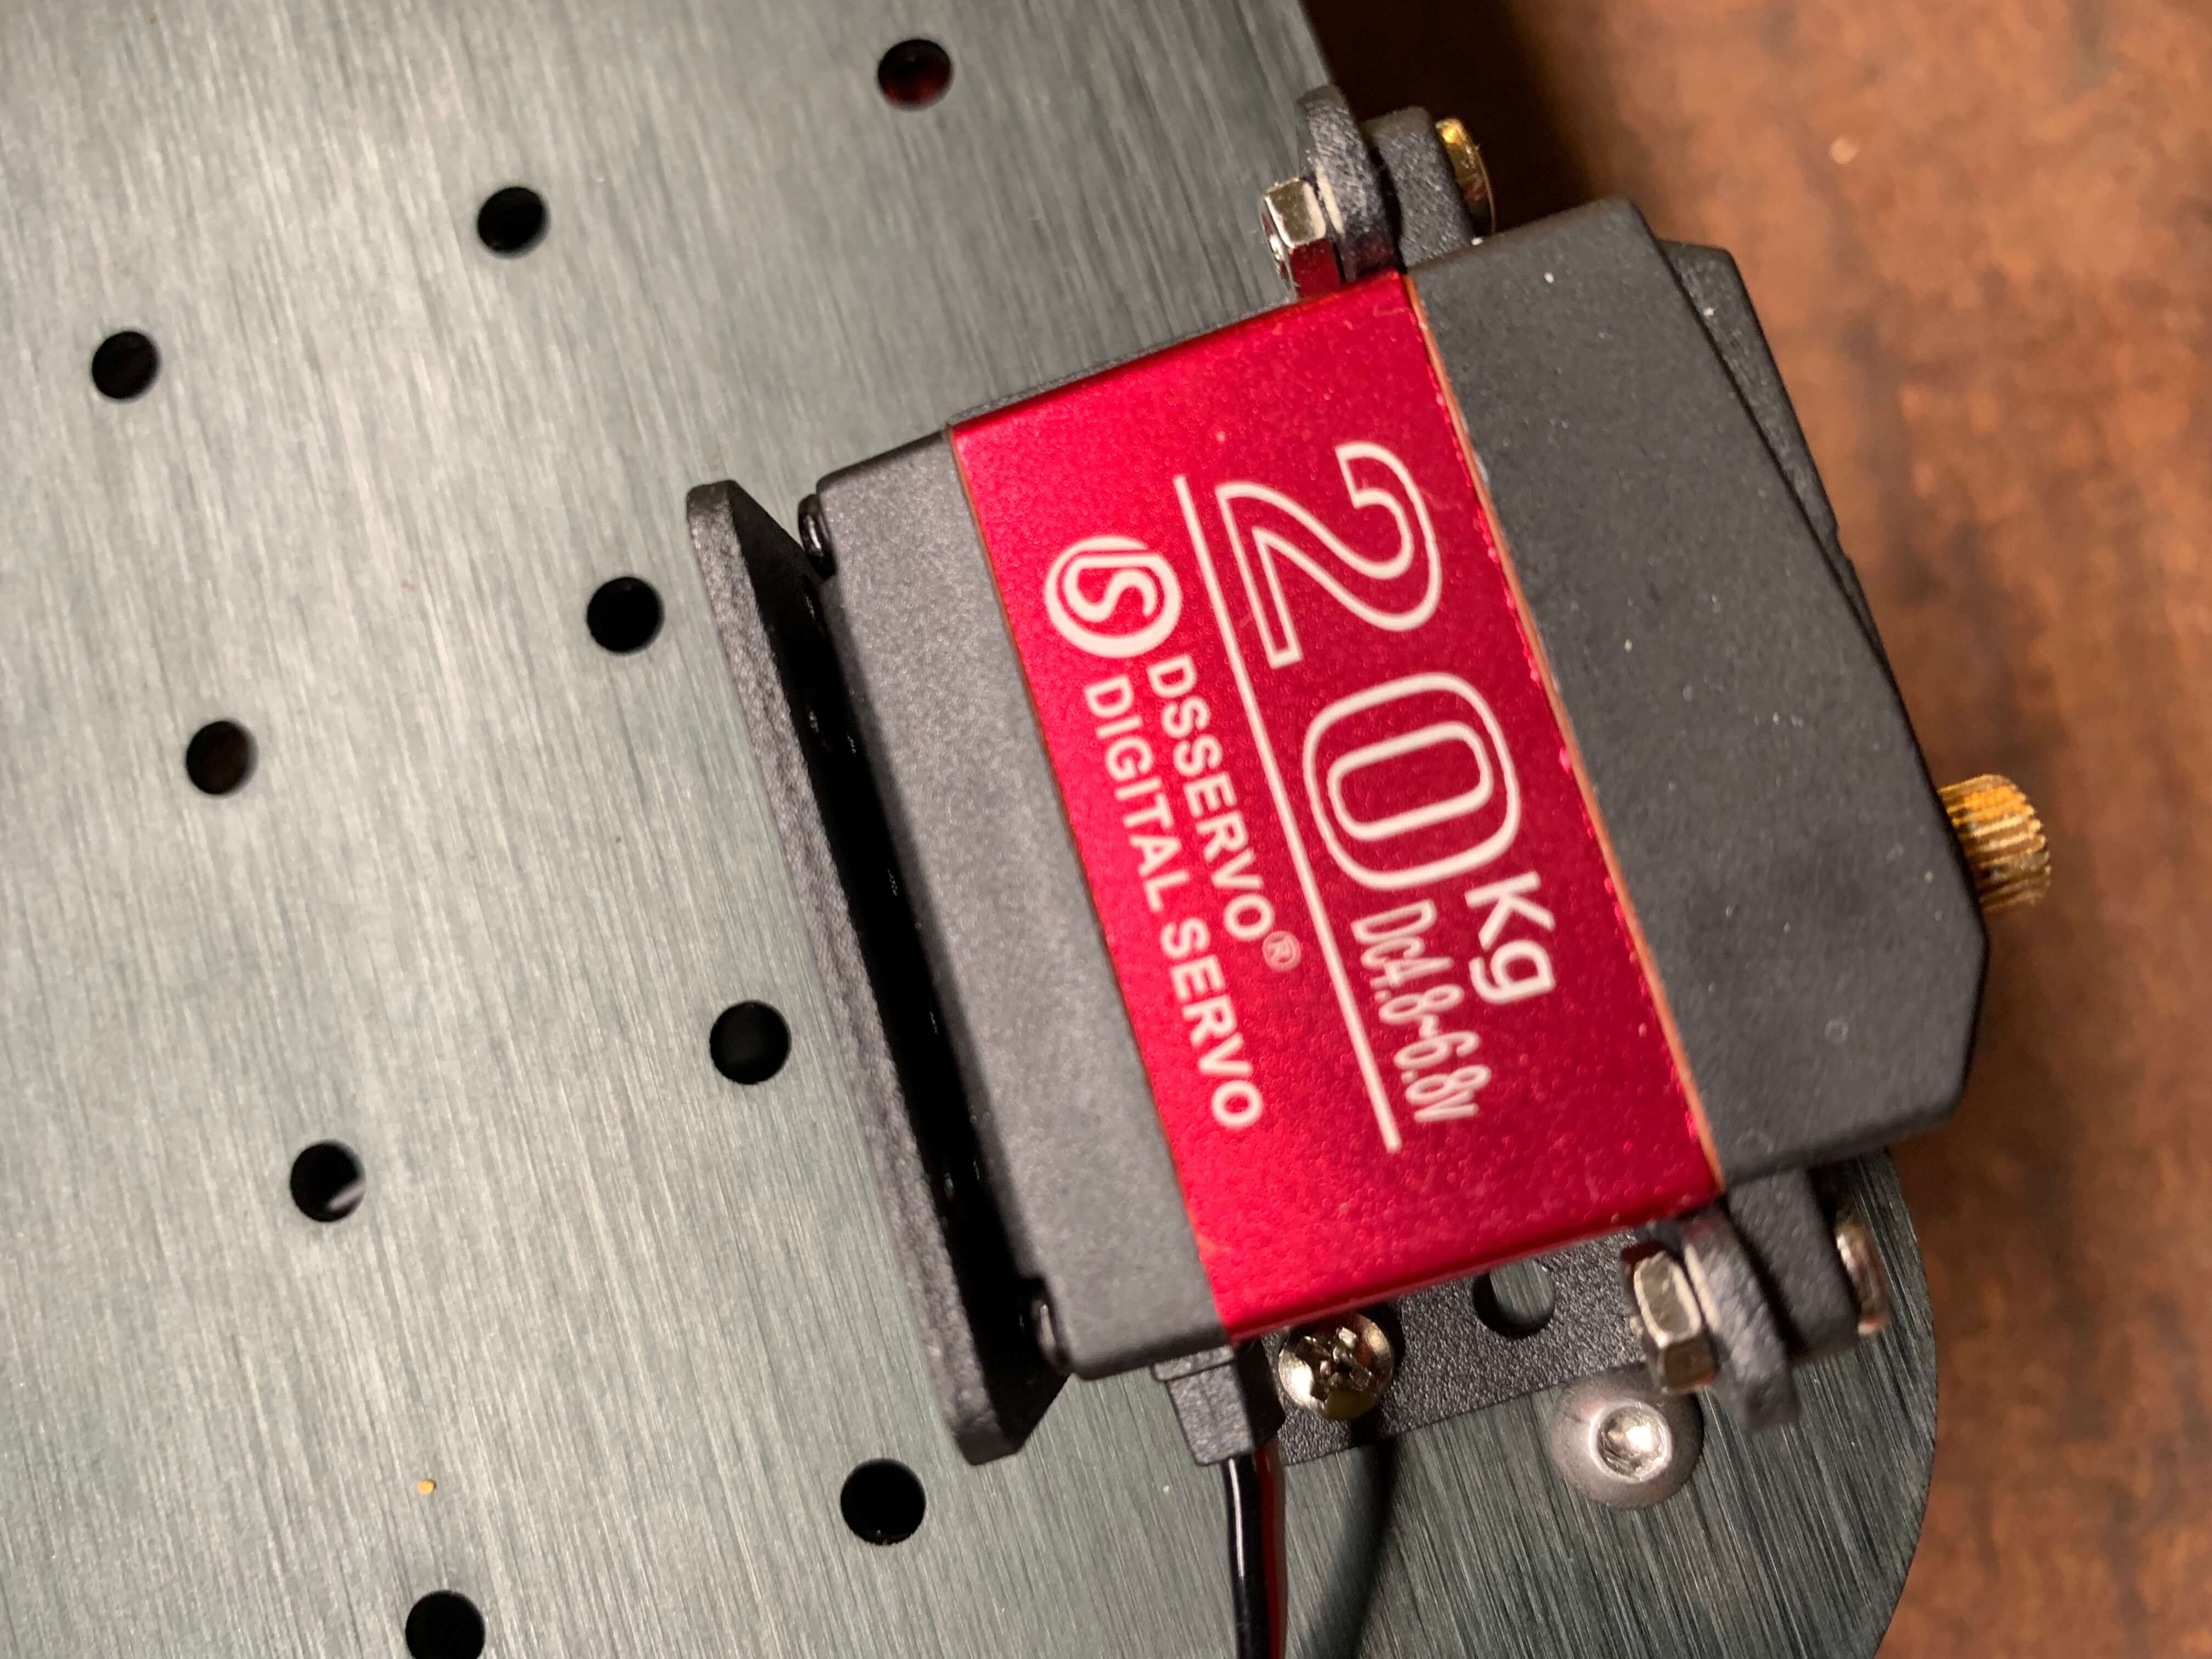
Using the bracket you printed or purchased, attach the servo mount to the Viam rover so that the servo output spline is facing outward in the front of the rover (screws required, mounting holes should line up).
Attach the servo to the bracket.
### 3. Servo disc
If you are 3D printing the servo disc, [download the STL file](https://github.com/viam-labs/tutorial-openai-integration/blob/main/servo_disc_large.stl) and print it.
Attach the servo disc to the servo by fitting it to the servo's output spline.
Now, download and print the [emoji wheel](https://github.com/viam-labs/tutorial-openai-integration/blob/main/3emotion.png) with a color, or black and white printer.
Cut the wheel out with scissors.
Do not attach it to the servo wheel yet.
### 4. Speaker
You need a speaker attached to your rover so that you can hear the responses generated from ChatGPT, and converted from text to speech.
Connect your speaker to your Pi:
- Connect the USB power cable to the speaker and any available USB port on the Pi.
- Connect the 3.5mm audio cable to the speaker and the audio jack on the Pi.
Both cables come with the speaker in the [hardware list](#hardware-list), and can otherwise be easily acquired.
You can also attach your speaker to the top of your rover with [double-sided foam tape](https://www.amazon.com/3M-Natural-Polyurethane-Double-Coated/dp/B007Y7CA3C/), but this is optional.
### 5. Set up tutorial software
The [git repository](https://github.com/viam-labs/tutorial-openai-integration) for this tutorial contains code that integrates with:
- [viam-server](/reference/viam-server/)
- [Google text/speech tools](https://gtts.readthedocs.io/en/latest/)
- [OpenAI](https://openai.com/api/)
It also contains an open source machine learning [detector model](https://github.com/viam-labs/tutorial-openai-integration/tree/main/detector).
Power your Raspberry Pi on, choose a location on your Pi, and clone the tutorial code repository.
If you don't have git installed on your Pi, you will need to first run:
```sh {class="command-line" data-prompt="$"}
sudo apt install git
```
If you have git installed on your Pi, run the following command in the preferred directory from your terminal:
```sh {class="command-line" data-prompt="$"}
git clone https://github.com/viam-labs/tutorial-openai-integration
```
Now that you have cloned the repository, you will need to install dependencies.
If you do not have python3 and pip3 installed, do this first:
```sh {class="command-line" data-prompt="$"}
sudo apt update && sudo apt upgrade -y
sudo apt-get install python3
sudo apt install python3-pip
```
You will also need to install pyaudio, alsa, and flac:
```sh {class="command-line" data-prompt="$"}
sudo apt install python3-pyaudio
sudo apt-get install alsa-tools alsa-utils
sudo apt-get install flac
```
Now, install the Python library dependencies by running the following command from inside the directory where you cloned the code:
```sh {class="command-line" data-prompt="$"}
pip install -r requirements.txt
```
Finally, you will need both Viam robot credentials and OpenAI API credentials in order to run the software.
To show your machine's API key in the sample code, toggle **Include API key**.
{{< alert title="Caution: Keep your API key safe" color="caution" >}}
We strongly recommend that you add your API key as an environment variable.
Anyone with your API key can access your machine, and the computer running your machine.
{{< /alert >}}
You can find API key and API key ID values for your robot by navigating to the **CONNECT** tab and selecting the **API keys** page.
To acquire OpenAI credentials, [sign up for OpenAI](https://openai.com/api/) and [set up API keys](https://platform.openai.com/account/api-keys).
Once you have both of the credentials, create a file called `run.sh`, add the following, and update the credentials within:
```sh {class="command-line" data-prompt="$"}
#!/usr/bin/sh
export OPENAPI_KEY=abc
export OPENAPI_ORG=xyz
export VIAM_API_KEY=123
export VIAM_API_KEY_ID=123
export VIAM_ADDRESS=789
python rosey.py
```
Then, make `run.sh` executable:
```sh {class="command-line" data-prompt="$"}
chmod +x run.sh
```
## Configuration
Now, configure your rover to:
- Recognize and operate the servo
- Make the ML detector model available for use by the Viam vision service
### 1. Configure the servo
To configure your [servo](/reference/components/servo/), go to your rover's **CONFIGURE** tab.
- Click the **+** icon next to your machine part in the left-hand menu and select **Blocks**.
- Search for `rpi-servo`, then select the `raspberry-pi/rpi-servo` block.
- Enter the name `servo1` for your servo and click **Add to machine**.
Now, in the panel for `servo1`, add the following attribute configuration:
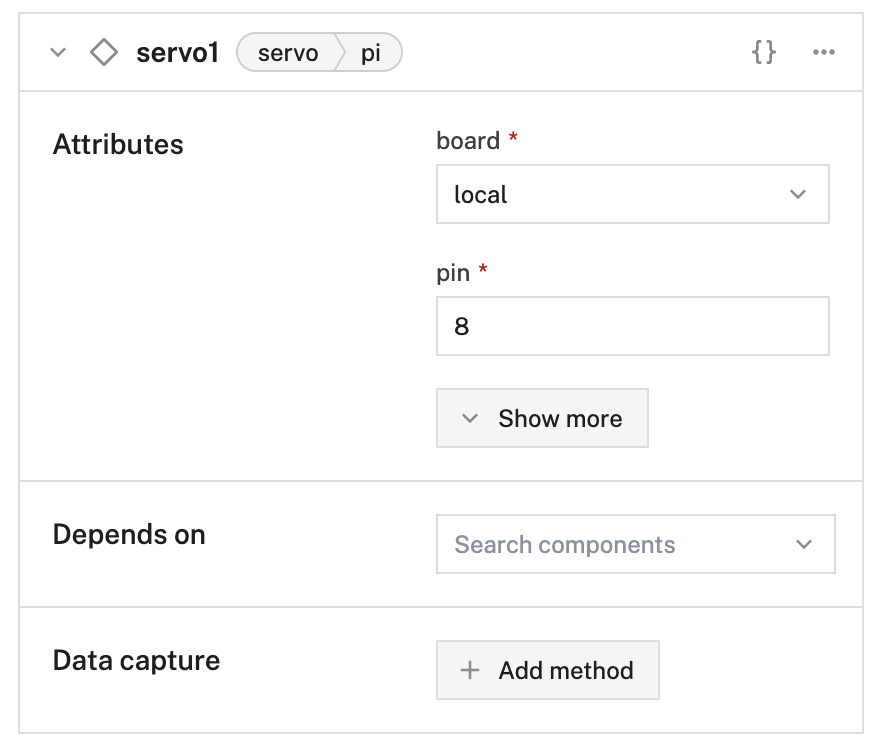
- Enter `8` for `pin`.
- Select the name of your [board](/reference/components/board/) for the `board` attribute: in this case, `local`.
This tells `viam-server` that the servo is attached to GPIO pin 8 on the board.
Press the **Save** button in the top-right corner of the page to save your config.
`viam-server` will now make the servo available for use.
Click on the **CONTROL** tab.
As long as your machine is connected to the app, you will see a panel for `servo1`.
From there, you can change the angle of your servo by increments of 1 or 10 degrees.
Move the servo to 0 degrees, and attach the emotion wheel to the servo with the happy emoji facing upwards and centered.
We found that if set up this way, the following positions accurately show the corresponding emojis, but you can verify and update the tutorial code if needed:
- happy: 0 degrees
- angry: 75 degrees
- sad: 157 degrees
### 2. Configure the ML Model and vision services to use the detector
The [ML model service](/vision/configure/) allows you to deploy a machine learning model to your robot.
This tutorial uses a pre-trained machine learning (ML) model from the Viam Registry named [`EfficientDet-COCO`](https://app.viam.com/ml-model/viam-labs/EfficientDet-COCO).
This model can detect a variety of objects, which you can find in the provided [labels.txt](https://github.com/viam-labs/devrel-demos/raw/main/Light%20up%20bot/labels.txt) file.
To configure an ML model service:
- Select the **CONFIGURE** tab.
- Click the **+** icon next to your machine part in the left-hand menu and select **Blocks**.
- Search for `tflite`, then select the `tflite_cpu/tflite_cpu` block.
- Enter the name `stuff_detector` for your service and click **Add to machine**.
Your robot registers this as a machine learning model and makes it available for use.
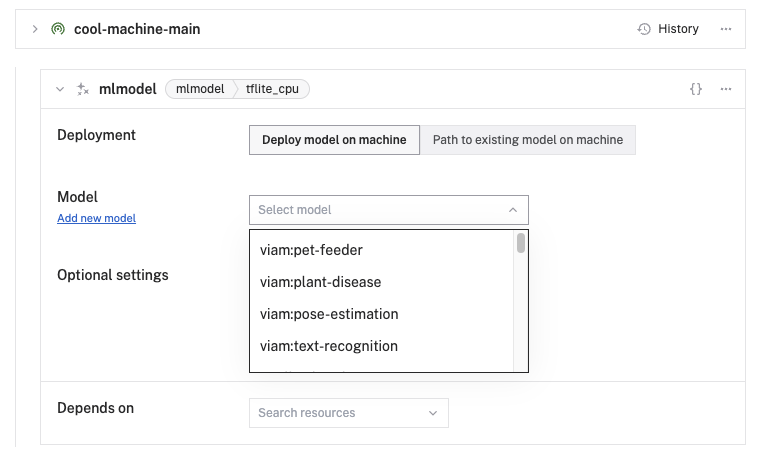
Select **Deploy model on machine** for the **Deployment** field.
Click **Select model**, then select the `viam-labs:EfficientDet-COCO` model from the modal that appears.
Now, create a vision service to visualize your ML model:
- Select the **CONFIGURE** tab.
- Click the **+** icon next to your machine part in the left-hand menu and select **Blocks**.
- Search for `mlmodel`, then select the `vision/mlmodel` block.
- Enter the name `mlmodel` for your service and click **Add to machine**.
Your companion robot will use this to interface with the machine learning model allowing you to - well, detect stuff!
Select the model that you added in the previous step in the **ML Model** field of your detector:
Click **Save** in the top-right corner of the page to save your config.
## Bring "Rosey" to life
With the rover and tutorial code set up and it is time to bring your companion robot to life!
Let's call her "Rosey", and bring her to life by running:
```sh {class="command-line" data-prompt="$"}
./run.sh
```
Now, you can start talking to Rosey.
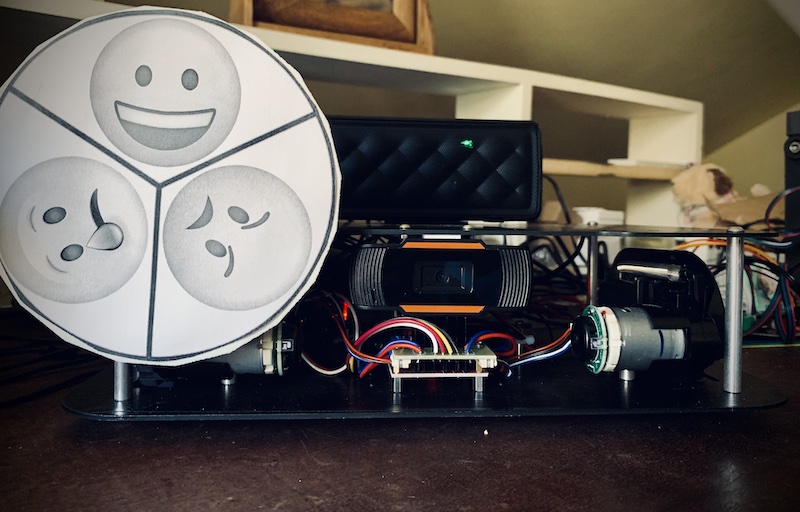
Any time she hears the keyword "Rosey", she will pay attention to anything you say immediately afterwards.
For example, if you say _"Hello Rosey, what do you think will happen today?"_, the phrase _"what do you think will happen today"_ will be sent to OpenAI's chat completion API, and you'll get a response back similar to _"It is impossible to predict what will happen today.
Every day is different and unpredictable!"_
If you [explore the tutorial code](https://github.com/viam-labs/tutorial-openai-integration/blob/main/rosey.py#L192), you will notice that some words or phrases are keywords when heard after "Rosey", and will trigger specific behavior.
For example, there are a number of commands that will cause the rover to move - like _"move forward"_, _"turn left"_, _"spin"_.

If you ask _"what do you see"_, it will use the rover's camera and a machine learning model to view the world, detect what it sees, and then read a ChatGPT-generated response about what it sees.
Also, a "mood" will be selected at random, and the response will be generated with that mood.
The GPT-3 model is quite good at responding in the style of known personas, so you can also say _"Hey Rosey, act like Yoda"_, and from that point on, responses will be generated in the style of Yoda! The tutorial code has a number of characters you can try, and to pick one randomly, you can say _"Rosey, act random"_.
You can even guess who Rosey is acting like by saying _"Rosey, I think you are Scooby Doo!"_
Much of Rosey's behavior can be modified by changing the values of parameters in the tutorial code's [params.py](https://github.com/viam-labs/tutorial-openai-integration/blob/main/params.py) file.
You can change Rosey's name to something else, add characters, adjust the detector confidence threshold, and more.
## Use realistic custom AI voices
By default, Rosey will use Google TTS for audio voice generation.
However, [ElevenLabs](https://elevenlabs.io/) can be used for enhanced AI voice generation.
To use ElevenLabs, add your ElevenLabs API key to `run.sh` as follows:
```sh {class="command-line" data-prompt="$"}
export ELEVENLABS_KEY=mykey
```
You can then assign voices to Rosey or any characters by adding the ElevenLabs voice name (including names of voices you have created with the [ElevenLabs VoiceLab](https://beta.elevenlabs.io/voice-lab)) in params.py.
For example:
```json
{ "linda belcher": { "voice": "domi" } }
```
This opens up some really interesting possibilities, like having your robot talk to you in a voice that sounds like your favorite celebrity, or having your robot tell your cat to "Get off of the table!" in an AI version of your own voice.
## Alternative option: configure Viam Labs speech module
As an alternate option for adding an AI speech integration to your robot, the [registry](https://app.viam.com/registry) provides [the `speech` module](https://app.viam.com/module/viam-labs/speech), a modular [service](/reference/glossary/#term-service)
providing text-to-speech (TTS) and speech-to-text (STT) capabilities for robots running on the Viam platform.
Usage is documented on [Viam Labs' GitHub](https://github.com/viam-labs/speech).
### Configuration
Navigate to the **CONFIGURE** page of your rover robot.
### Builder
Click the **+** icon next to your machine part in the left-hand menu and select **Service**.
Search `speech`.
Select the `speech/speechio` option and click **Add module**.
Give your new speech module a name of your choice.
In the pane that appears for the service, copy and paste the following JSON into the attributes field:
```json
{
"completion_provider_org": "org-abc123",
"completion_provider_key": "sk-mykey",
"completion_persona": "Gollum",
"listen": true,
"speech_provider": "elevenlabs",
"speech_provider_key": "keygoeshere",
"speech_voice": "Antoni",
"mic_device_name": "myMic"
}
```
For example:
Save your config by selecting the **Save** button in the top-right corner of the page.
### JSON Template
Select **JSON** mode.
Copy and paste the following into your `modules` array to add [`speech`](https://app.viam.com/module/viam-labs/speech) from the [registry](https://app.viam.com/registry):
```json
{
"type": "registry",
"name": "viam-labs_speech",
"module_id": "viam-labs:speech",
"version": "latest"
}
```
Then, copy and paste the following into your `services` array to add [elevenlabs.io](https://elevenlabs.io/) as your `speechio` modular service provider:
```json
{
"namespace": "viam-labs",
"model": "viam-labs:speech:speechio",
"attributes": {
"completion_provider_org": "org-abc123",
"completion_provider_key": "sk-mykey",
"completion_persona": "Gollum",
"listen": true,
"speech_provider": "elevenlabs",
"speech_provider_key": "keygoeshere",
"speech_voice": "Antoni",
"mic_device_name": "myMic"
},
"name": "speechio",
"type": "speech"
}
```
Save your config by selecting the **Save** button in the top-right corner of the page.
Use the above configuration to set up listening mode, use an ElevenLabs voice `"Antoni"`, make AI completions available, and use a 'Gollum' persona for AI completion from OpenAI.
Edit the attributes as applicable:
- Edit `"completion_provider_org"` and `"completion_provider_key"` to match your AI API organization and API credentials, for example your [OpenAI organization header and API key credentials](https://platform.openai.com/account/api-keys).
- Edit `"speech_provider_key"` to match [your API key from elevenlabs](https://elevenlabs.io/app/settings/api-keys) or another speech provider.
- Edit `"mic_device_name"` to match the name your microphone is assigned on your robot's computer.
Available microphone device names will logged on module startup.
If left blank, the module will attempt to auto-detect the microphone.
## Next steps
What you've seen in this tutorial is a very basic integration between a Viam-powered robot and OpenAI.
There's a lot that could be done to make this a more production-ready companion robot.
Some ideas:
- Make the voice recognition software listen in the background, so the robot can move and interact with the world while listening and responding.
- Integrate another ML model that is used to follow a human (when told to do so).
- Add Lidar and integrate a SLAM service to map the world around it.
- Use Viam's [Data Management](/data/capture-sync/capture-and-sync-data/) to collect environmental data and use this data to train new ML models that allow the robot to improve its functionality.
We'd love to see where you decide to take this. If you build your own companion robot, let us and others know on the [Community Discord](https://discord.gg/viam).