A Person Detection Security Robot That Sends You Photos
In this tutorial, you will create a desk security system with no hardware other than your laptop and the built-in webcam.
Maybe you keep a box of chocolates on your desk to snack on when you are hungry. Maybe someone is eating your chocolates when you are away. You’re not sure who, but you suspect Steve. This robot will help you catch the culprit.
When someone comes to your desk, the robot will use the vision service and the ML model service to detect a person, take their photo, and text you an alert with a photo of the person.

Hardware requirements
You need the following hardware for this tutorial:
- Computer with a webcam
- Mobile phone (to receive text messages)
Software requirements
You will use the following software in this tutorial:
- Python 3.8 or newer
viam-server- Viam Python SDK
- The Viam Python SDK (software development kit) lets you control your Viam-powered machine by writing custom scripts in the Python programming language. Install the Viam Python SDK by following these instructions.
- yagmail
- A Gmail account to send emails. You can use an existing account, or create a new one.
Configure your machine
Install viam-server and connect to your machine
Add a new machine on Viam.
On the machine’s page, follow the setup instructions to install viam-server on the computer you’re using for your project.
Wait until your machine has successfully connected to Viam.
Configure the camera component
Configure your webcam so that your machine can get the video stream from your camera:
Navigate to your machine’s page. Check that the part status dropdown in the upper left of the page, next to your machine’s name, reads “Live”; this indicates that your machine is turned on and that its instance of
viam-serveris in contact with Viam.Click the + (Create) button next to your main part in the left-hand menu and select Blocks. Start typing “webcam” and select camera / webcam. Give your camera a name. This tutorial uses the name
camin all example code. Click Add to machine.Leave the video_path blank and the camera will use the default video path for your machine. If this doesn’t work when you test your camera later, you can try a different video path by following the prompt in the camera’s configuration panel.
Click Save in the top right corner of the screen to save your changes.
Test your physical camera
To test your camera, go to the CONTROL tab and click to expand your camera’s panel.
Toggle View cam to the “on” position.
The video feed should display.
If it doesn’t, double-check that your config is saved correctly, and check the LOGS tab for errors.
Configure your services
Now that you know the camera is properly connected to your machine, it is time to add computer vision by configuring the vision service on your machine.
This tutorial uses a pre-trained Machine Learning model from the Viam Registry called EfficientDet-COCO.
The model can detect a variety of things, including Persons.
You can see a full list of what the model can detect in
If you want to train your own model instead, follow the instructions to train a TFlite or another model.
Configure the ML model service
Navigate to your machine’s CONFIGURE tab.
Click the + (Create) button next to your main part in the left-hand menu and select Blocks. Start typing
ML modeland select ML model / TFLite CPU from the builtin options.Enter
peopleas the name, then click Add to machine.In the new ML Model service panel, configure your service.
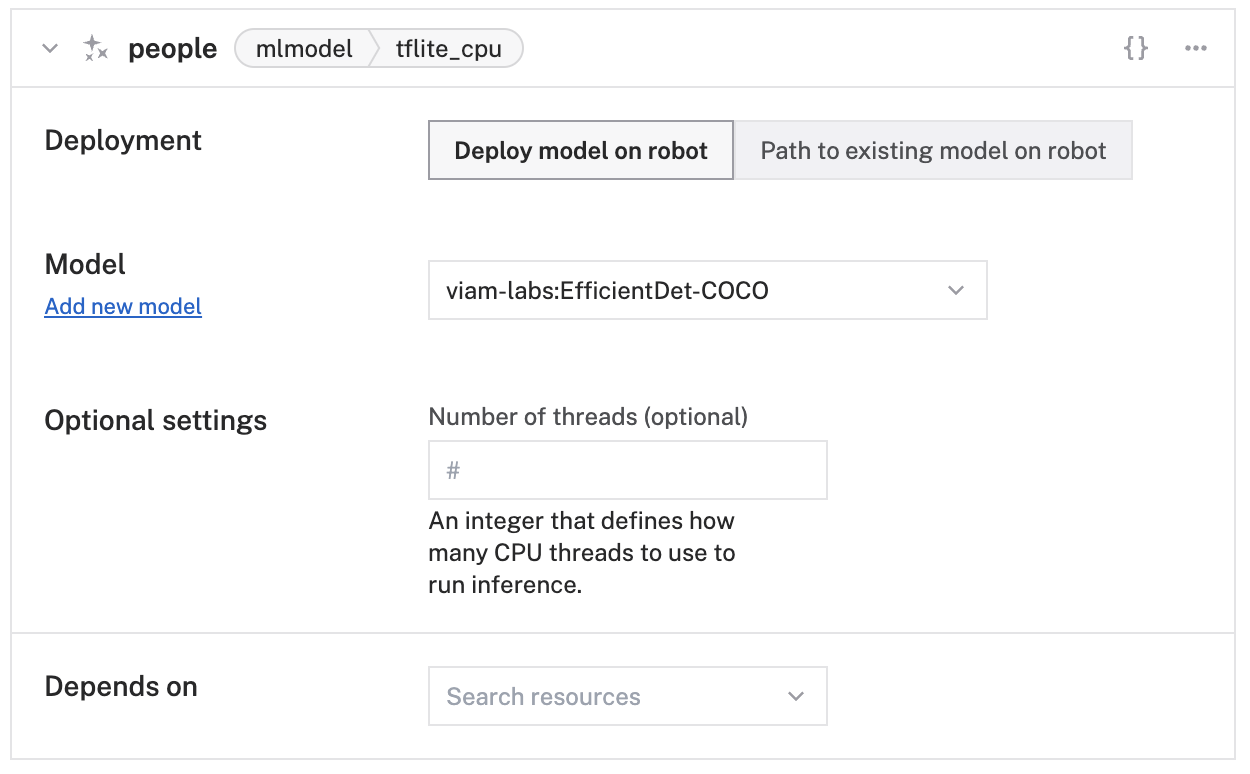
Select Deploy model on machine for the Deployment field. Then select the
viam-labs:EfficientDet-COCOmodel from the Select model dropdown.Configure an mlmodel detector vision service
Click the + (Create) button next to your main part in the left-hand menu and select Blocks. Start typing
ML modeland select vision / ML model from the builtin options.Enter
myPeopleDetectoras the name, then click Add to machine.In the new vision service panel, configure your service.
Select
peoplefrom the ML Model dropdown.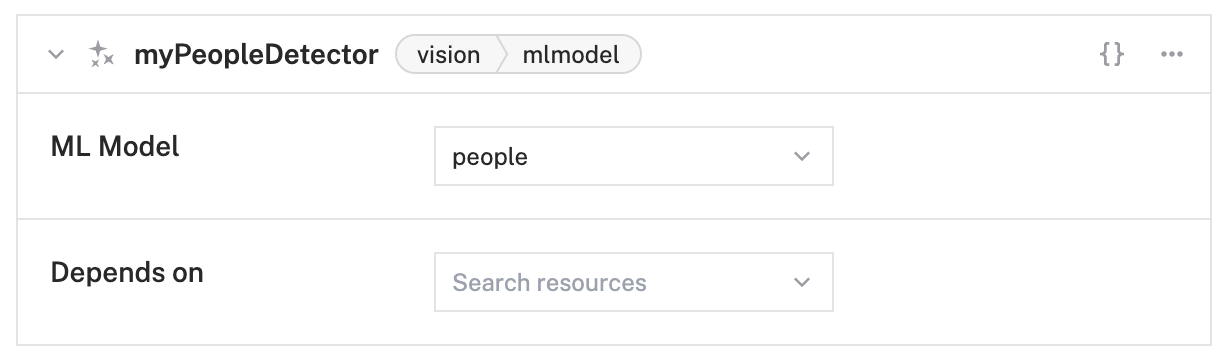


Click Save in the top right corner of the screen.
Test the detection camera
To test that the vision service is working, click on the Test area of the vision service panel myPeopleDetector or click on the vision service panel on the CONTROL tab.

If the vision service detects a person on the configured camera, you will see a red box around the detection along with the confidence score of the detection.
How to use yagmail
Install yagmail (Yet Another Gmail/SMTP client) by running the following command in a terminal on your computer:
pip3 install yagmail
Tip
As you are programming the yagmail section of this project, you will be prompted to use your Gmail username and password within the code. If you use 2-step verification for your email, some apps or devices may be blocked from accessing your Google account. You can get an “Application-Specific Password” following this guide.
App Passwords are 16-digit passcodes that allow the app or device access to your Google account. This step is optional.
Then we have to indicate whom to send a message to, the subject, and the contents of the text message (which can be a string, image, or audio). Example code below (though you don’t have to use it yet, this will get used in the next section):
yag.send('phone_number@gatewayaddress.com', 'subject', contents)
For this tutorial, you are going to send the text to yourself.
You will replace to@someone.com with your phone number and SMS gateway address.
You can find yours here: Gateway Addresses for Mobile Phone Carrier Text Message.
Some common ones:
- AT&T:
txt.att.net - T-Mobile:
tmomail.net - Verizon Wireless:
vtext.com
As an example, if you have T-Mobile your code will look like this:
yag.send('xxxxxxxxxx@tmomail.net', 'subject', contents)
This allows you to route the email to your phone as a text message.
Use the Viam Python SDK to control your security robot
Create the main script file
On your computer, navigate to the directory where you want to put the code for this project. Create a file there called
Copy the following code and paste it into
import asyncio
import os
import yagmail

from viam.robot.client import RobotClient
from viam.components.camera import Camera
from viam.rpc.dial import Credentials, DialOptions
from viam.services.vision import VisionClient, VisModelConfig, \
    VisModelType, Detection
from viam.media.utils.pil import viam_to_pil_image

# Set environment variables. You can get them from your machine's CONNECT tab
api_key = os.getenv('API_KEY') or ''
api_key_id = os.getenv('API_KEY_ID') or ''
host = os.getenv('MACHINE_ADDRESS') or ''


async def connect():
    opts = RobotClient.Options.with_api_key(
      api_key=_api_key,
      api_key_id=api_key_id
    )
    return await RobotClient.at_address(host, opts)


async def main():
    async with await connect() as machine:
        # make sure that your detector name in the app matches "myPeopleDetector"
        myPeopleDetector = VisionClient.from_robot(machine, "myPeopleDetector")
        # make sure that your camera name in the app matches "my-camera"
        my_camera = Camera.from_robot(robot=machine, name="cam")

        while True:
            images, _ = await my_camera.get_images(mime_type="image/jpeg")
            img = images[0]
            detections = await myPeopleDetector.get_detections(img)

            found = False
            for d in detections:
                if d.confidence > 0.8 and d.class_name.lower() == "person":
                    print("This is a person!")
                    found = True
            if found:
                print("sending a message")
                # Convert to PIL image
                pil_image = viam_to_pil_image(img)
                # Change this path to your own
                pil_image.save('/yourpath/foundyou.jpeg')
                # Yagmail section
                # Create a yagmail.SMTP instance
                # to initialize the server connection.
                # TODO: Replace username and password with actual credentials.
                yag = yagmail.SMTP('mygmailusername', 'mygmailpassword')
                # Specify the message contents
                contents = ['There is someone at your desk - beware',
                            '/yourpath/foundyou.jpeg']
                # Add phone number and gateway address
                # found in the SMS gateway step
                yag.send('xxx-xxx-xxxx@tmomail.net', 'subject', contents)

                # If the machine detects a person and sends a text, we don't need
                # it to keep sending us more texts so we sleep it for 60
                # seconds before looking for a person again
                await asyncio.sleep(60)
            else:
                print("There's nobody here, don't send a message")
                await asyncio.sleep(10)
        await asyncio.sleep(5)


if __name__ == '__main__':
    asyncio.run(main())
After connecting to your machine, your machine will continuously check images for detections of people.
If a person is detected, your robot will print sending a message, take a photo, and save it to your computer as
Then it will create a yagmail.SMTP instance to send the email and send the email.
Connect the code to the machine
You need to tell the code how to access your specific machine (which in this case represents your computer and its webcam).
Navigate to the machine’s CONNECT tab.
Make sure Python is selected in the Language selector.
Get the machine address, API key, and API key ID from the CONNECT tab’s API keys section and set them as environment variables or add them at the top of
To show your machine’s API key in the sample code, toggle Include API key.
Caution: Keep your API key safe
We strongly recommend that you add your API key as an environment variable. Anyone with your API key can access your machine, and the computer running your machine.
Save your code file.
Run the code
You are ready to test your machine!
From a command line on your computer, navigate to the project directory and run the code with this command:
python3 chocolate_security.py
If you are in front of your computer’s webcam, you should get a text!
Your terminal should look like this as your project runs if you are in front of the camera for a bit, and then move away from the screen:
python3 chocolate_security.py
This is a person!
sending a message
x_min: 7
y_min: 0
x_max: 543
y_max: 480
confidence: 0.94140625

This is a person!
sending a message
x_min: 51
y_min: 0
x_max: 588
y_max: 480
confidence: 0.9375

This is a person!
sending a message
There's nobody here, don't send a message
There's nobody here, don't send a message
Next steps
In this tutorial, you learned how to build a security robot using the vision service, the ML model service, your computer, and your mobile phone, and we all learned not to trust Steve.
Have you heard about the chocolate box thief? He’s always got a few Twix up his Steve.
For more robotics projects, check out our other tutorials.
You can also ask questions in the Community Discord and we will be happy to help.
Was this page helpful?
Glad to hear it! If you have any other feedback please let us know:
We're sorry about that. To help us improve, please tell us what we can do better:
Thank you!